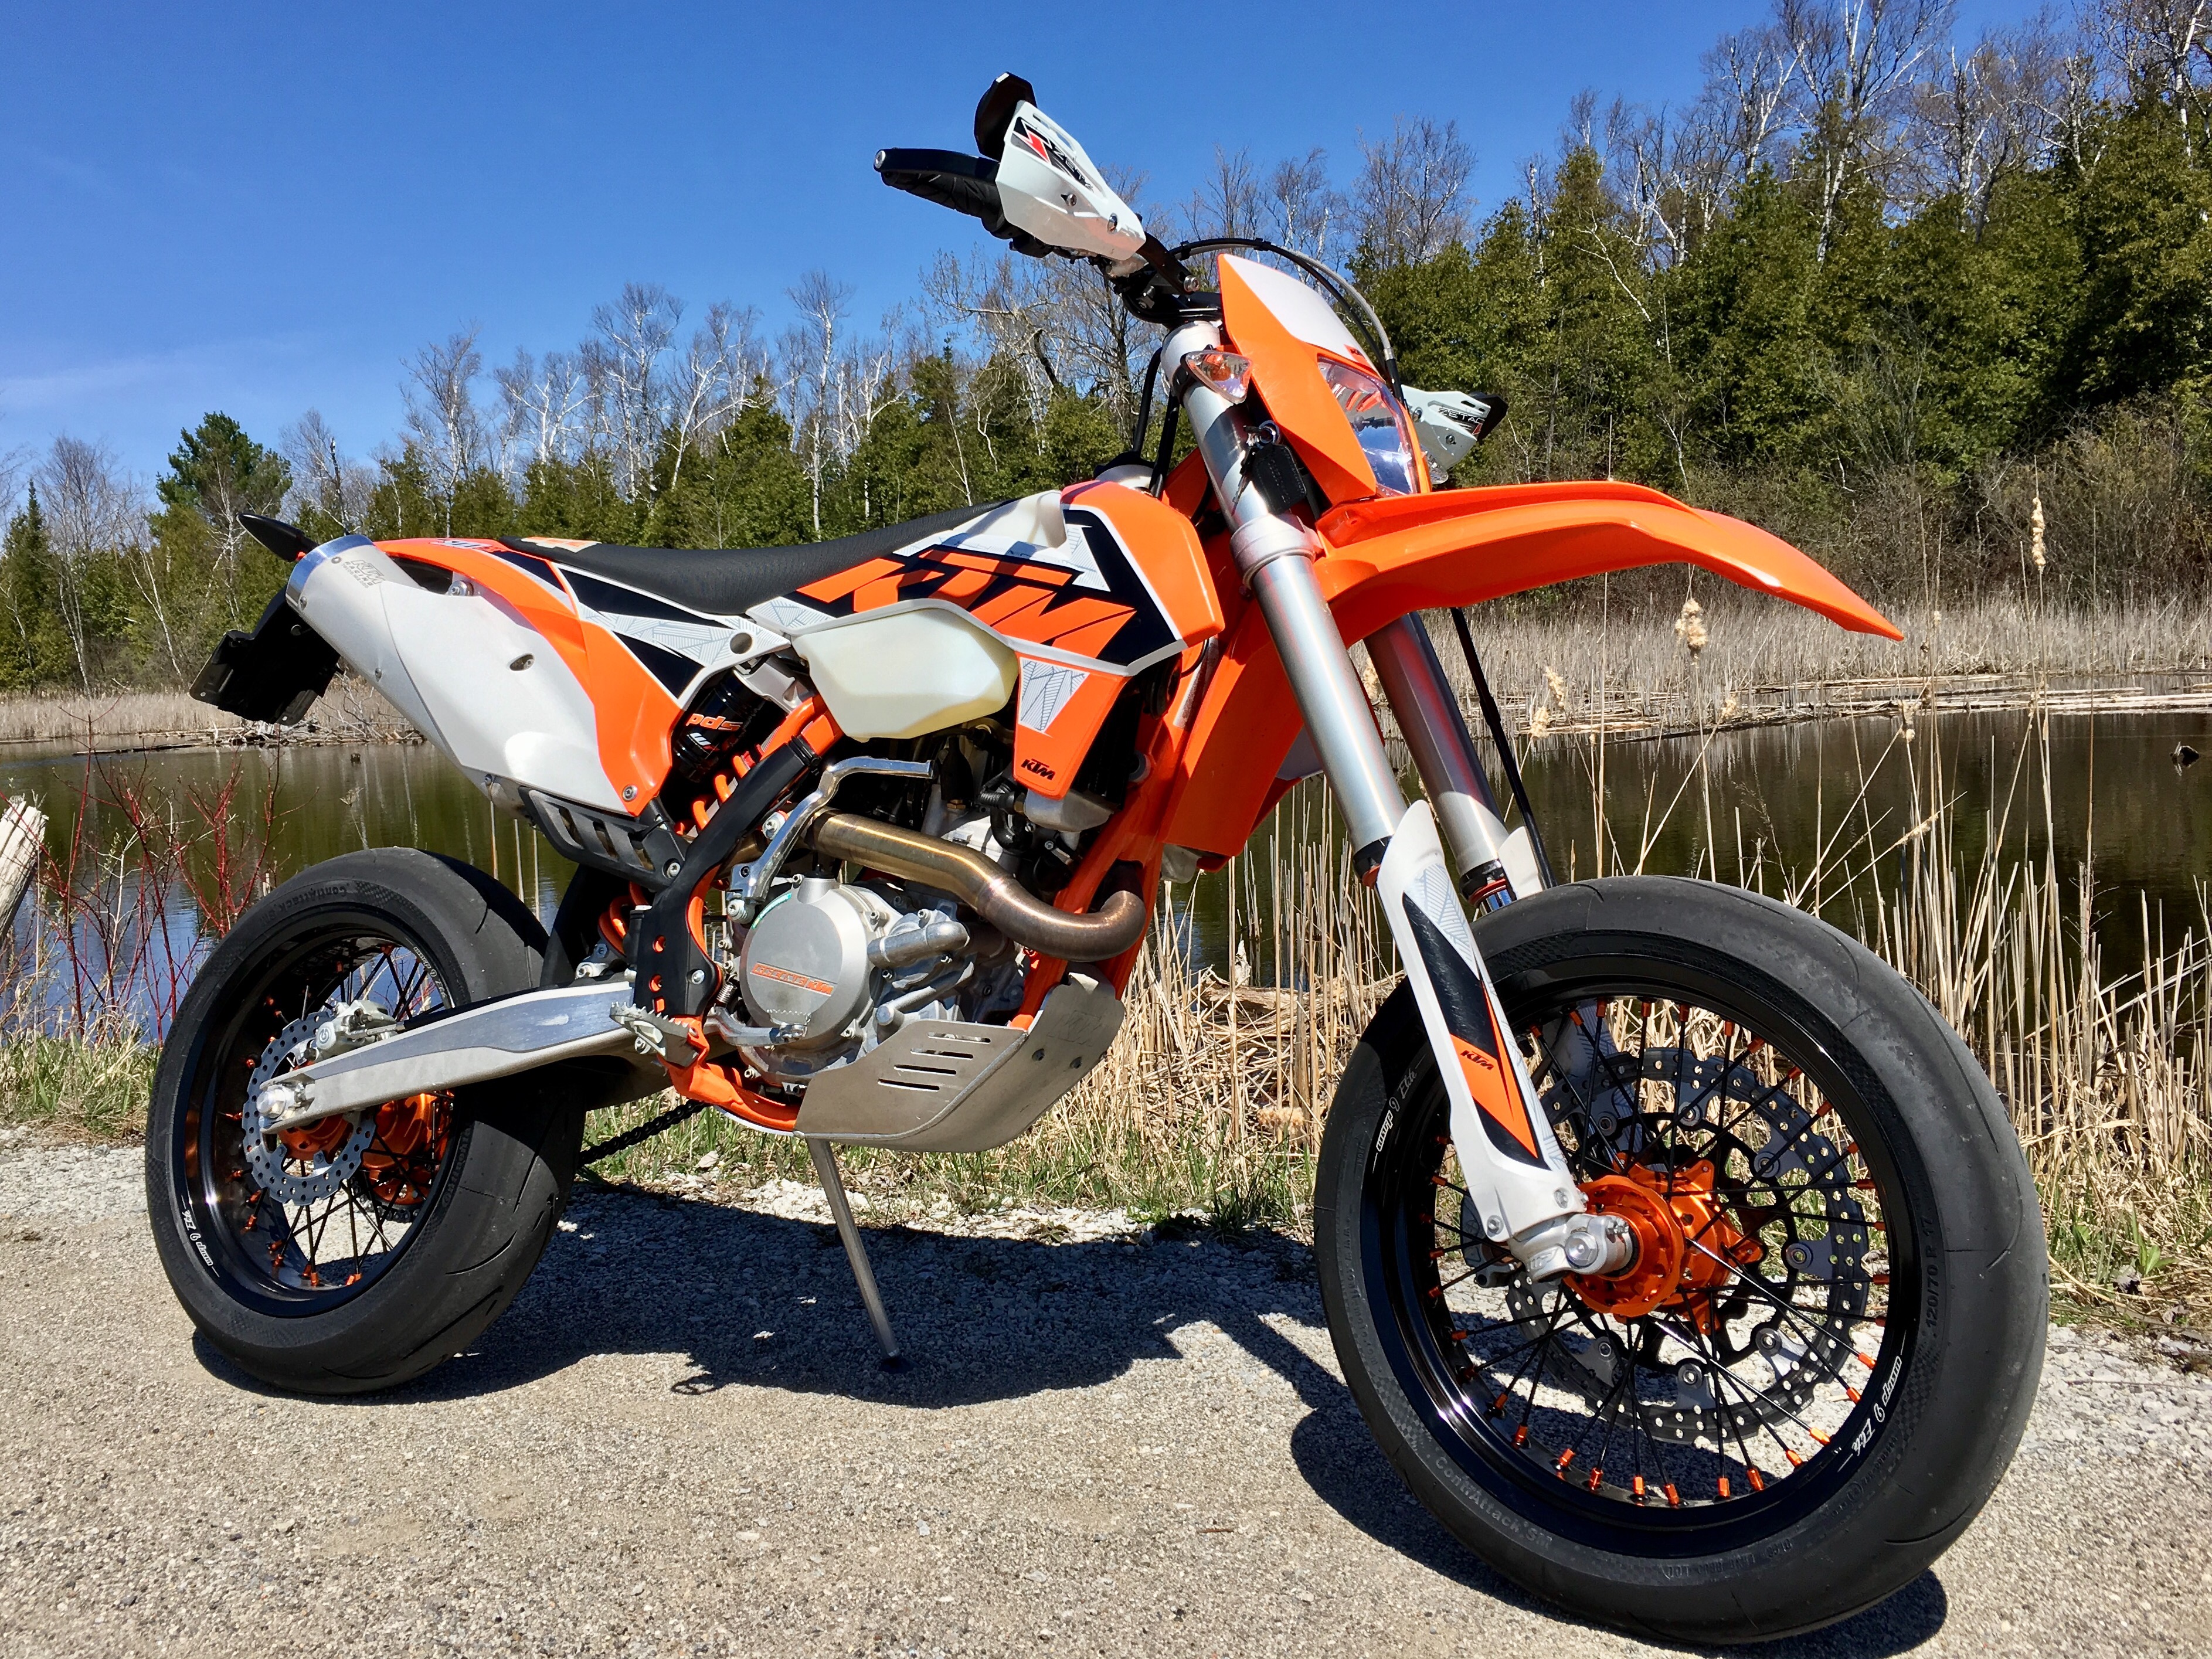
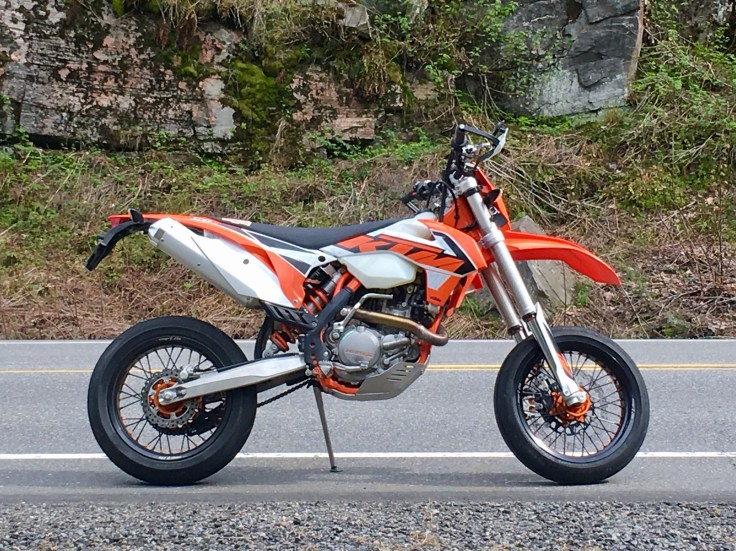
Street-legal supermotos are a special breed of motorcycles. At various times throughout history, select manufacturers have produced them (eg. Yamaha’s WR 250X, the perennial favorite, Suzuki’s DRZ 400 or the more modern Husqvarna 701), but they’ve always been niche and most of the offerings in North America are somewhat sedate in comparison to the dirt bike conversions of yesteryear. These days, if you want a serious, lightweight supermoto for the street, you have to build it yourself and what better platform to start with than the 2016 KTM 500 EXC.
Already (barely) street legal, the 500 EXC platform has always been high on power and low on weight -two key ingredients for a potent supermoto. There are, however a few essential modifications required to get the platform into fighting shape. Our project bike had only 1,500 kms on it so we were starting with a relatively clean slate for this build. The build was done over the winter months and took approximately 6 weeks of on-and-off work to complete. Here’s how we did it and what we thought of the results.
 The (mostly) stock 500 EXC in its non-native environment.
 Getting the bike running well was the first priority, so we turned to the simple solutions that are tried-and-true for recent model EXCs.
De-Smog: The California emissions standards (as good a guideline as they are) actually affect most (if not all) of the bikes sold in North America, often exceeding local requirements. This can be seen in the form of charcoal canisters and bypass systems which re-route venting from various parts of the fueling system. The results is restriction and overall rougher running of the motor which is why modifications in this area can yield significant power gains.
*PSA: As always, you’ll want to check local laws before tampering with any component of the emissions system.
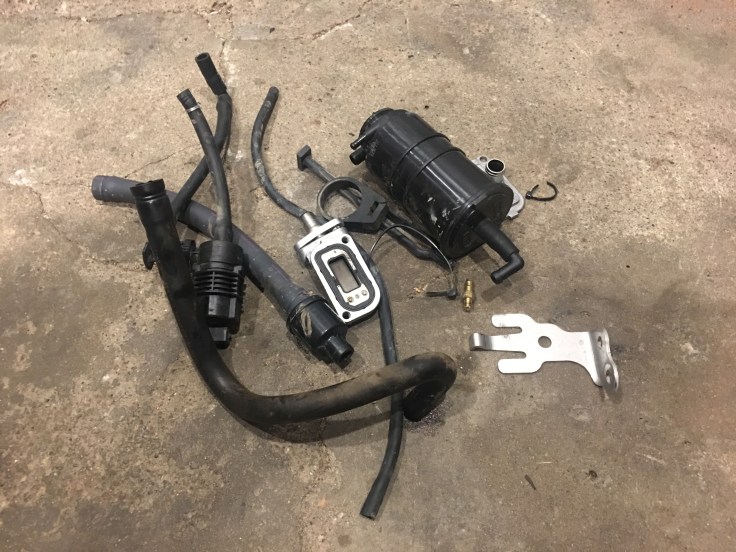
There are 2 ways to do the de-smog: the kit route (such as the Blais Racing kit we elected to use) and the DIY route (go to your local hardware store and buy the parts you’ll need to close off lines and redirect airflow). The install is very straightforward (with the supplied instructions) but those going the DIY route will want to some forum searching to determine what needs to be removed/plugged/capped.
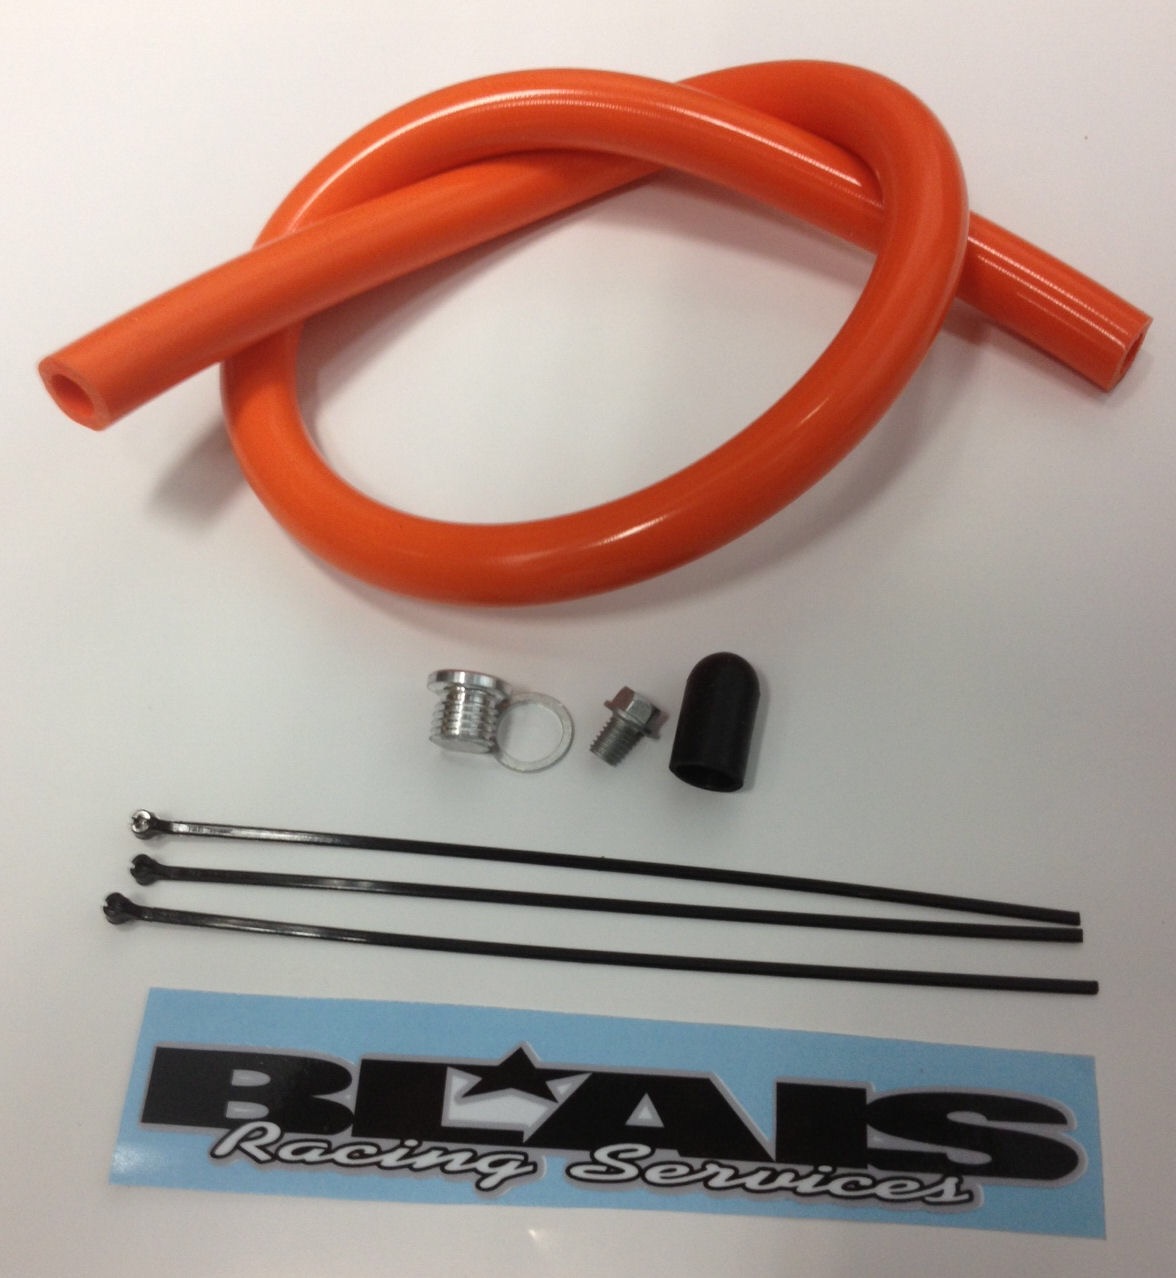 The Blais Racing block-off kit contains all the parts you’ll need to de-smog your 500EXC
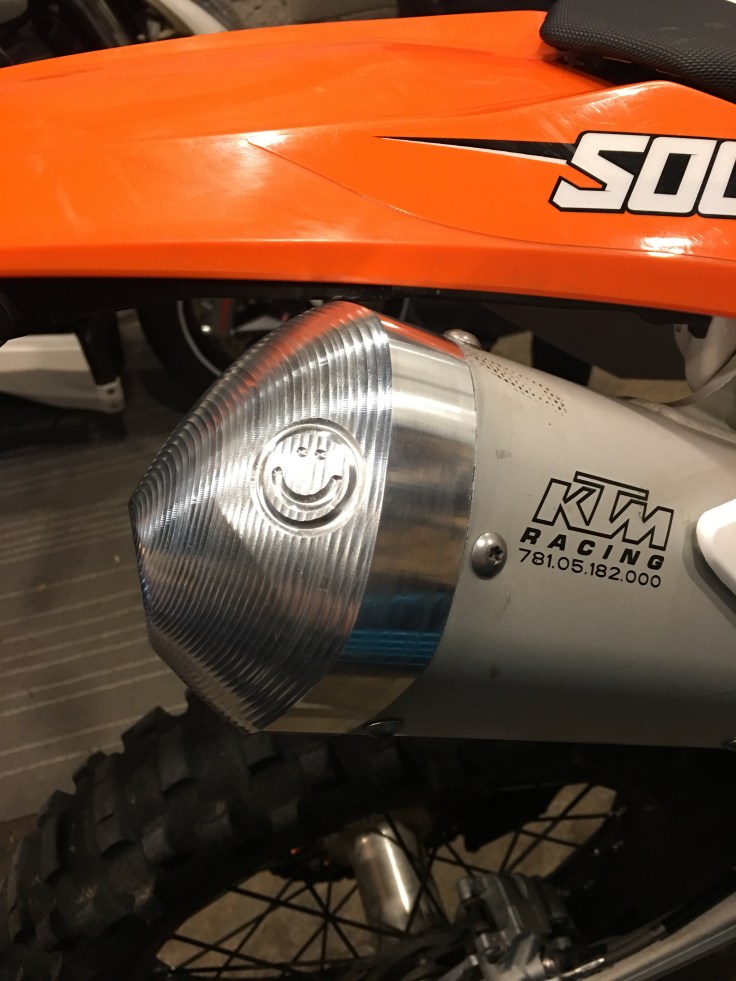
Exhaust: With the de-smog complete, the motor was breathing better but still had some restriction from the stock exhaust can. Fortunately, the exhaust cap is removable on the EXC and a simple replacement should yield very similar results to replacing the entire can. We opted for the STE-2 Endcap which provides much better exhaust gas flow through its shorter screen and more direct path, while maintaining roughly the same noise level as the stock unit.
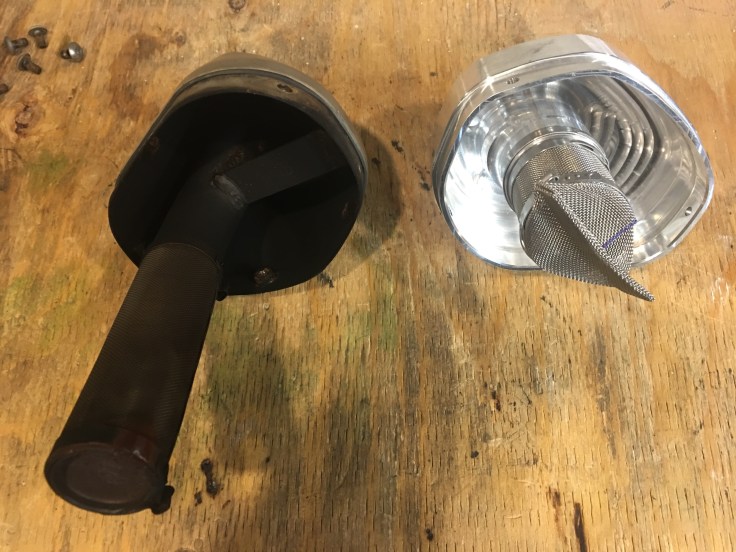
Getting the exhaust cap on/off required only some gentle hammering with a rubber mallet. A tight mechanical seal is good however, as we don’t want any exhaust gasses escaping and causing a loss of backpressure.
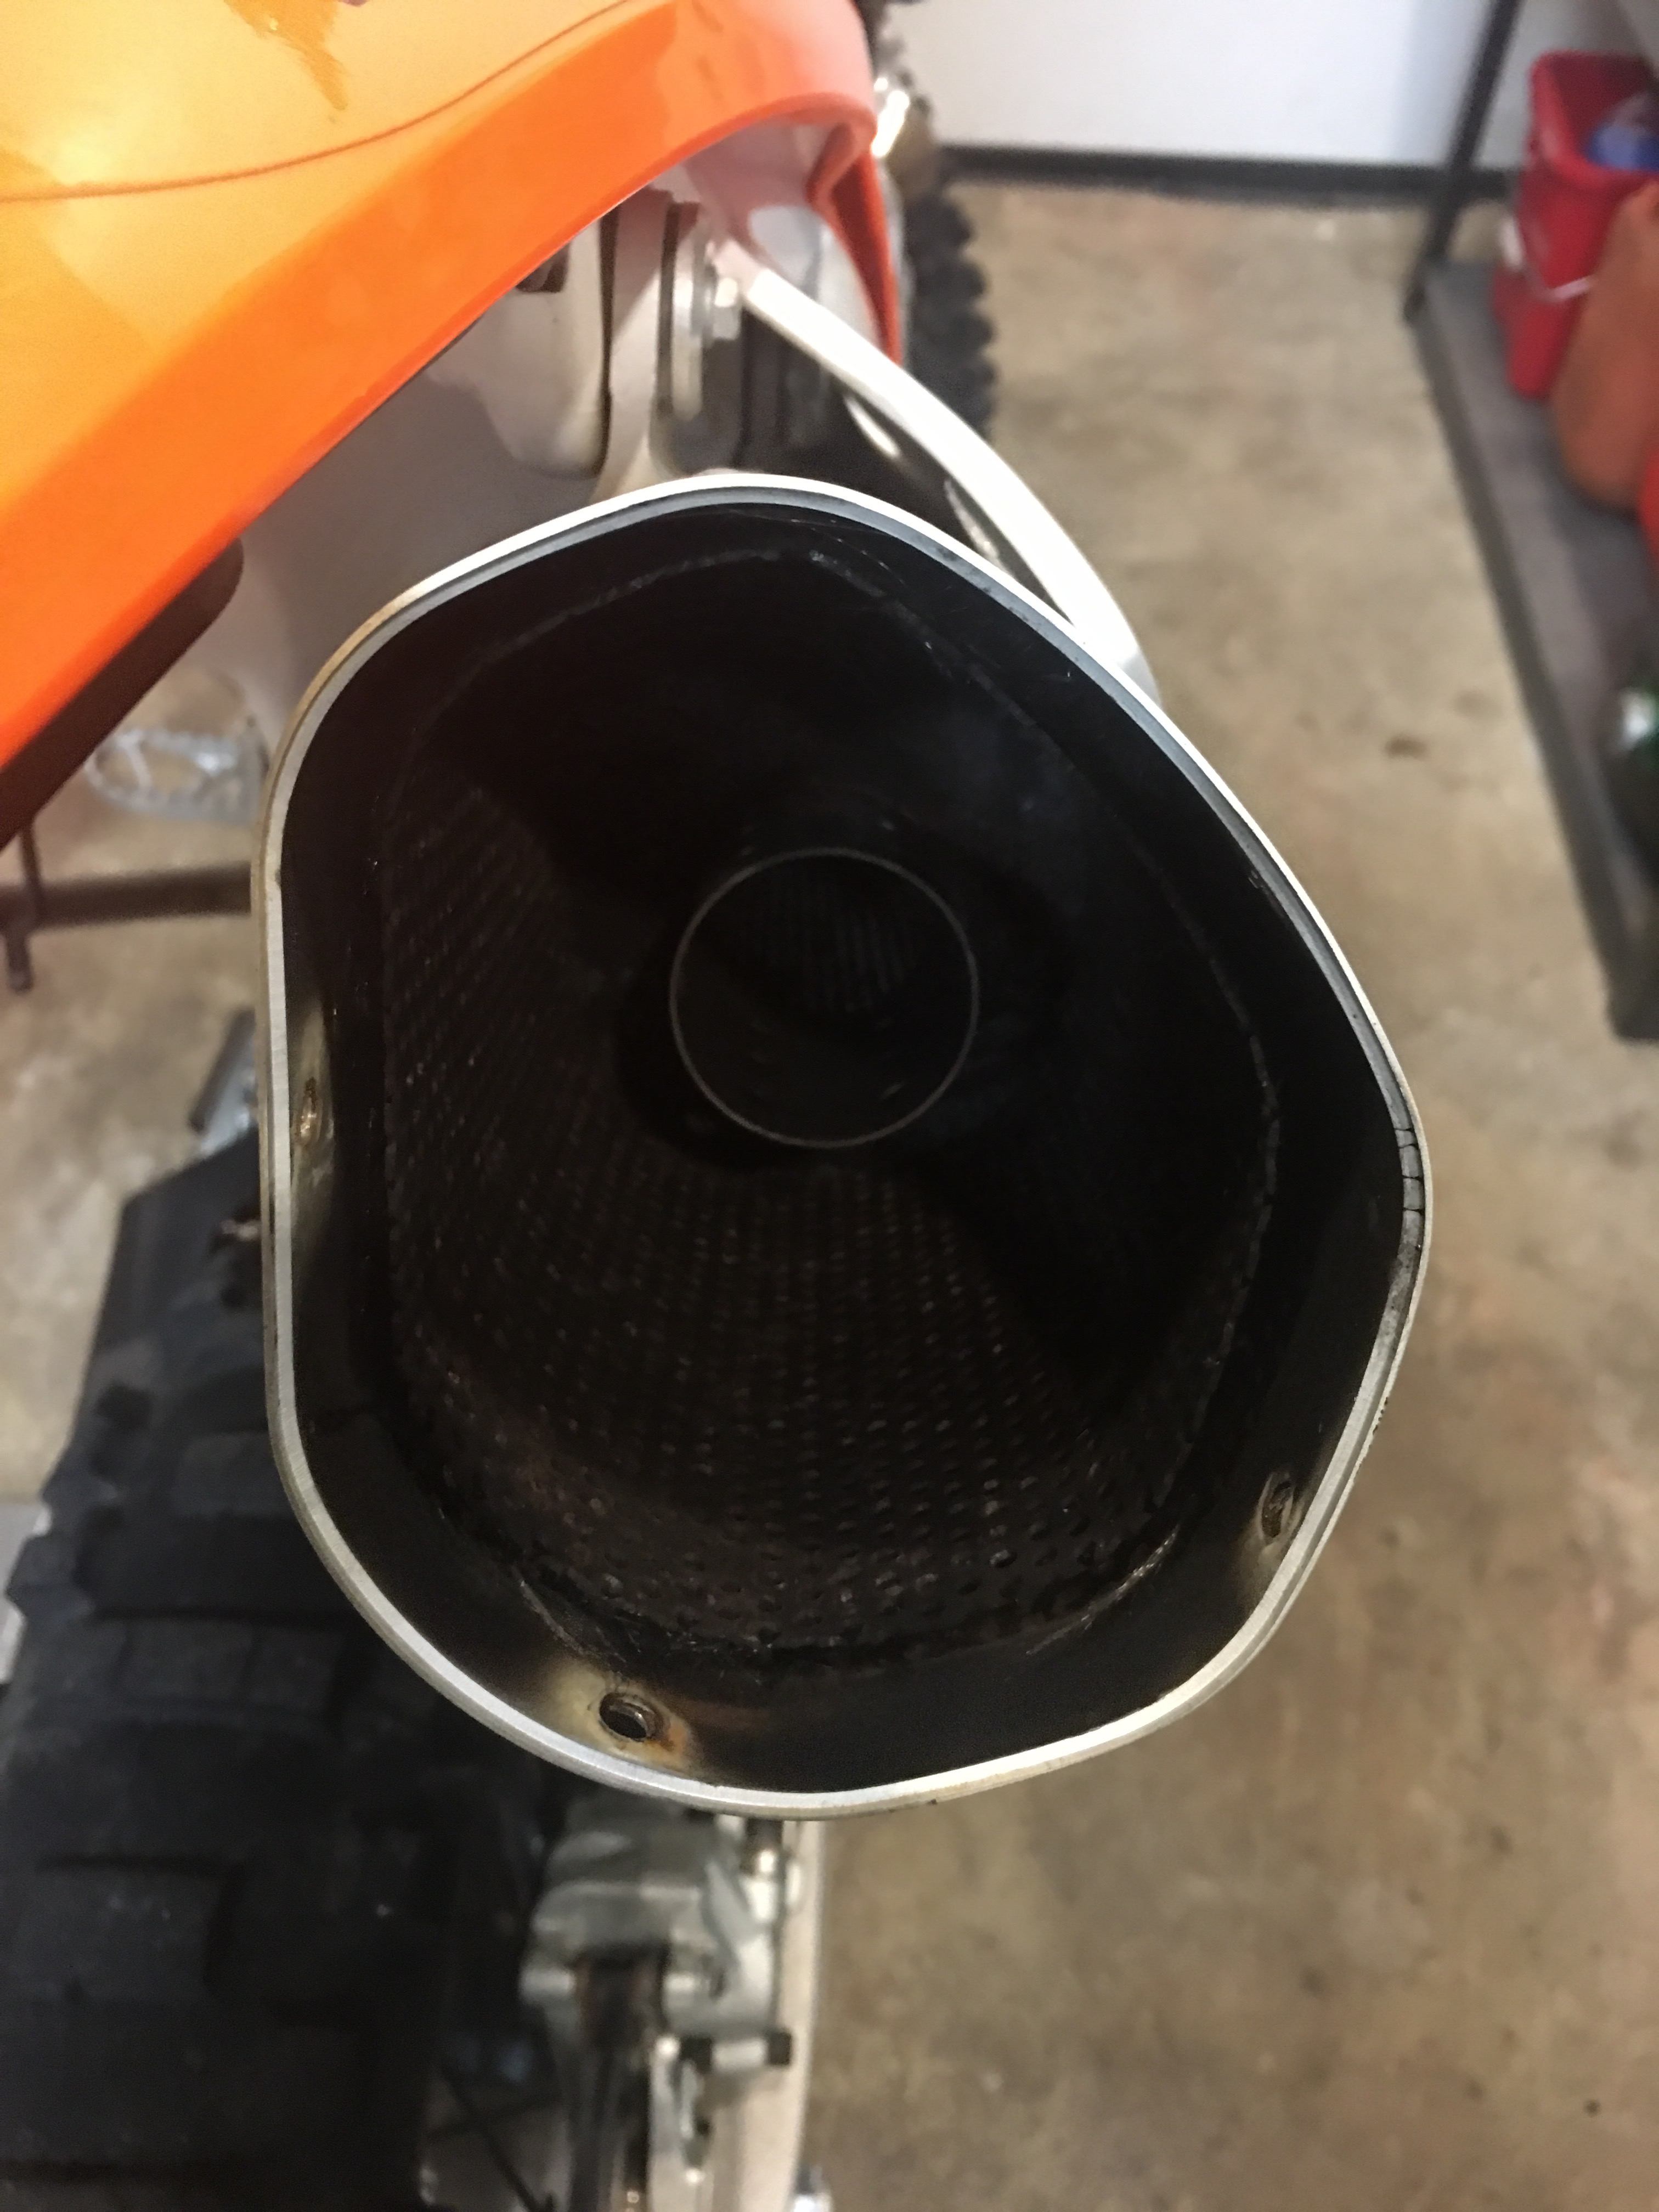 Looking down the barrel of the muffler, you can see how the STE-2 end cap lines up exactly with where the gas enters the muffler from the header pipe, resulting in less restriction.
Aesthetically, the new end cap adds a bit of “bling” to the bike without screaming “I’m aftermarket”. The resulting sound is only about 10% louder than stock and the cap comes with a “quiet” insert which restricts the flow and brings sound levels down to the same as the stock unit.
Fueling: With intake and exhaust optimized, fueling was the next area to turn our attention to. Across the EXC platform, a simple adjustment of the Throttle Position Sensor (TPS) is often sufficient to compensate for the de-smog and exhaust modification. To this end, there are two ways to tune the system. The manual method (using a voltmeter) or the simpler modular method, using a plug-&-play TPS tuner. Again, if using the DIY method, forums or videos like this one are your friend.
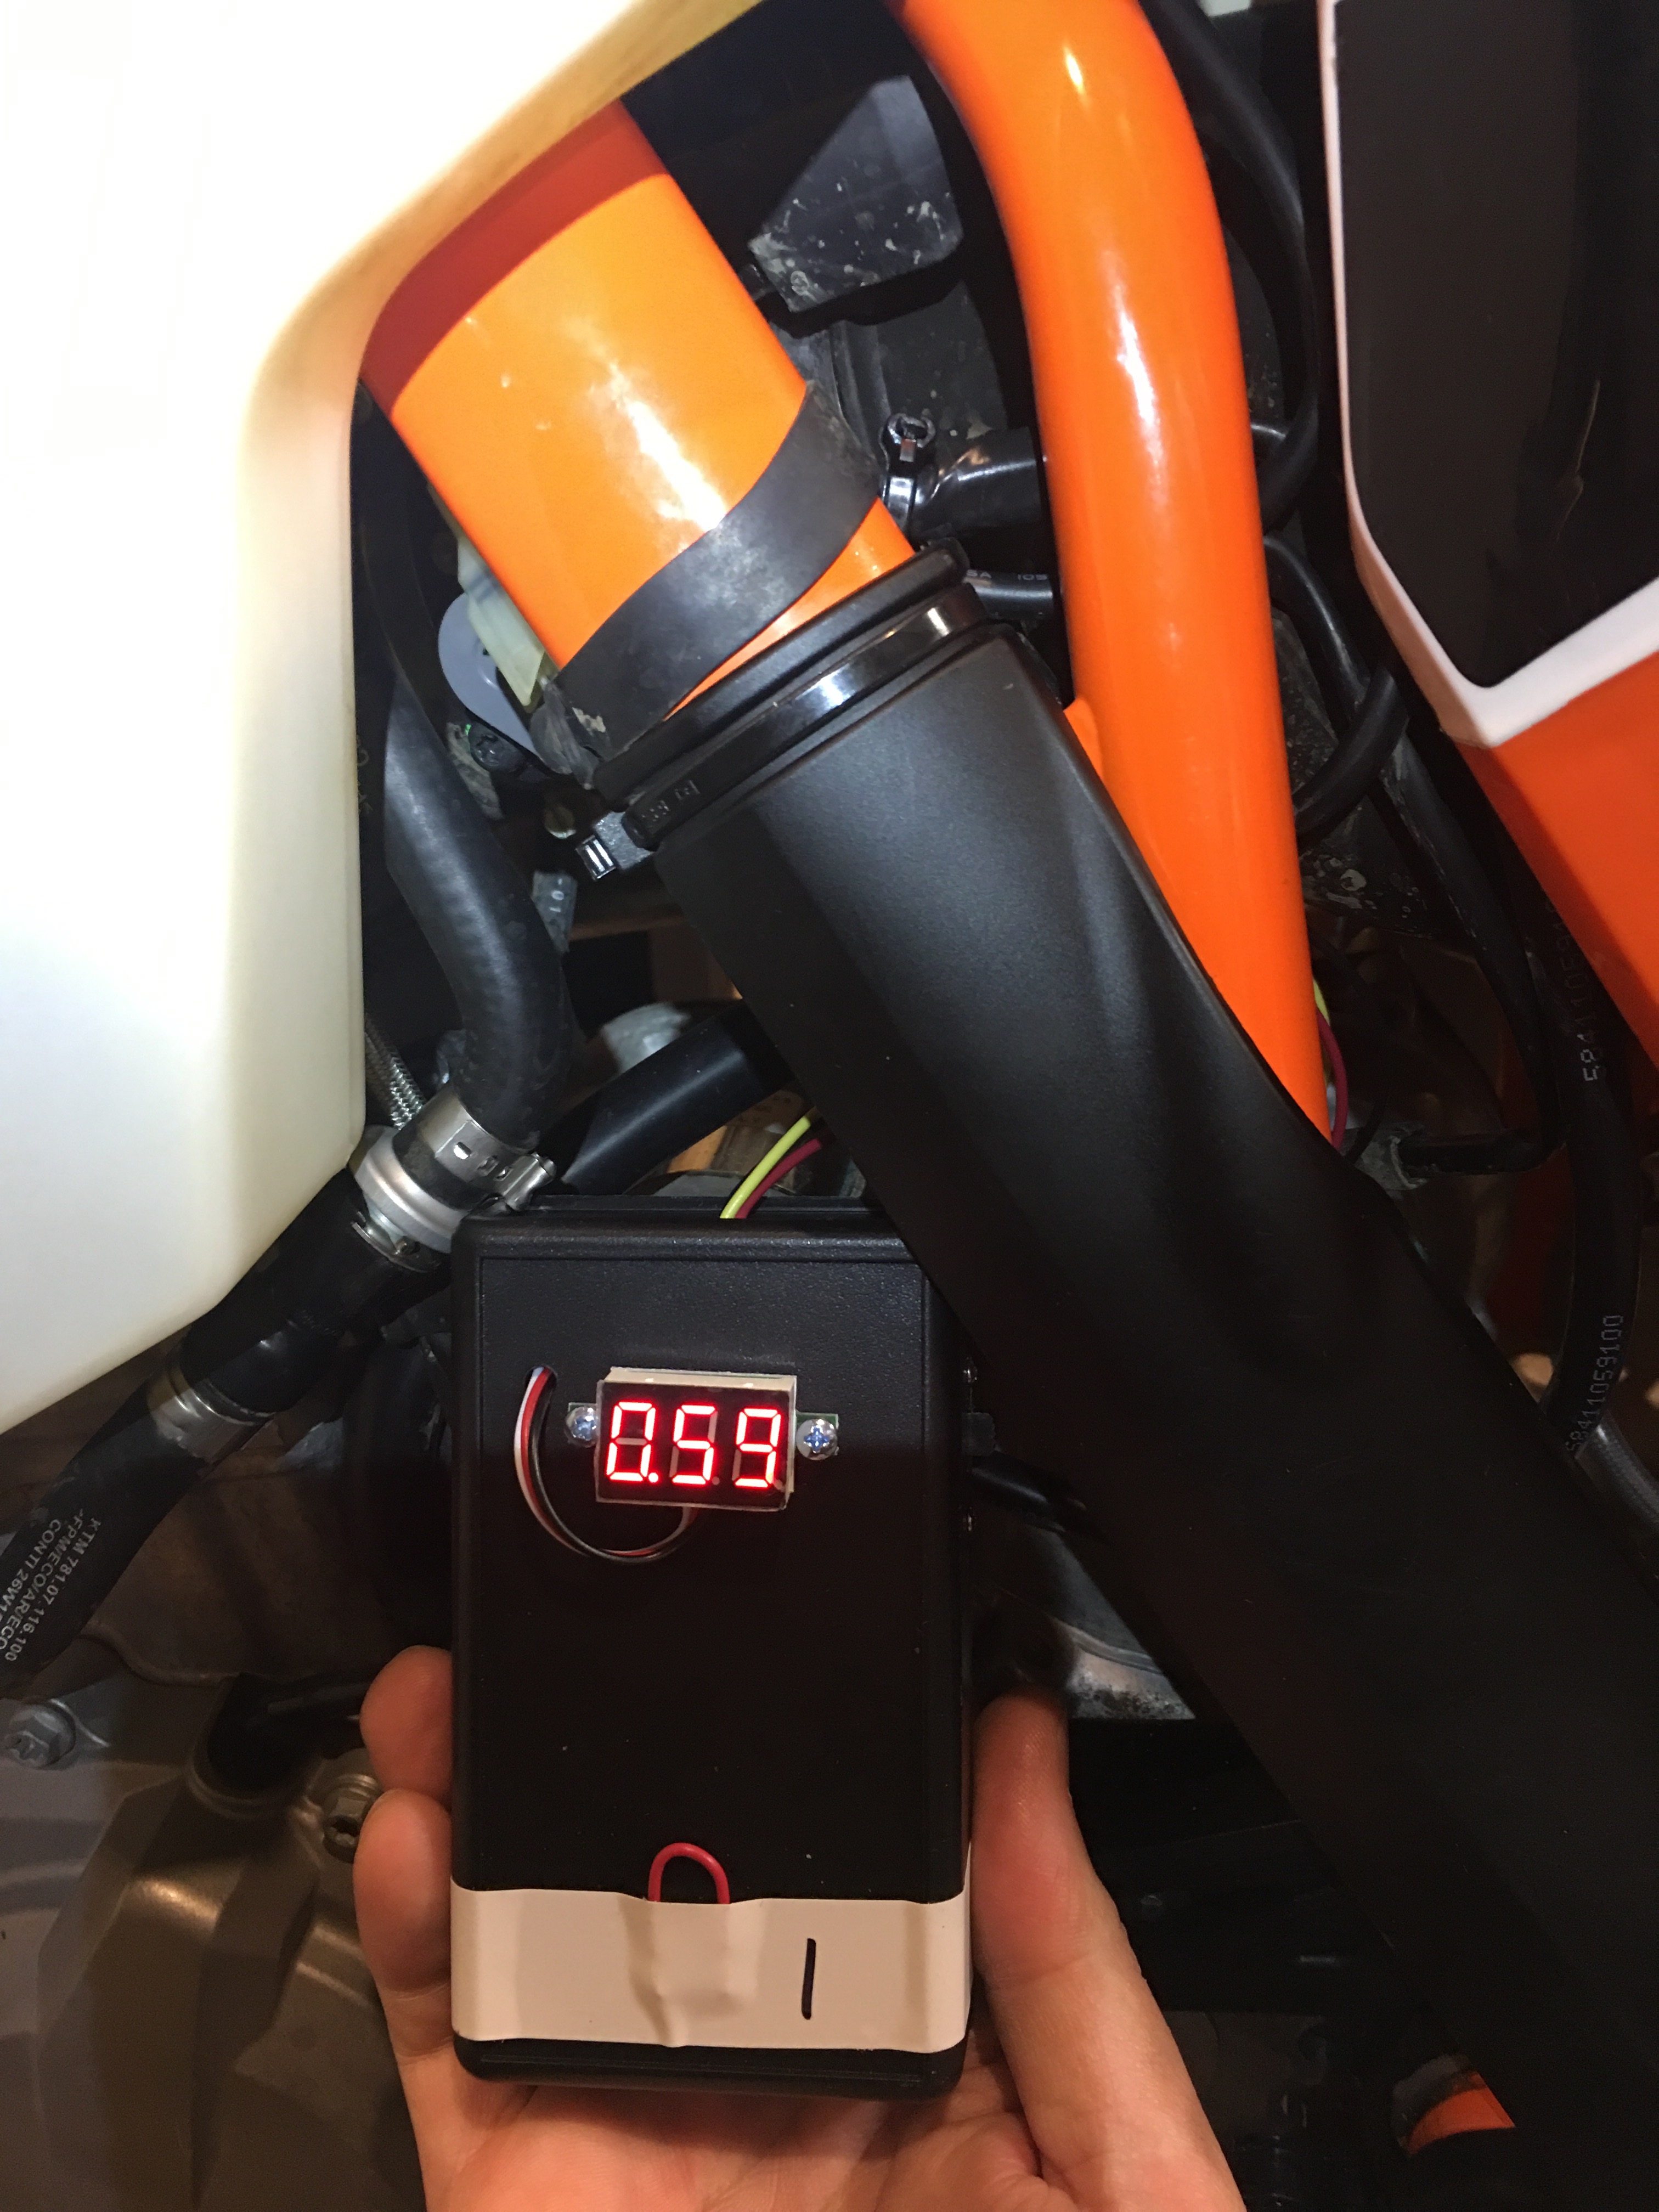 The recommended range from the factory (before adjustment) is 0.58-0.60.
After testing the bike at a few different values, we settled around the 0.64 mark, where throttle response, power and ease of starting seemed to be at their best. Using a different exhaust can, Powerbomb header or making any other modifications would likely require a different setting so trial and error is really the best tuning method.
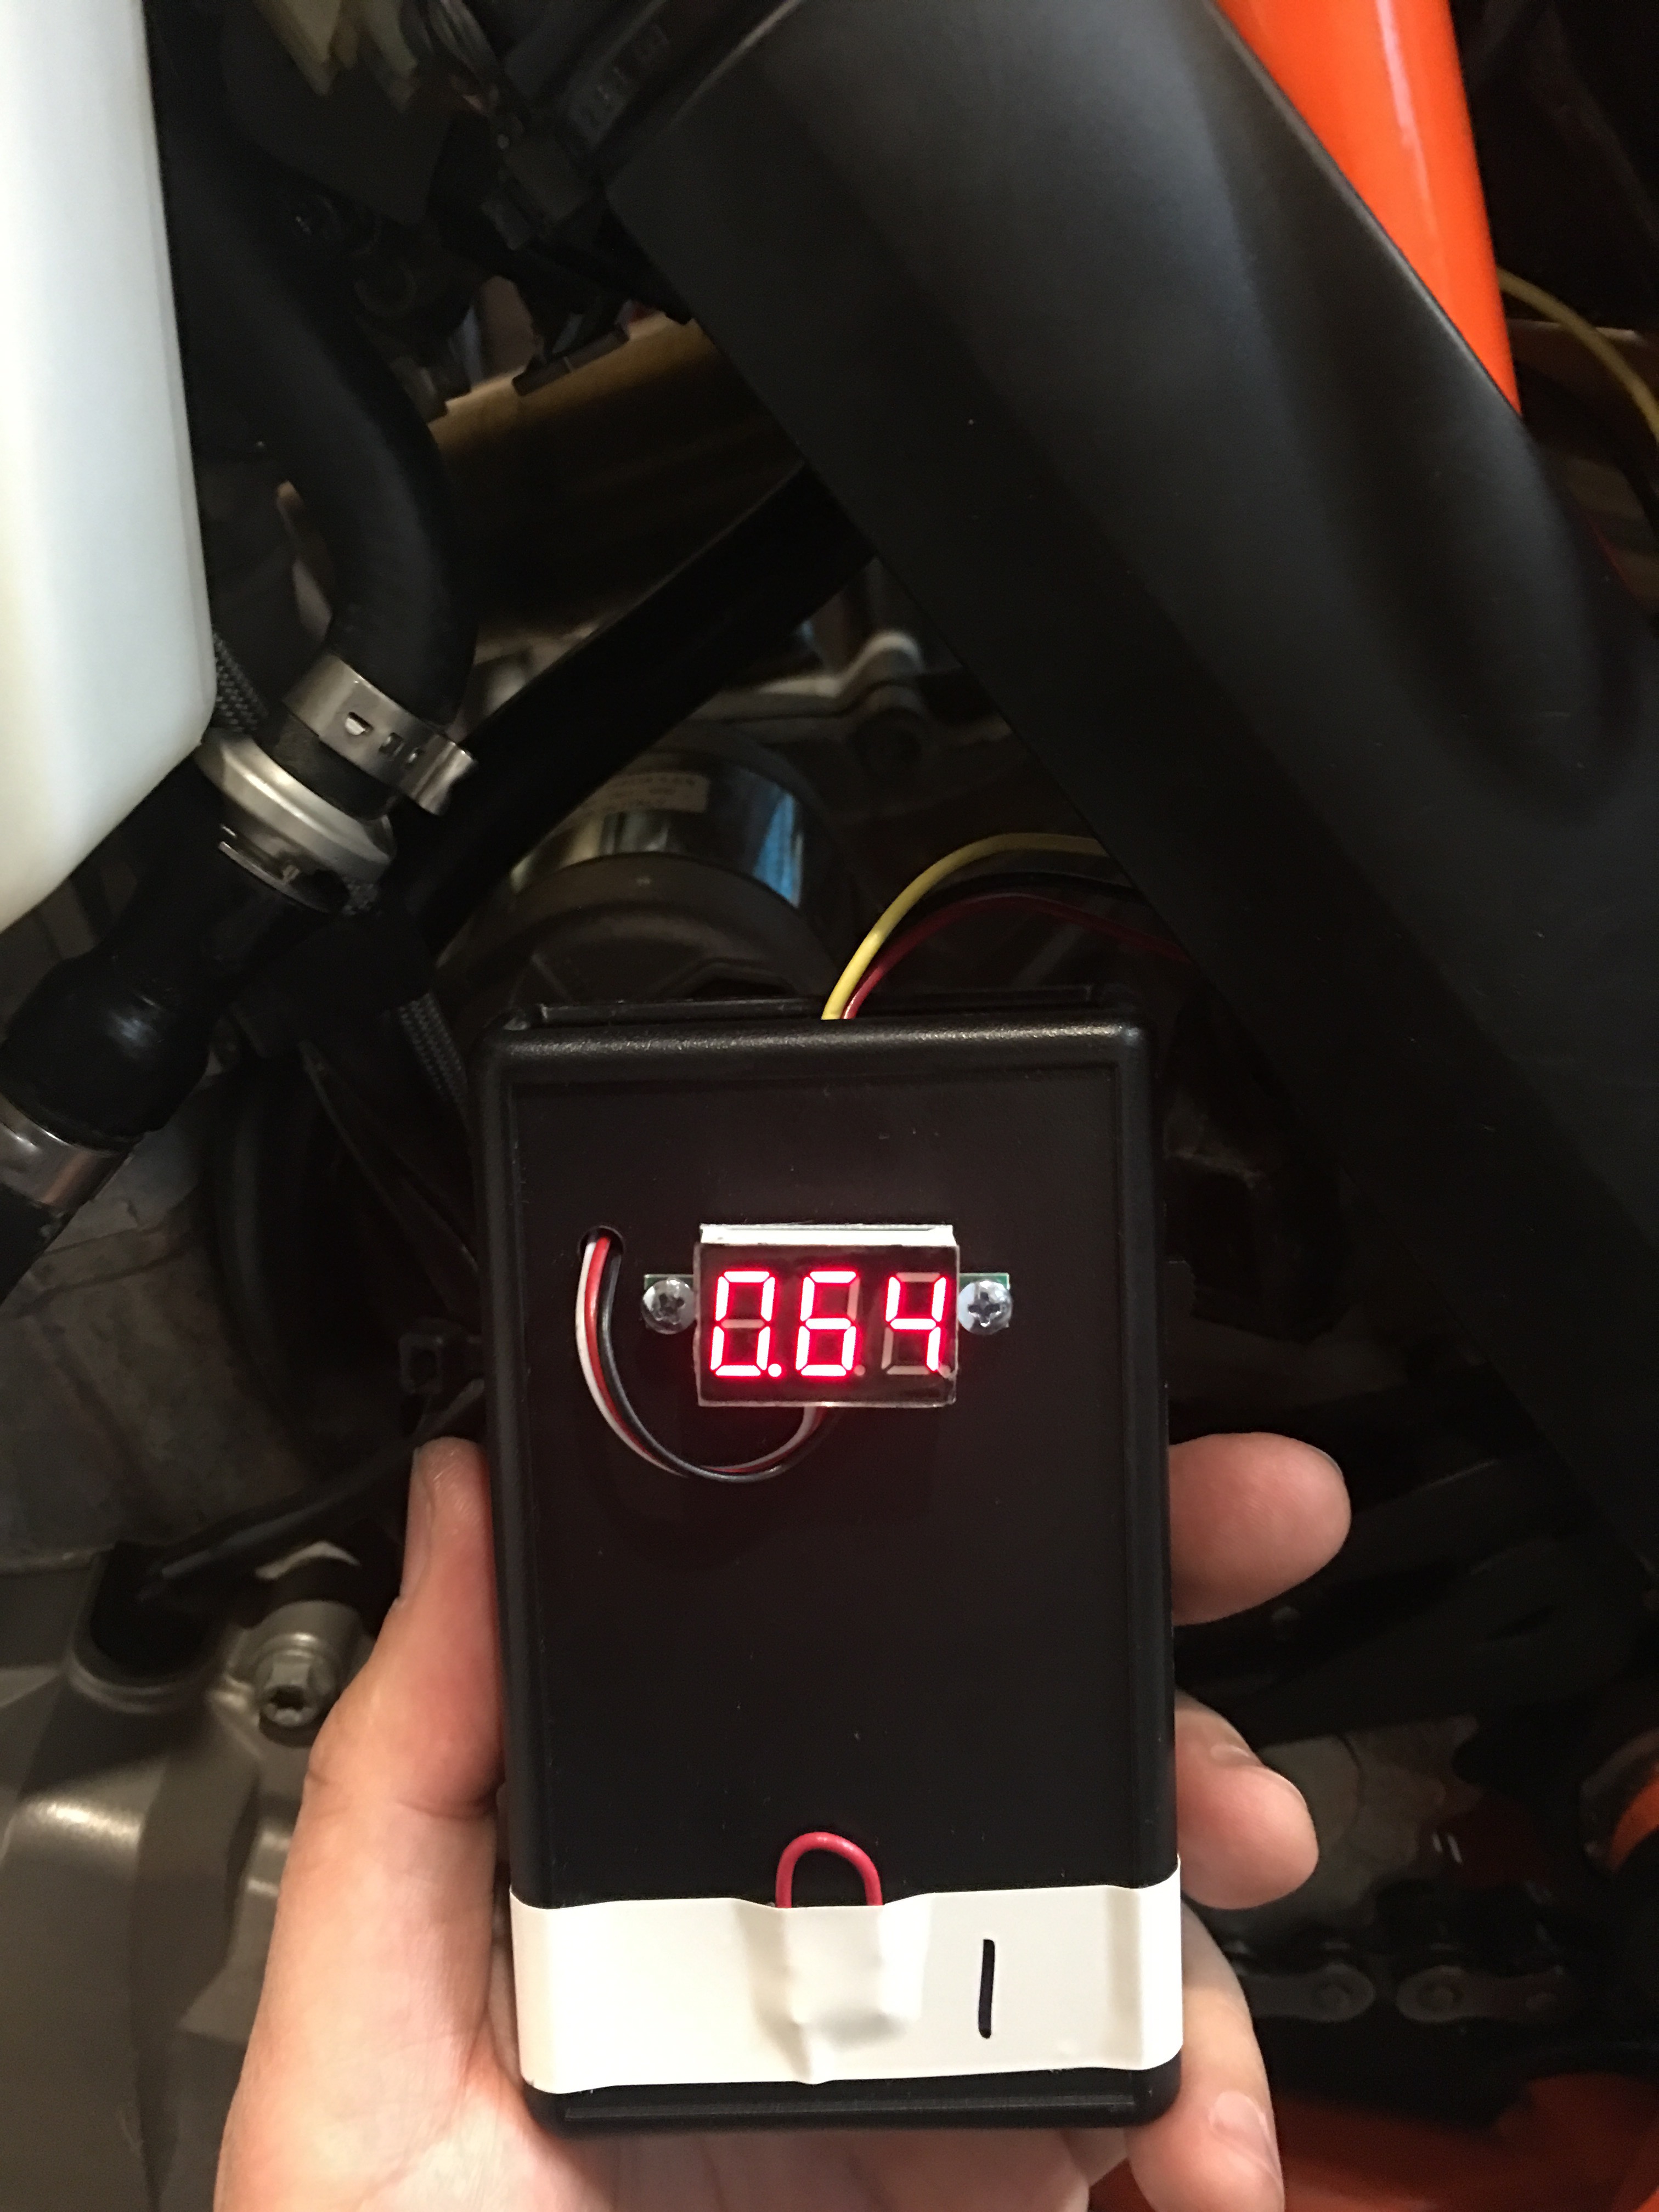 The adjusted (enriched) setting, after setting the TPS.
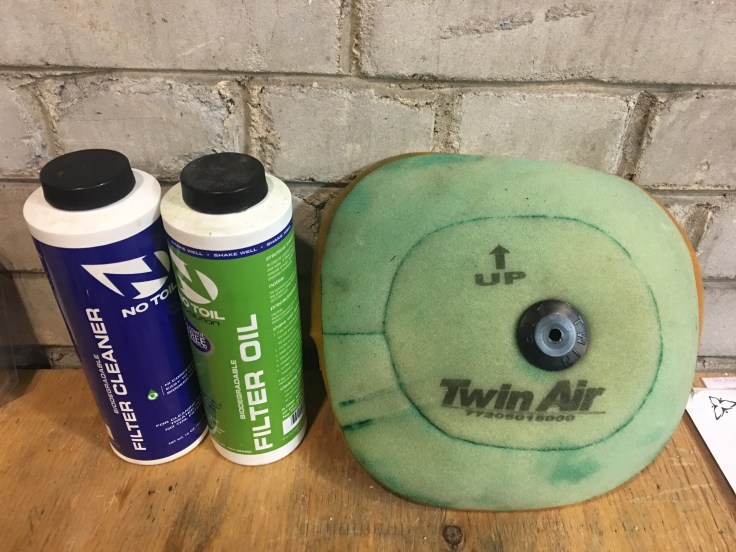
Air Filter: With air/fuel properly sorted on the bike, we gave the air filter a good cleaning and oiling using a kit from No Toil. As on most dirt bikes, the filter is very easy to access on the KTM so there’s no excuse for running with a dirty one.
Valve Tolerances: There are two critical elements of keeping a street-going 500 EXC motor healthy. Frequent oil changes is one and keeping the valves in spec is the other. Fortunately, both are simple procedures and a relatively competent home mechanic should be able to perform the work without any drama.
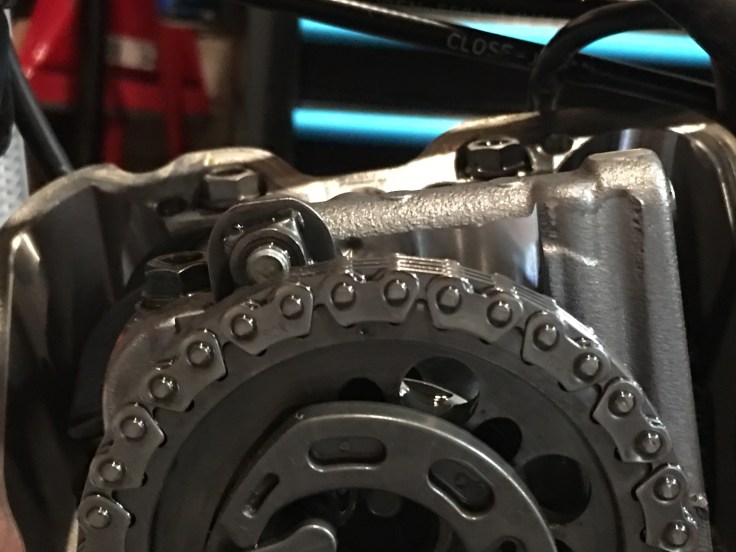
The first step of checking the valves is to remove the head cover (secured by 4 bolts). Next, align the mark (recessed dot) on the cam timing chain with the similar mark on the motor (larger recessed dot) by turning the back wheel with the bike in gear (this is much easier with the bike on a center stand).
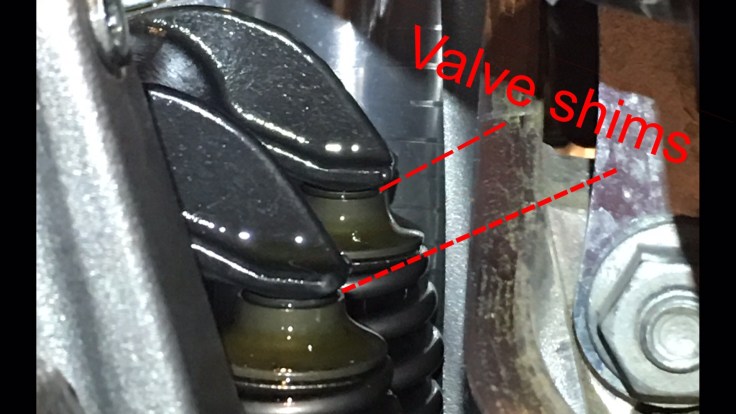
With the marks aligned, you can now verify the tolerances with the help of a feeler gauge. Also note that valve tolerances should be checked at room temperature (not immediately after riding the bike). It’s also a good idea to stuff rags or shop towels into the various openings in the motor, just in case you drop something, so that you don’t end up having to fish it out of the motor.
In our case, the bike had never had its valves checked and at 2,000 kms of street riding, all 4 of the valves were tight and out of spec. We pulled out the rocker arms and all 4 of the shims so we could measure and replace with the correct shims.
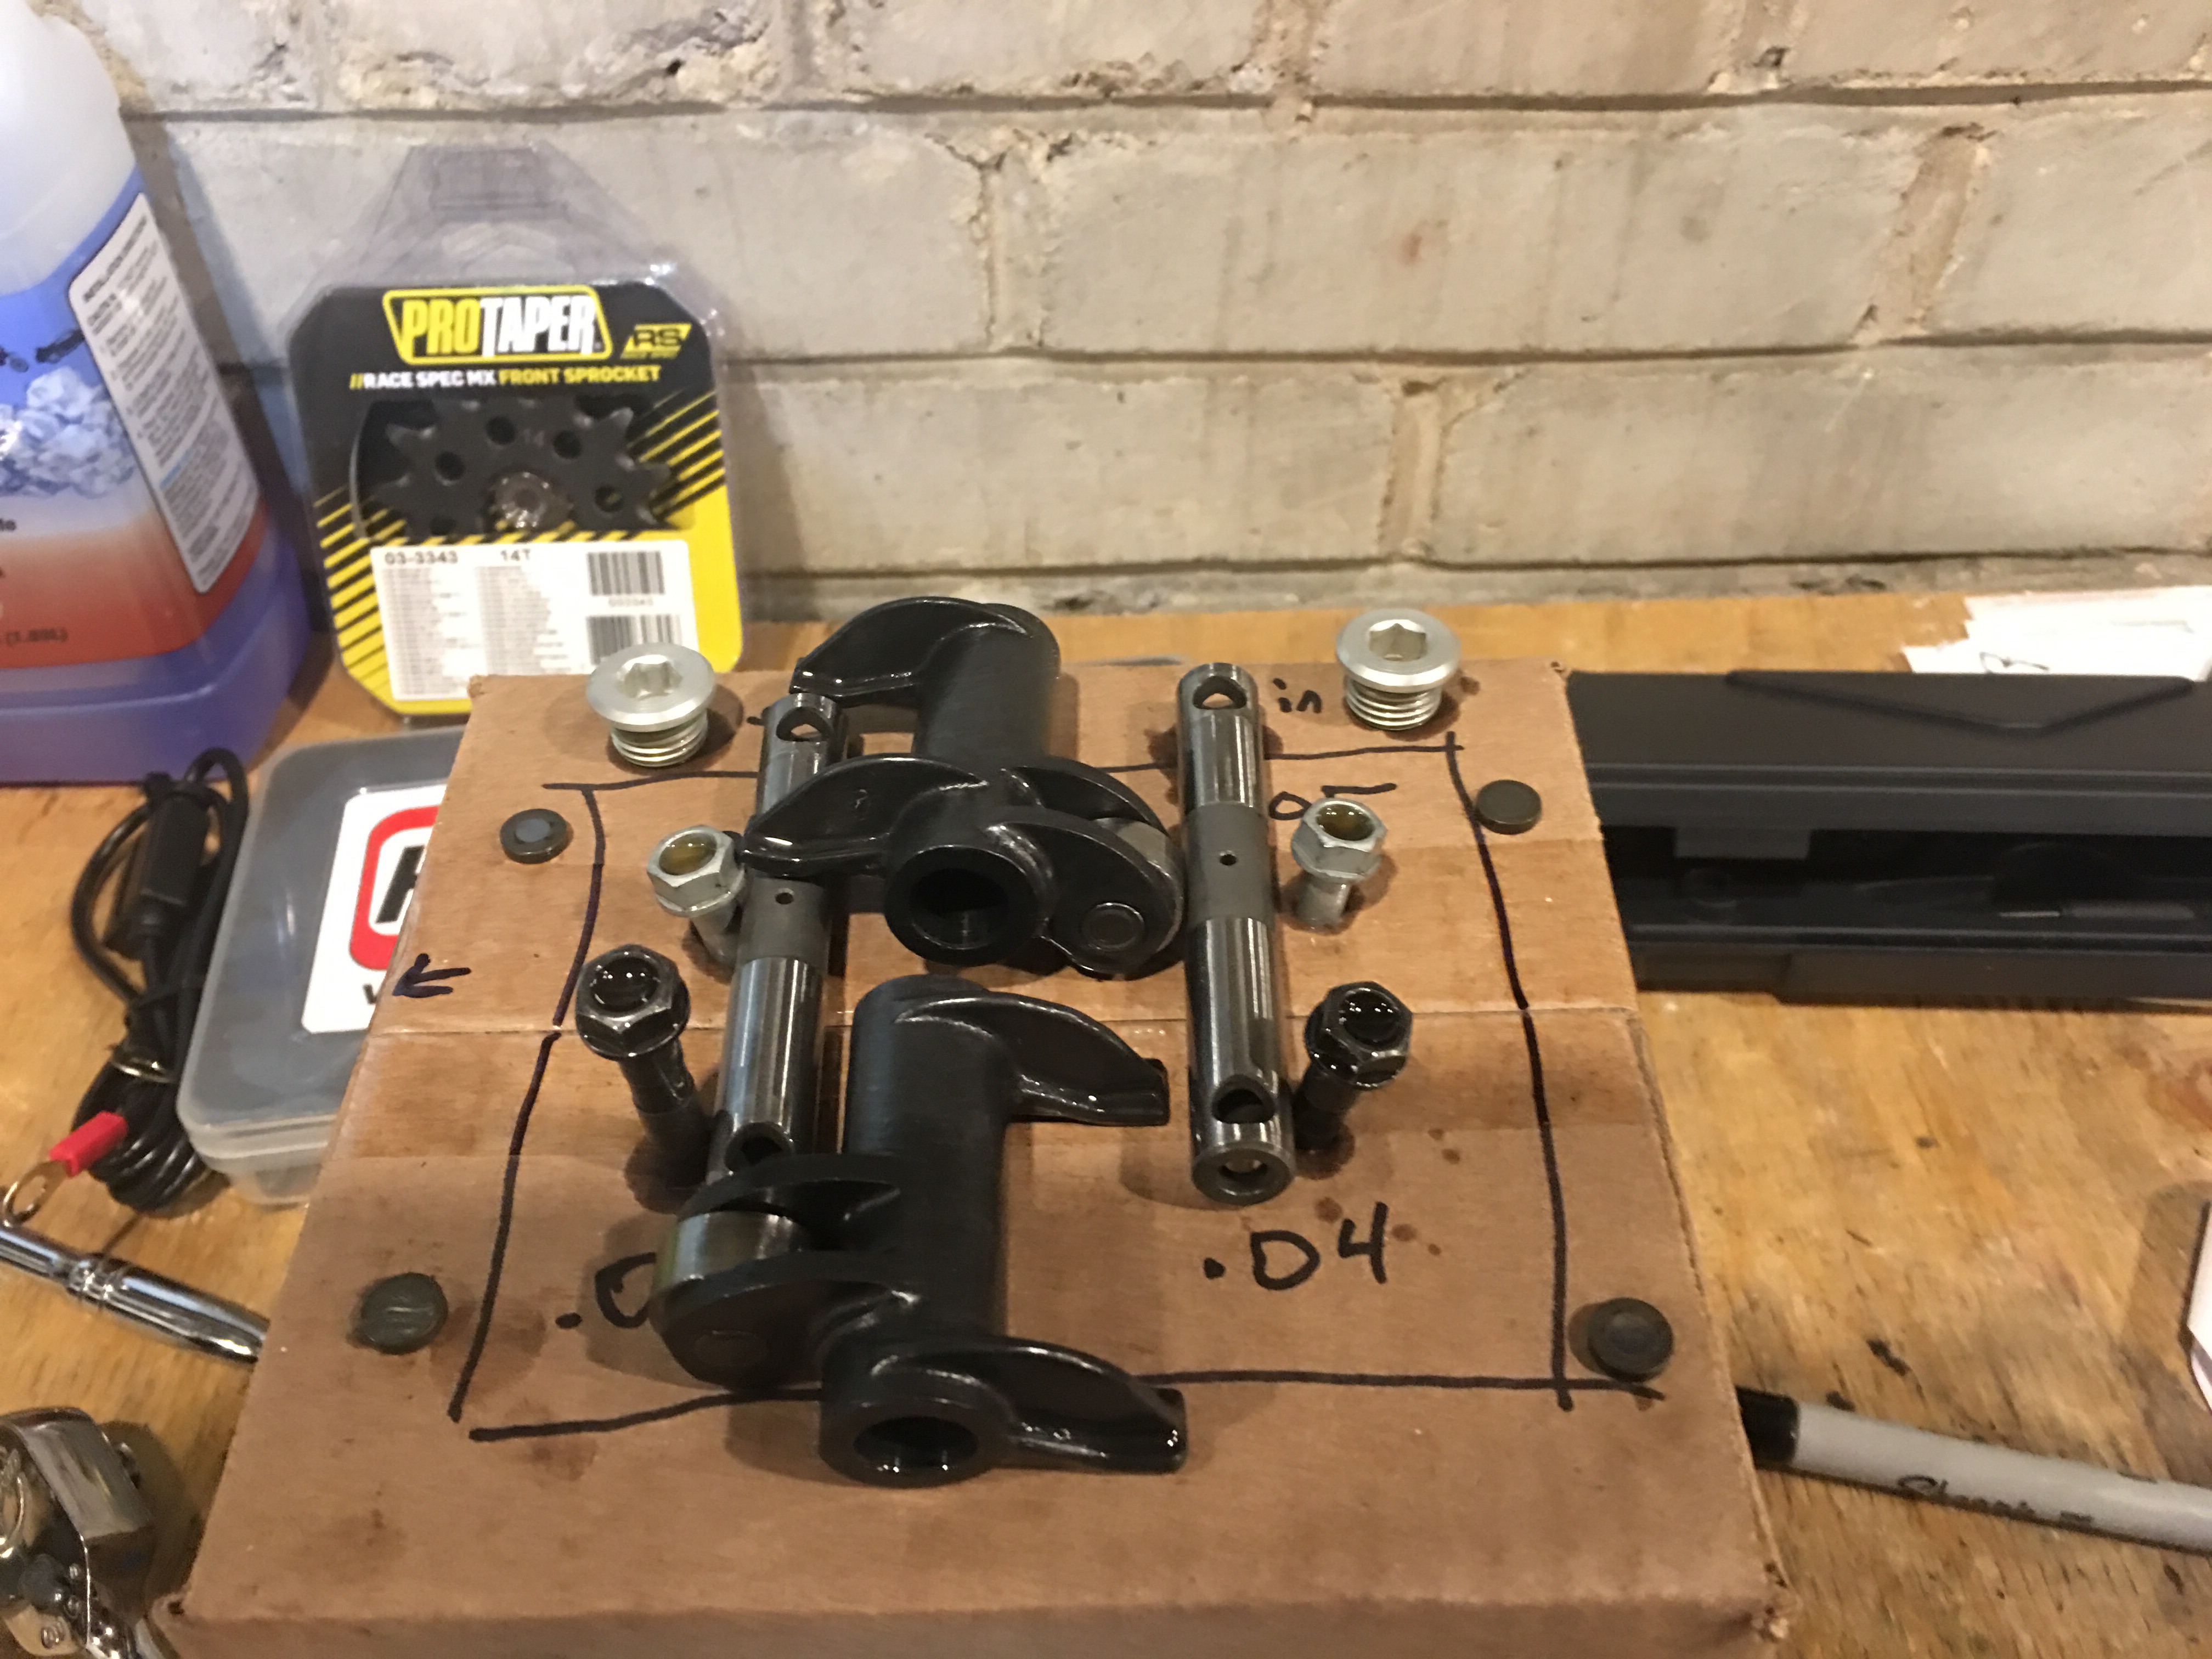 Using and old box to keep track of which-bolt-goes-where can save you a lot of headache, particularly when it comes to engine internals. Credit for this trick goes to my father in-law.
The spec tolerances can be located in your owner’s manual and the method used to calculate required shim thickness is well explained in this video, for those new to this type of valve adjustment.
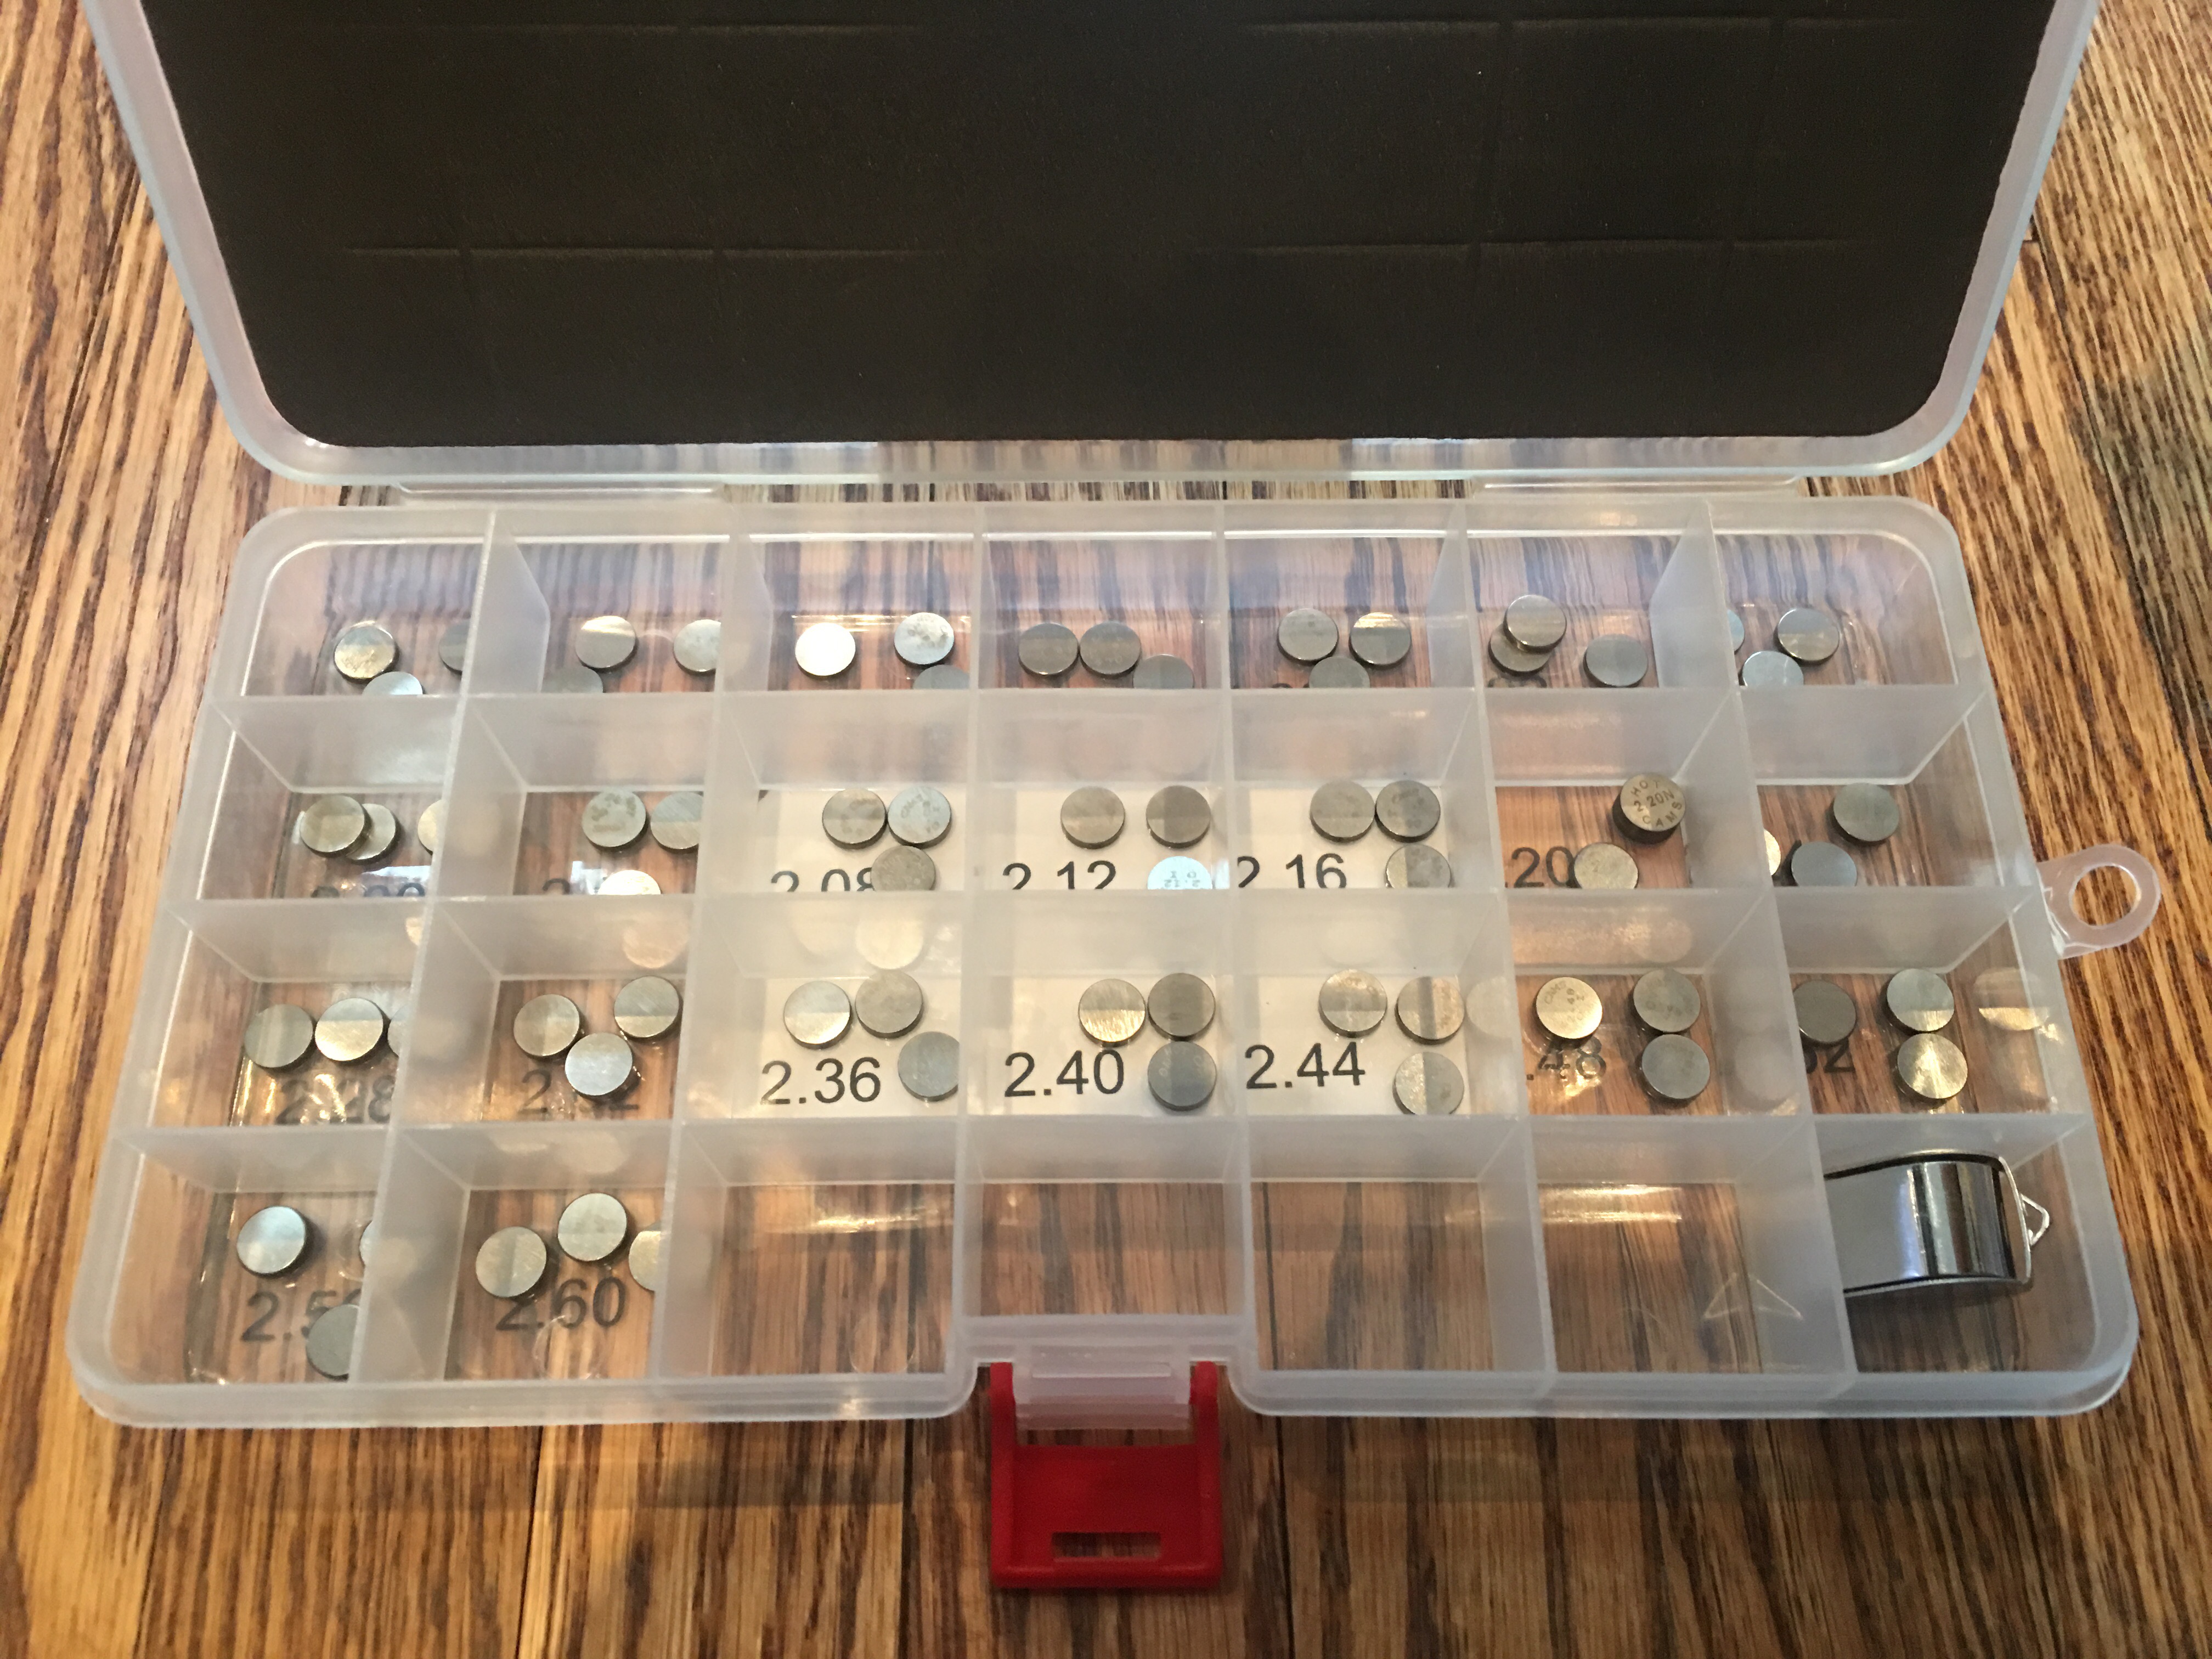 Valve shims come in a variety of shapes and sizes so make sure you are ordering the right kit for your bike.The kit comes with 3 shims of each thickness and covers the entire range of useful adjustment for most bikes.
Even though the new shims are stamped with their thickness, it’s always a good idea to re-measure, just to be sure.
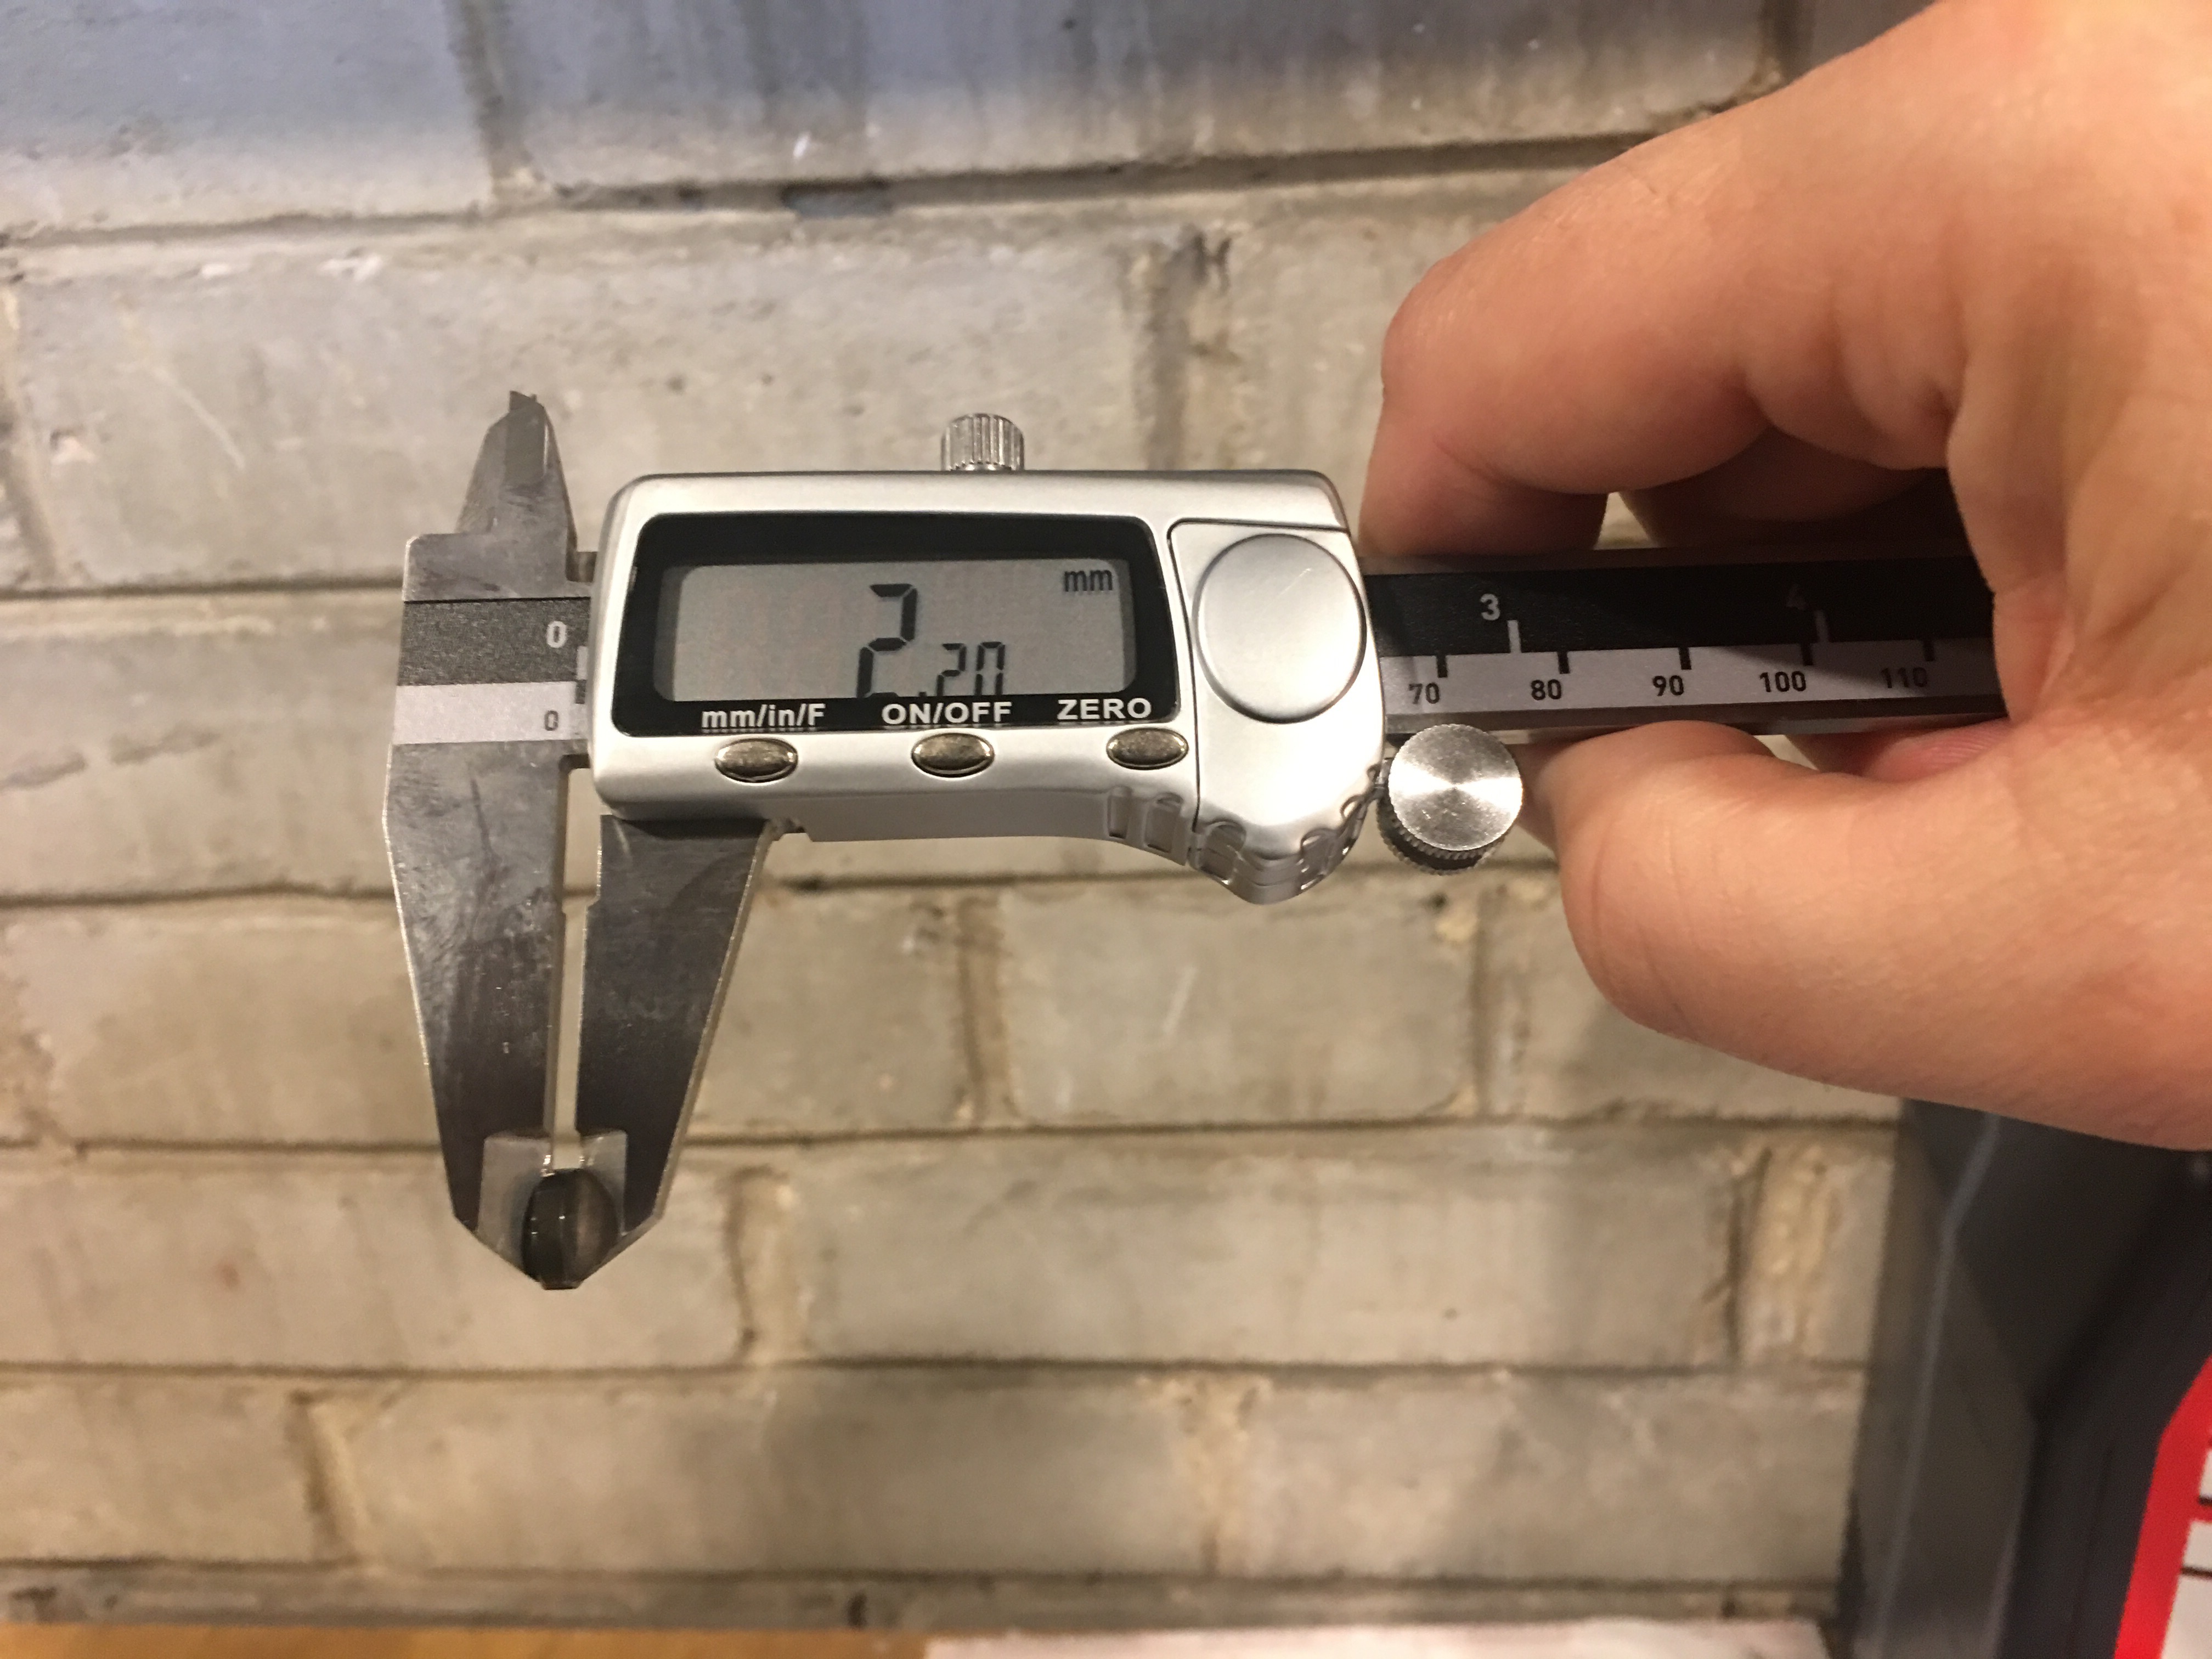 Measuring the shims to make sure they’re the right thickness can save you from pulling the top end apart if you do all the work, only to see that the valves still aren’t in spec.
Pulling and dropping in the shims is easily done with a telescopic magnet tool, so if you don’t have one, it’s $15 well spent and they can be found at pretty much any hardware store.
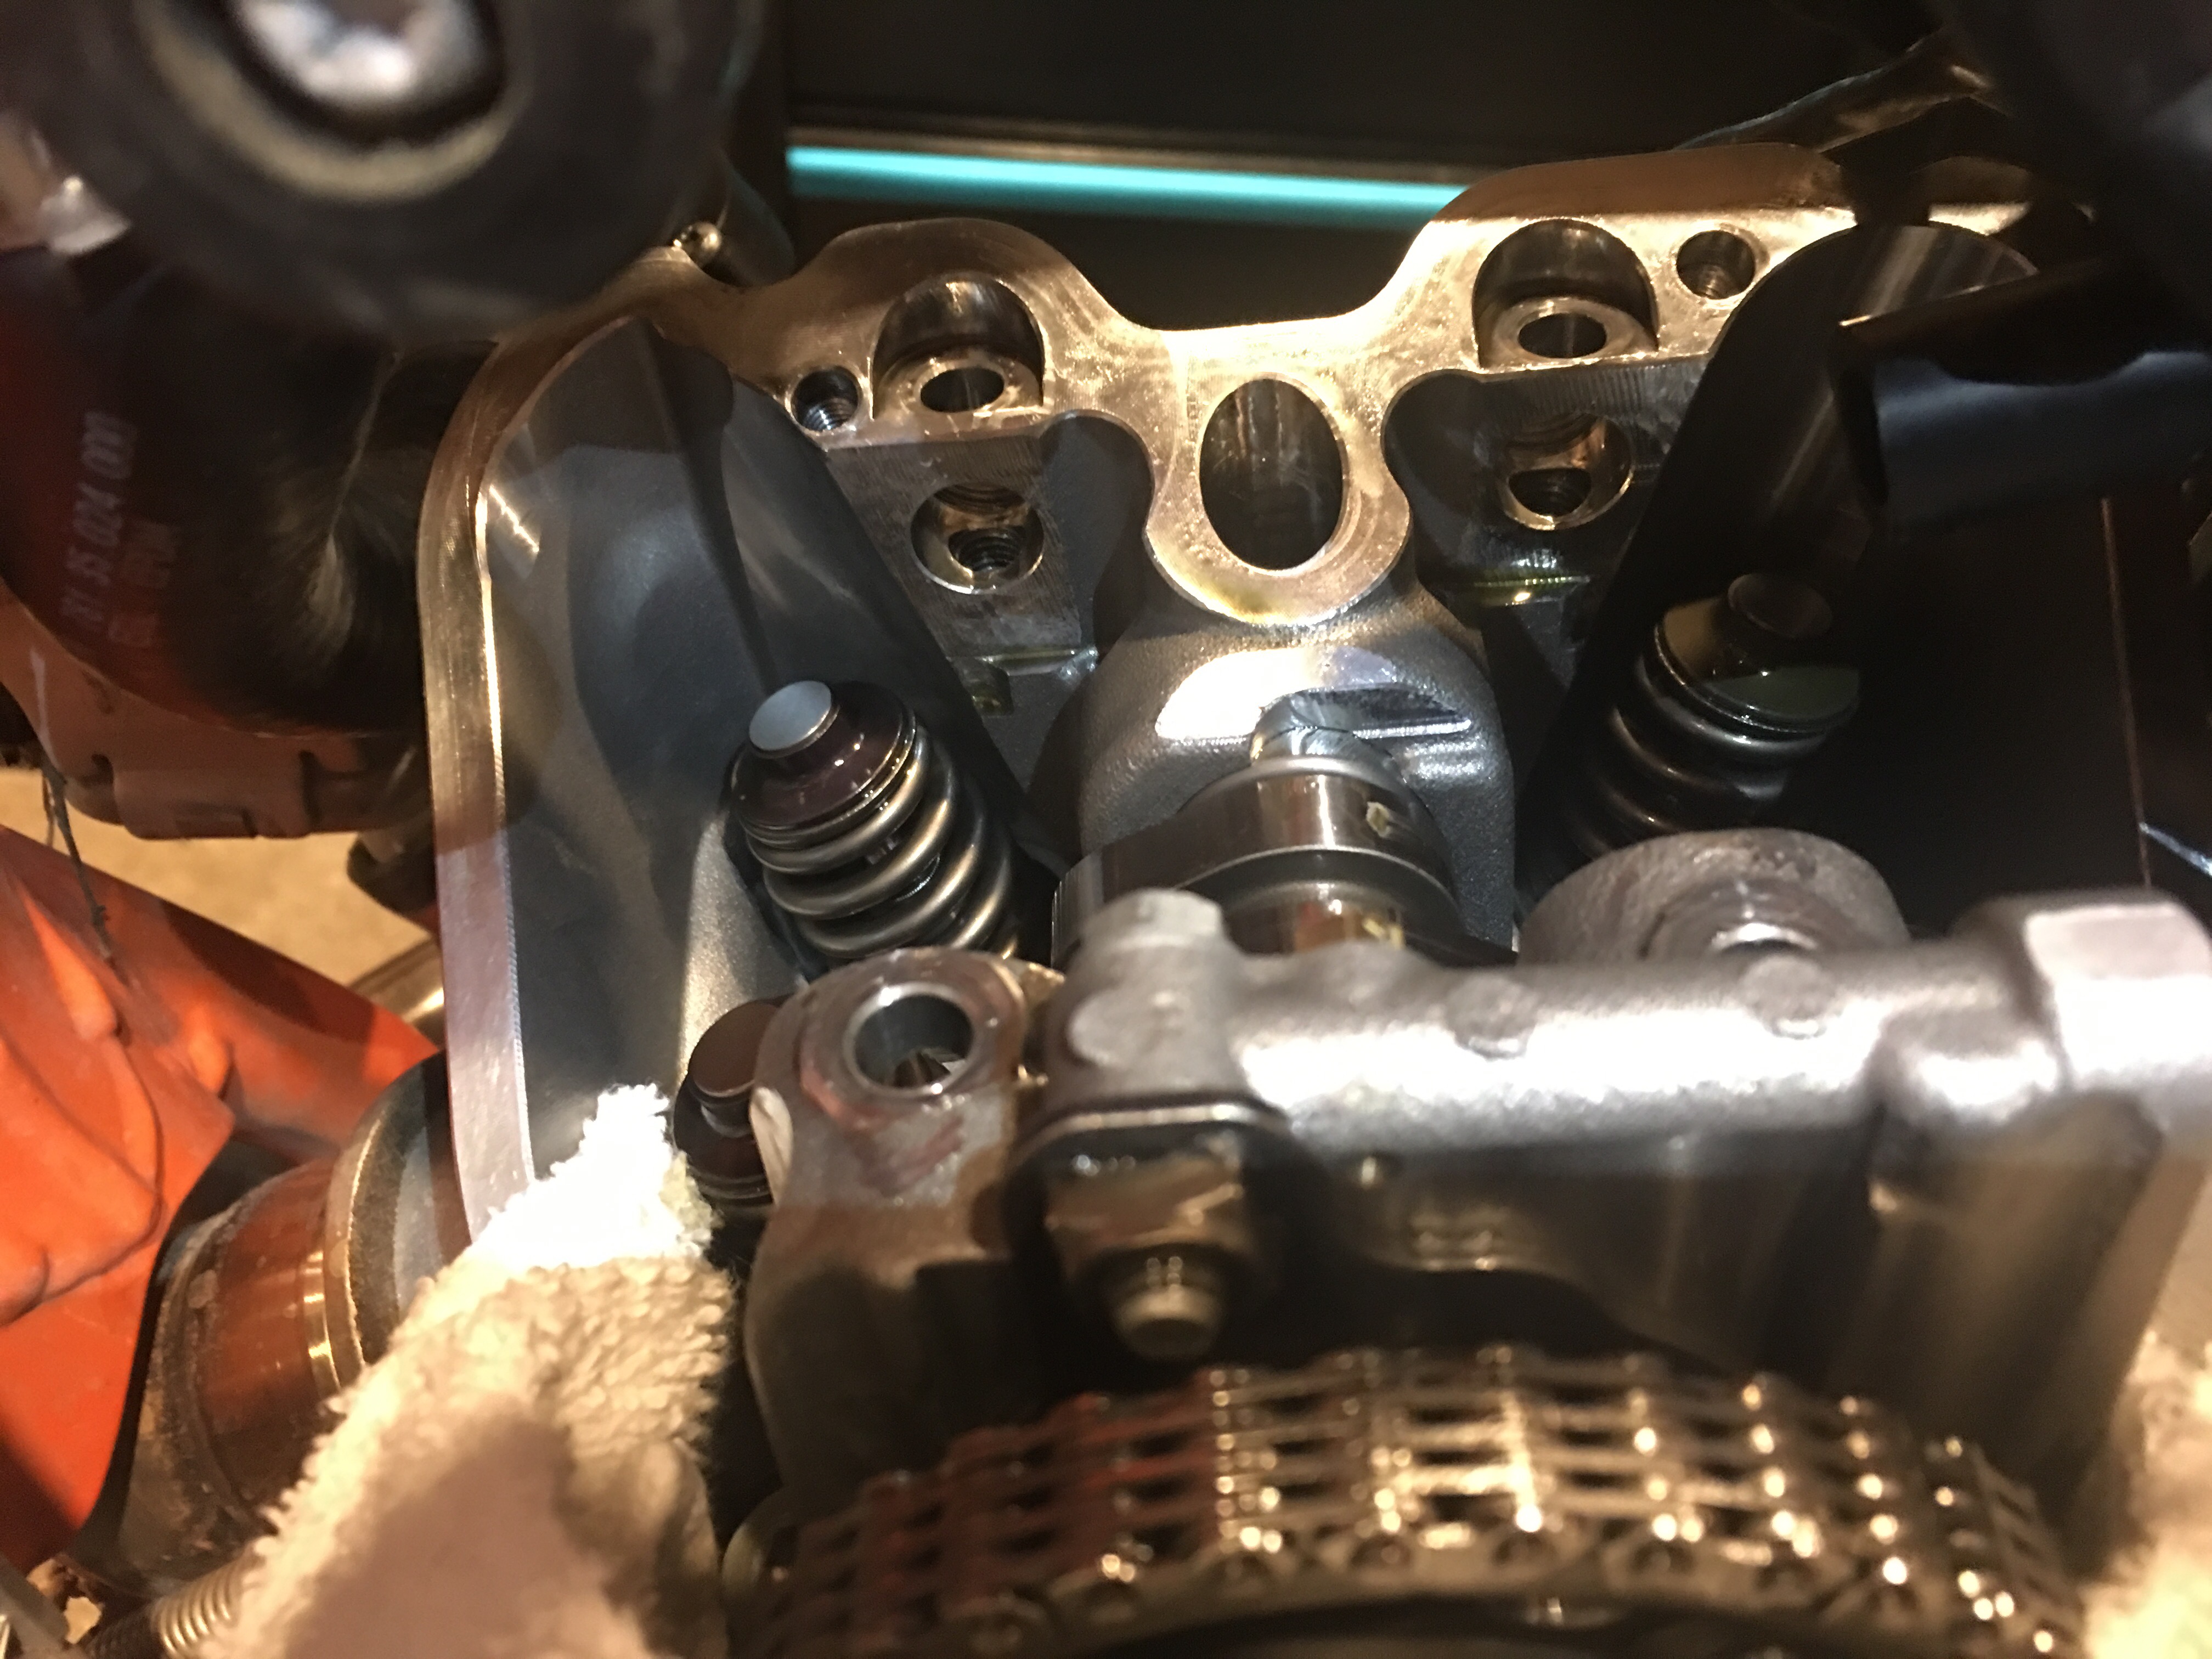 Keep shims or bolts from falling into the nether-regions of the motor by stuffing rags or shop towels in holes.
Once the new shims are in and everything is torqued back to spec, you should re-measure the tolerances to make sure your calculations were correct before putting the valve cover back on. Upon firing the bike back up, it should start easily and idle smoothly. Once those two criteria are met, take it for a ride and enjoy the fruits of your labor.
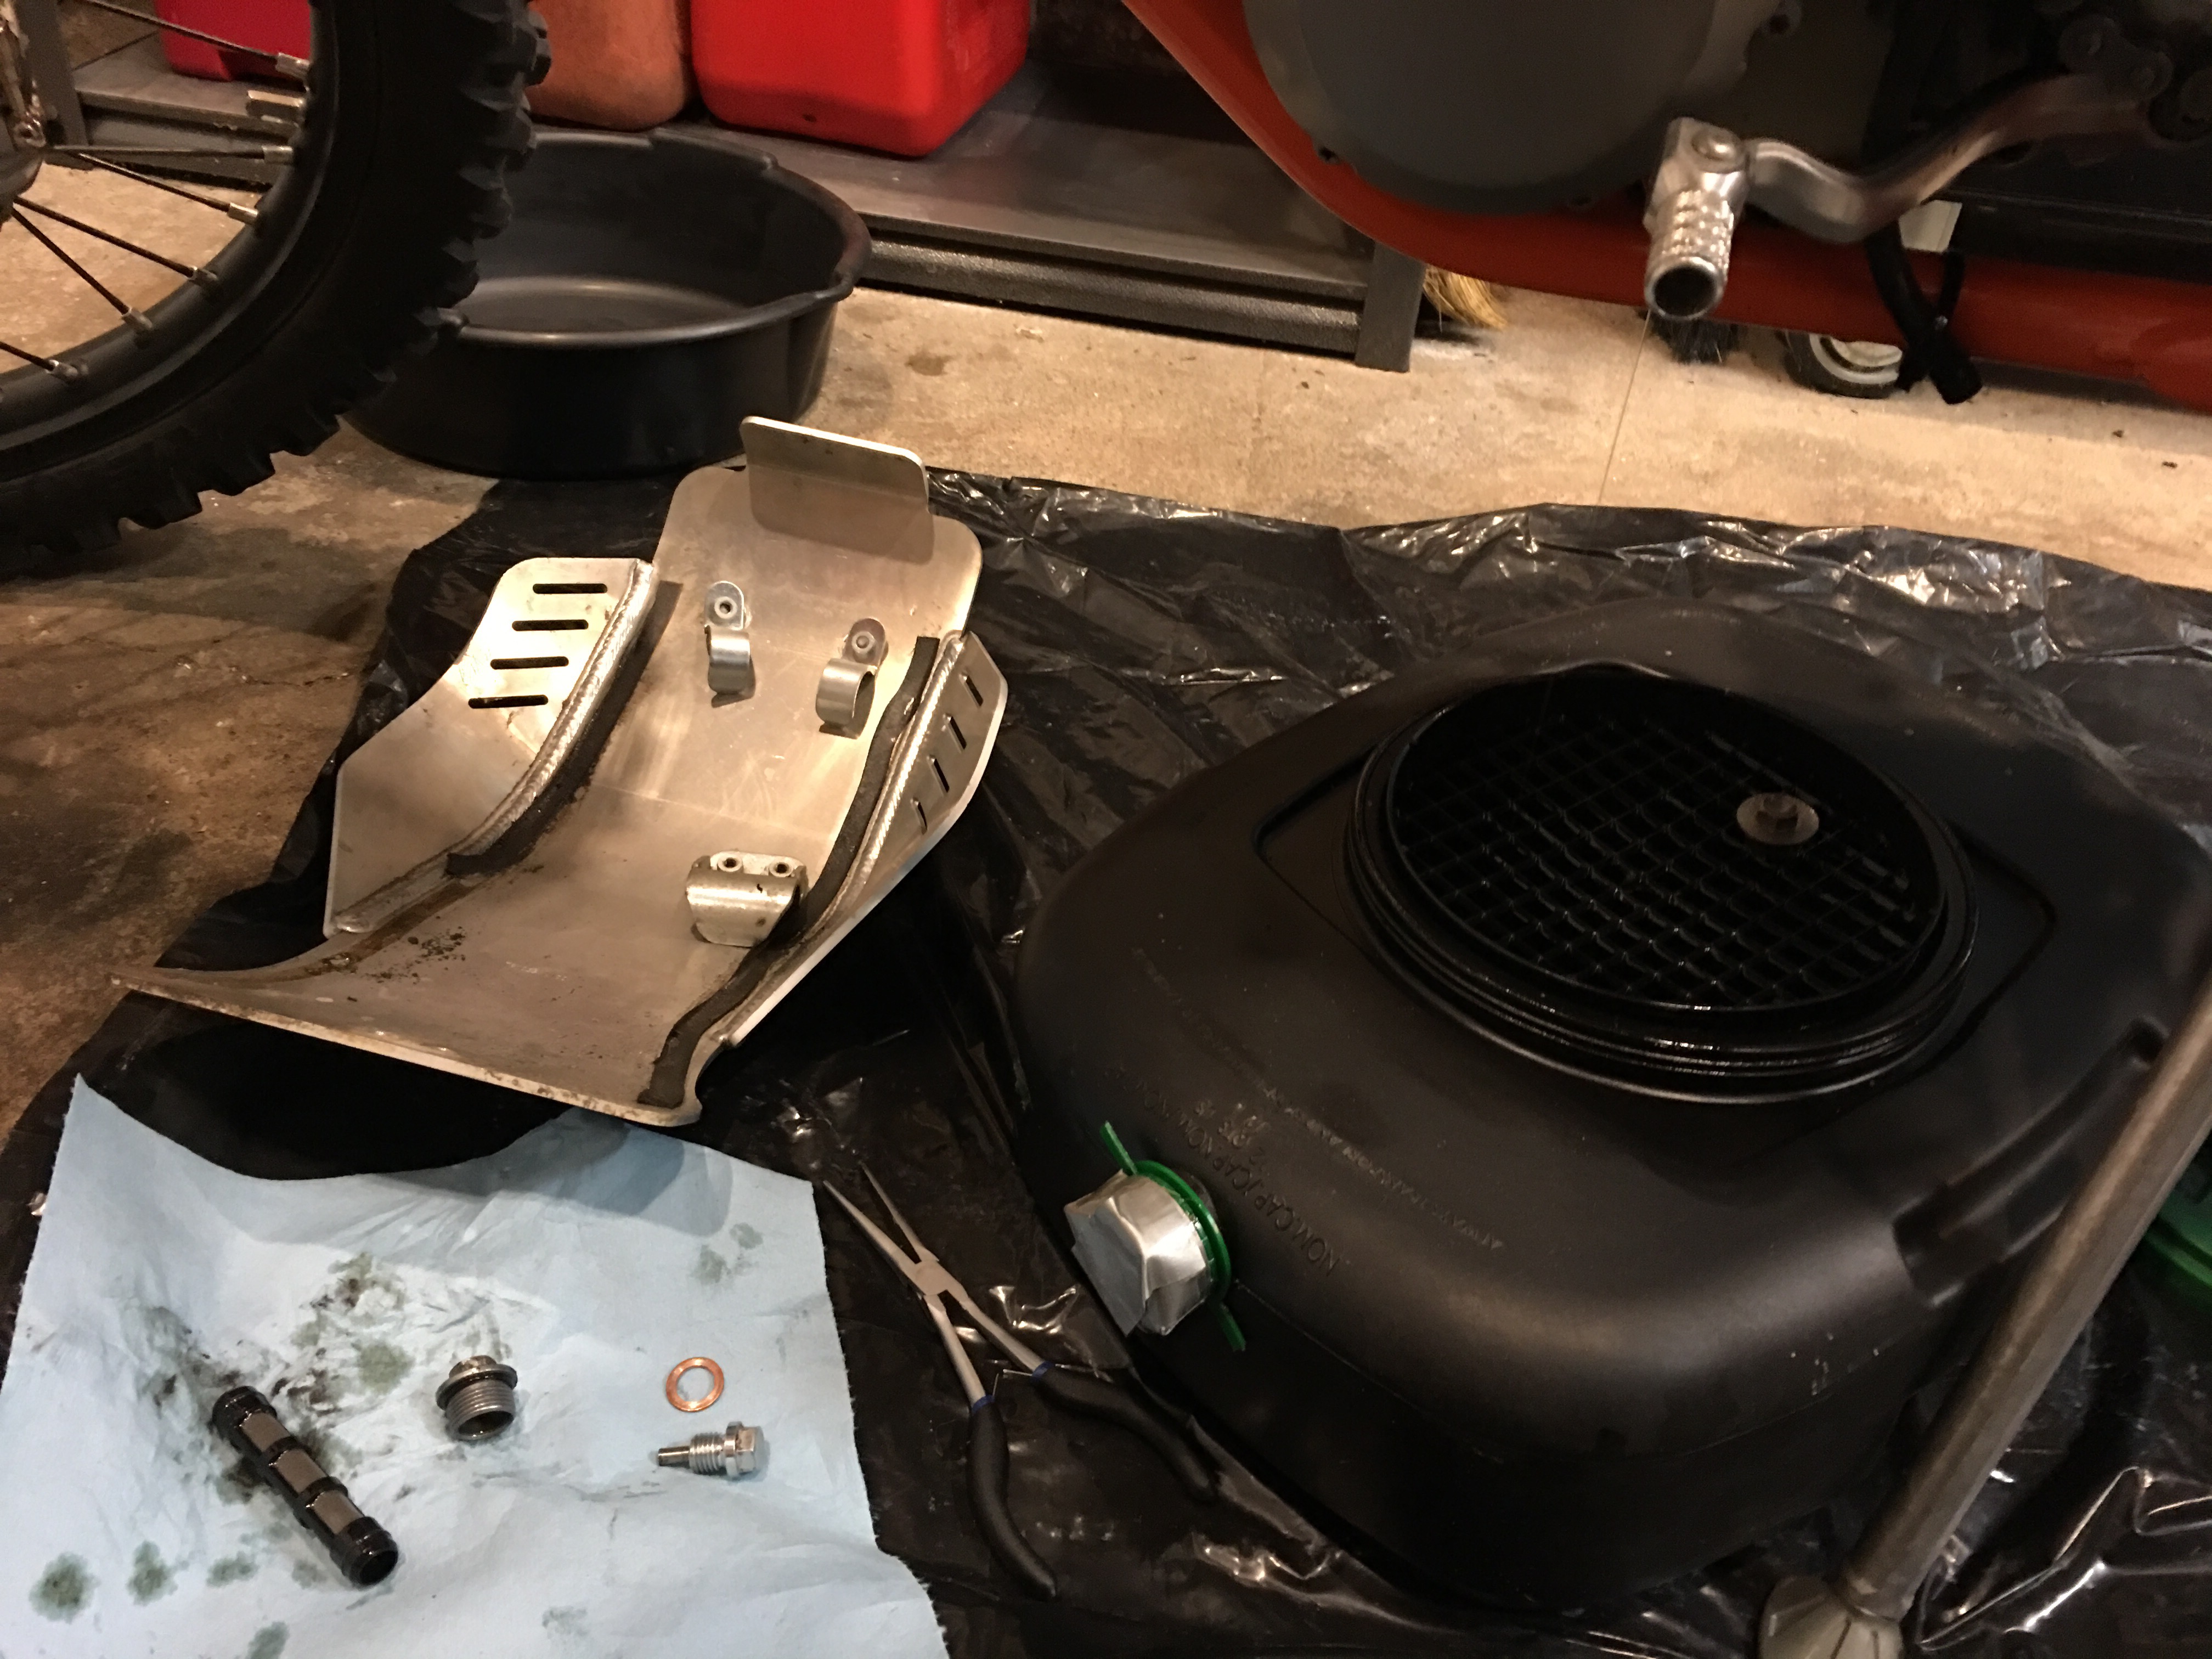
Oil Change: The last mechanical step to getting the bike into top shape was to change the oil. In this case, full synthetic Motul 7100 is the fluid of choice in the 15W50 variety. The oil change procedure is fairly simple on the EXC range (see our motorcycle oil change guide here) but does require the removal of the bash plate (for those who run one). Oil capacity is 1.5L so a 5L jug should be good for at least 3 oil changes. Oil filter options include KTM part #77038005044 or the K&N-655 (among others).
 How often you change the oil is a very controversial subject but under regular (spirited) use, we recommend going no more than 500kms of road riding and less when doing track days.
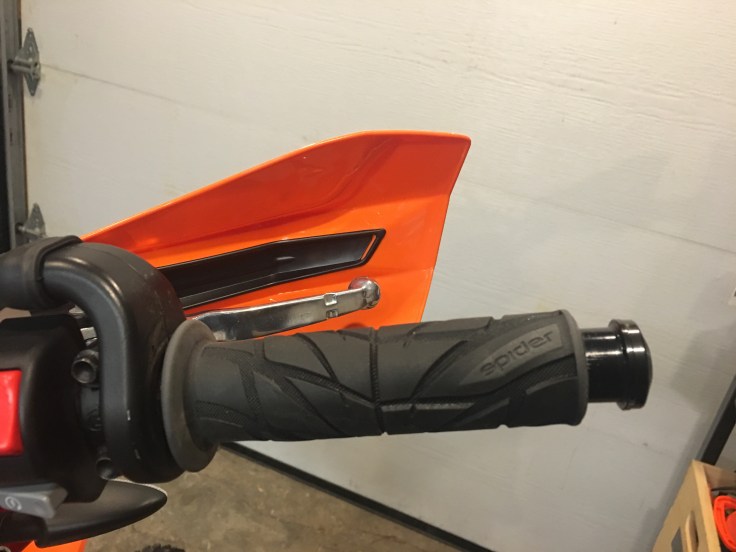
Grips: With the bike in top mechanical shape, we turned our attention to a few cosmetic areas we wanted to tweak, starting with the replacement of the stock grips with our favorite Spider Peak grips. A little compressed air gets the old grips off and the new ones on. If the grips we’re using don’t fit tightly enough, a little bit of hair spray on the inside of the new grip is enough of an adhesive to keep them from spinning in your hand (but won’t be a nightmare when the time comes to replace them).
Tail Cleanup: Not a complete tail tidy in this case, but more of a minimizing of the stock unit. A dremel with cutting wheel makes for a tidier tail while still retaining the dirt-fling-avoidance properties of the OEM piece.
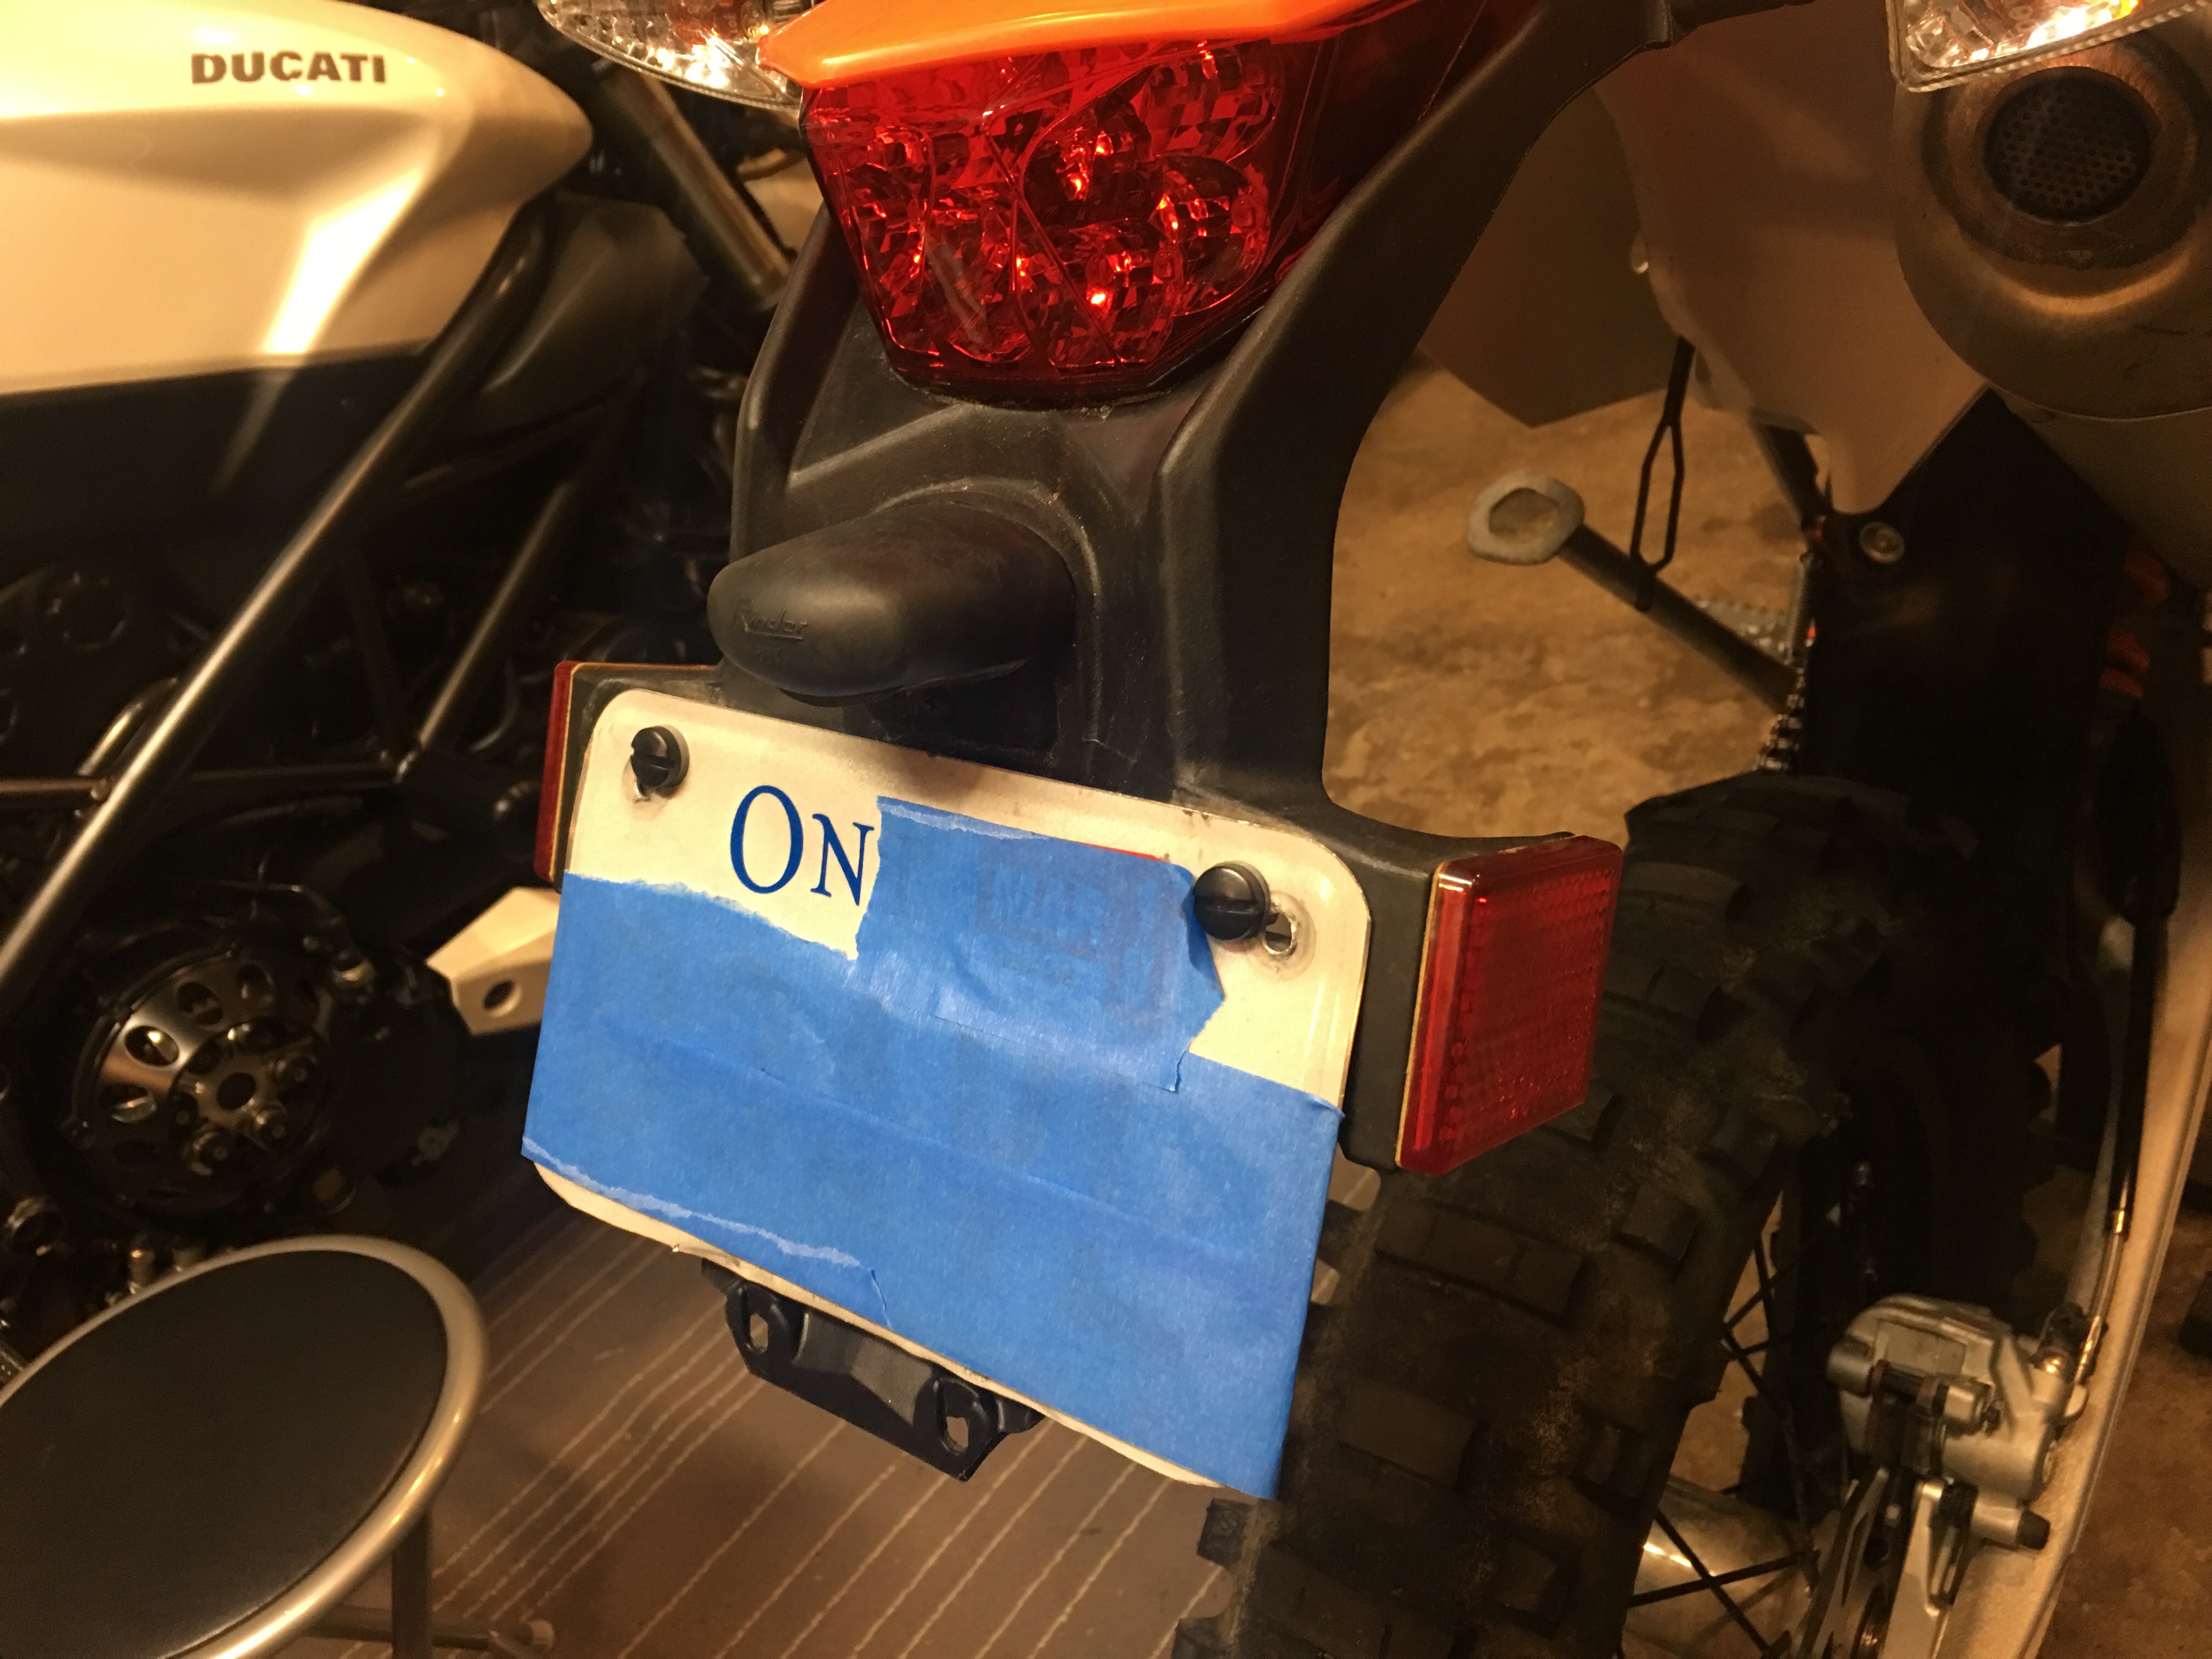 Before (notice reflectors on sides and extra plastic at bottom)
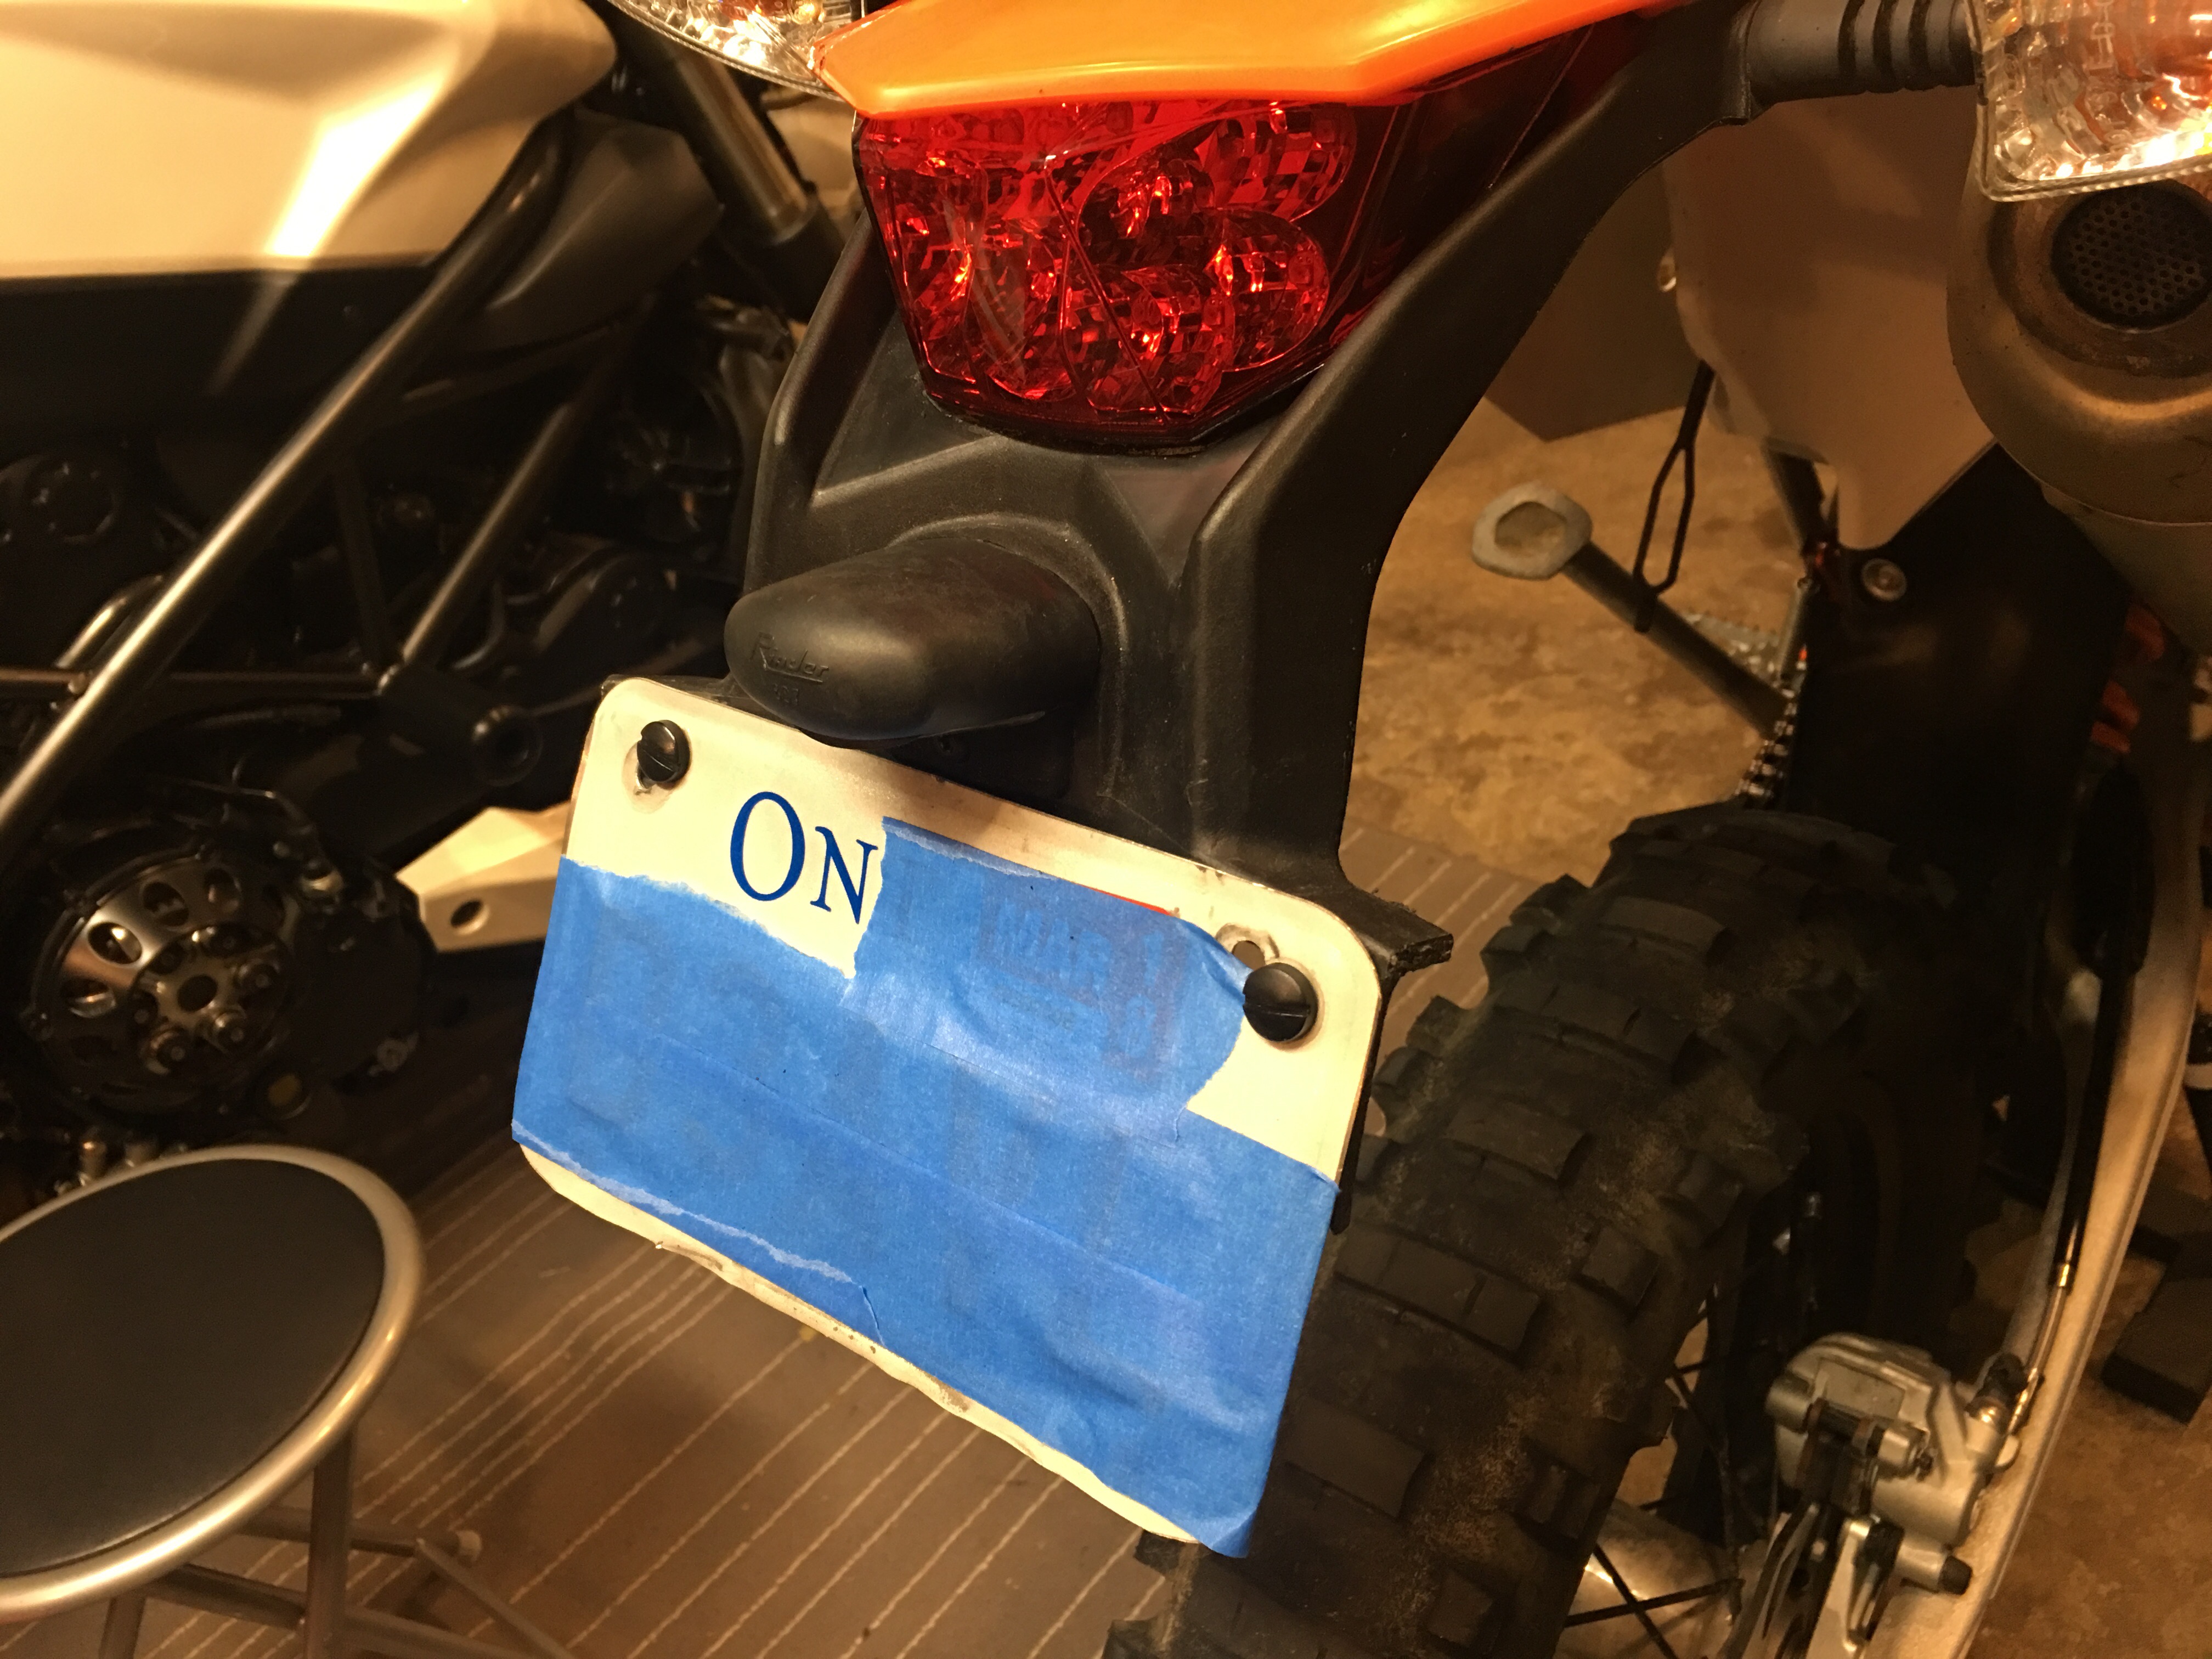 After.
Mirrors & Hand Guards: The project bike we purchased already had this $20 Acerbis folding mirror as a replacement for the large, square OEM units. The problem was that it vibrated and folded at speed, so although it kept the bike legal, it didn’t really provide any useful view of traffic behind us.
 The Acerbis 7/8 folding mirror is great if you just want to be legal but not great if you want to see anything behind you.
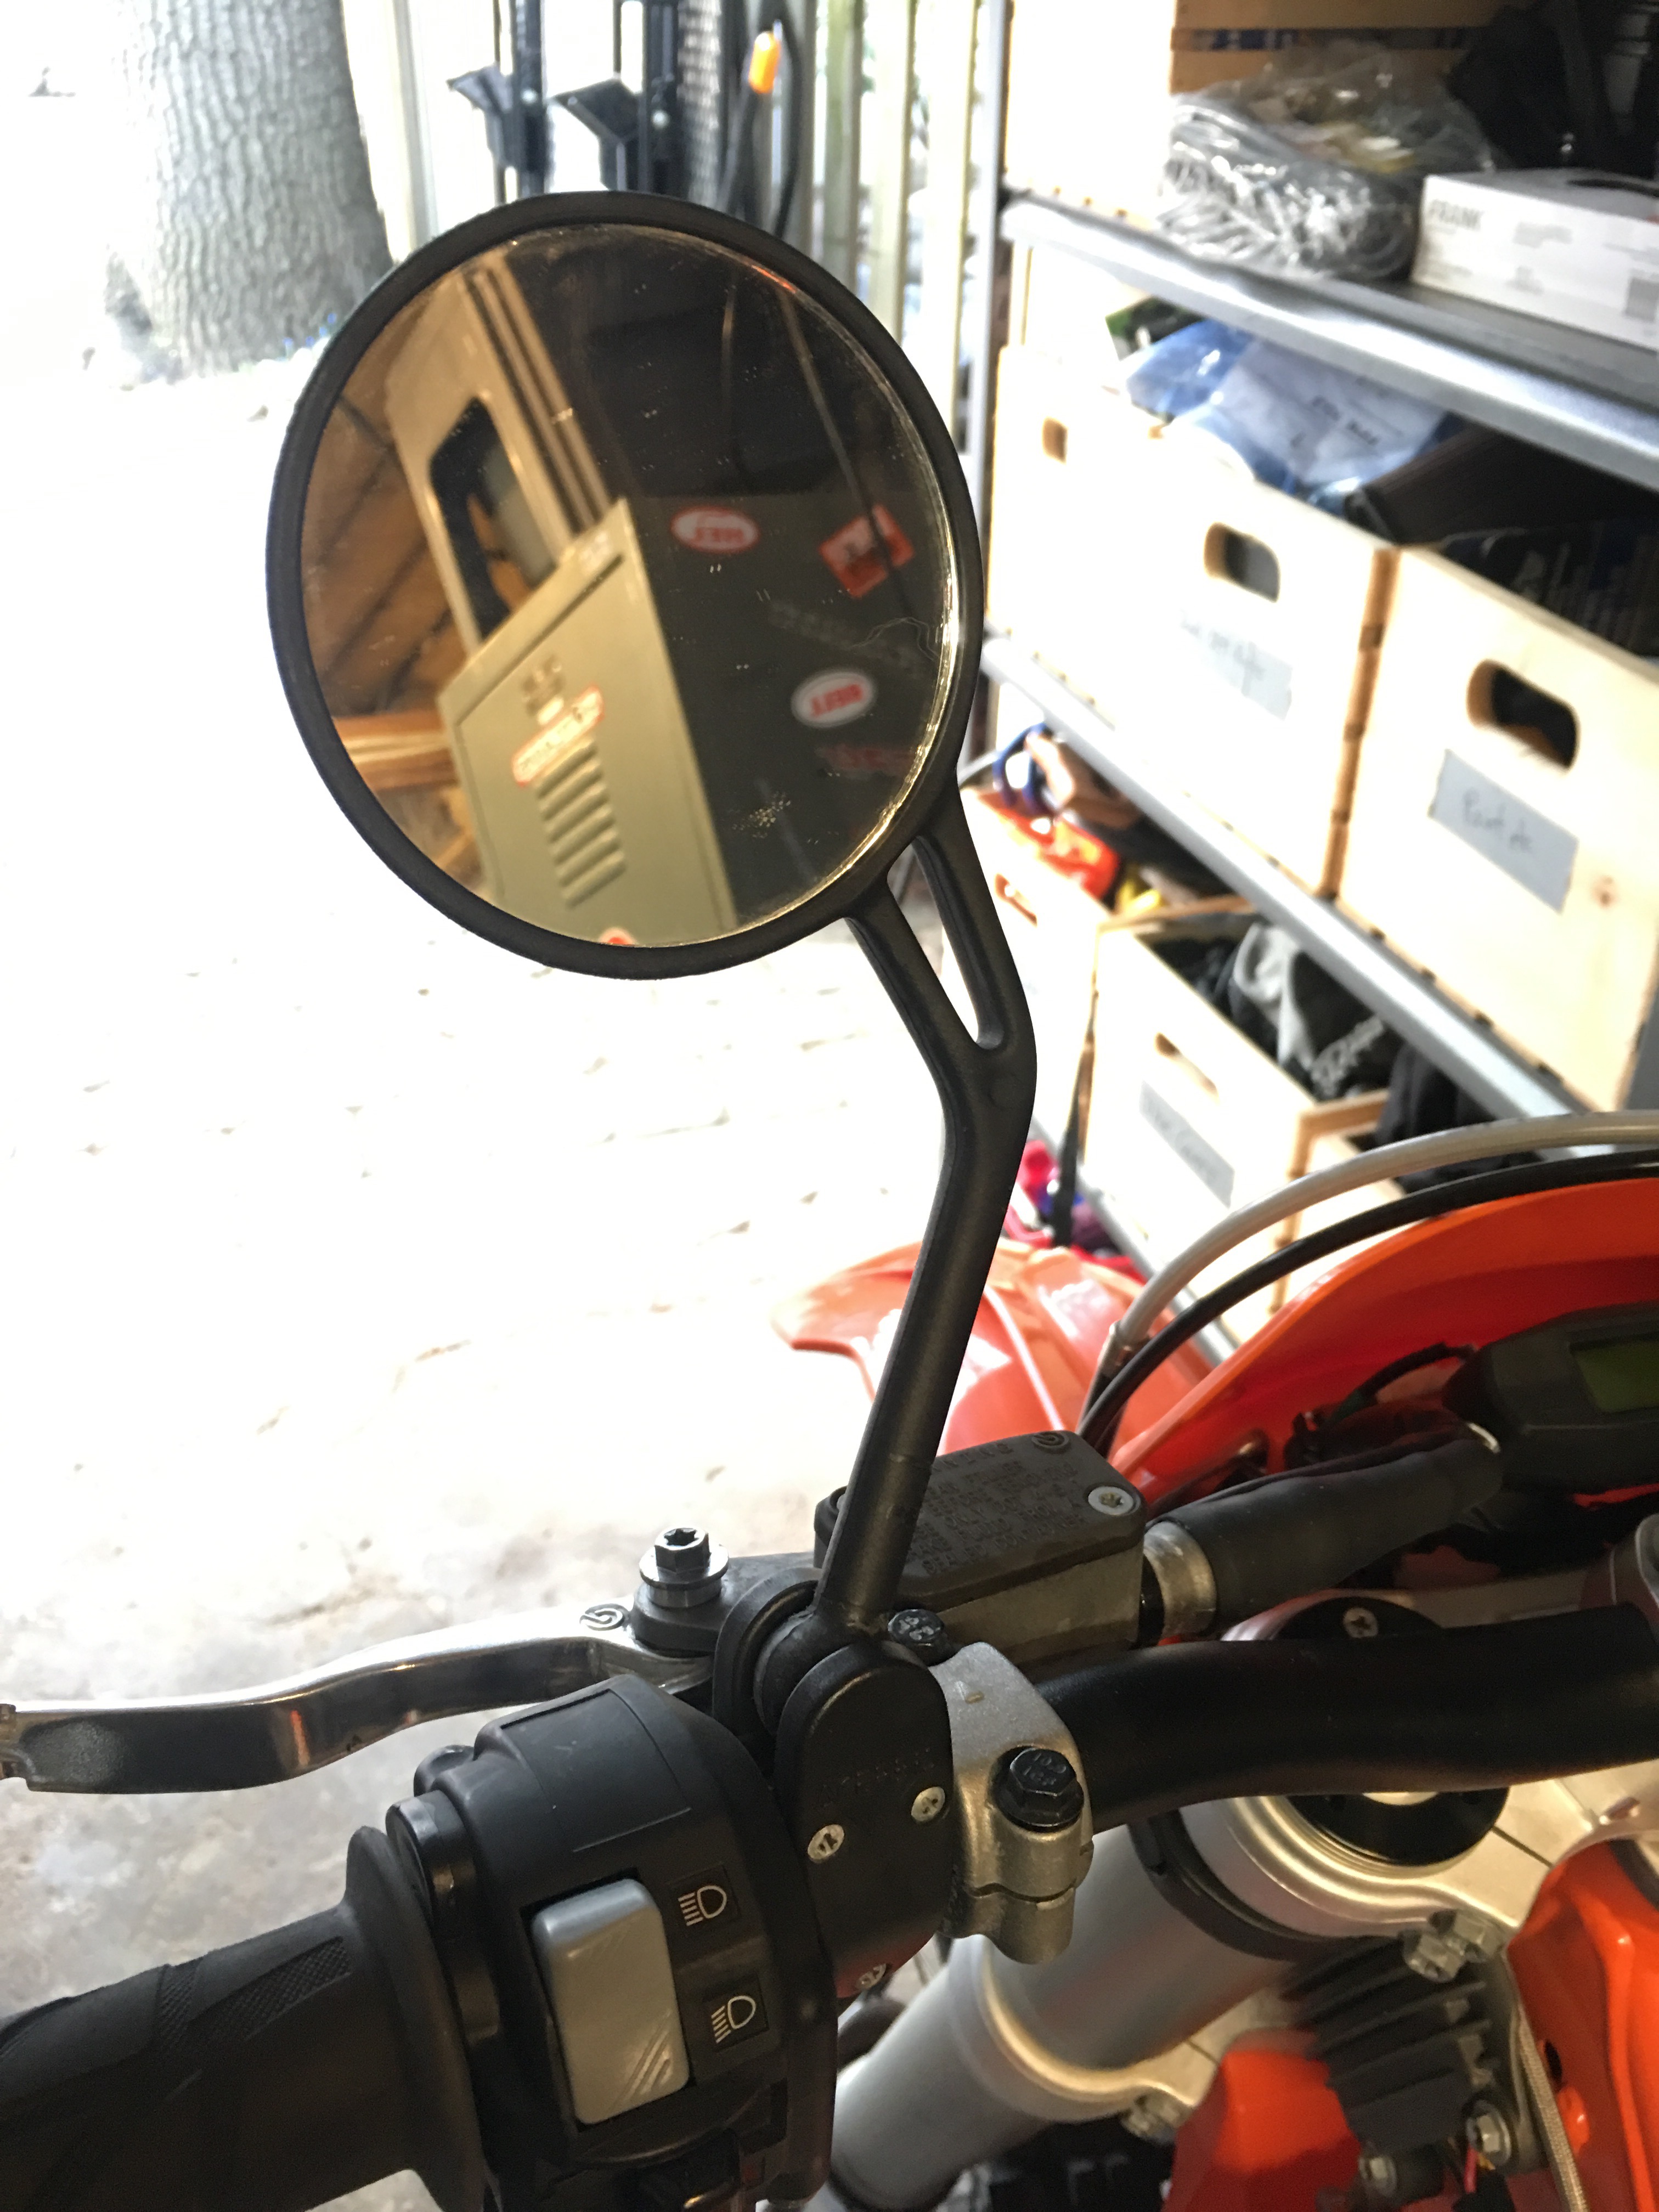
We’ve run this combo before on our project Yamaha WR250X with great results: A set of Zeta 7/8 hand guards, along with a set of inexpensive Powermadd convex mirrors.
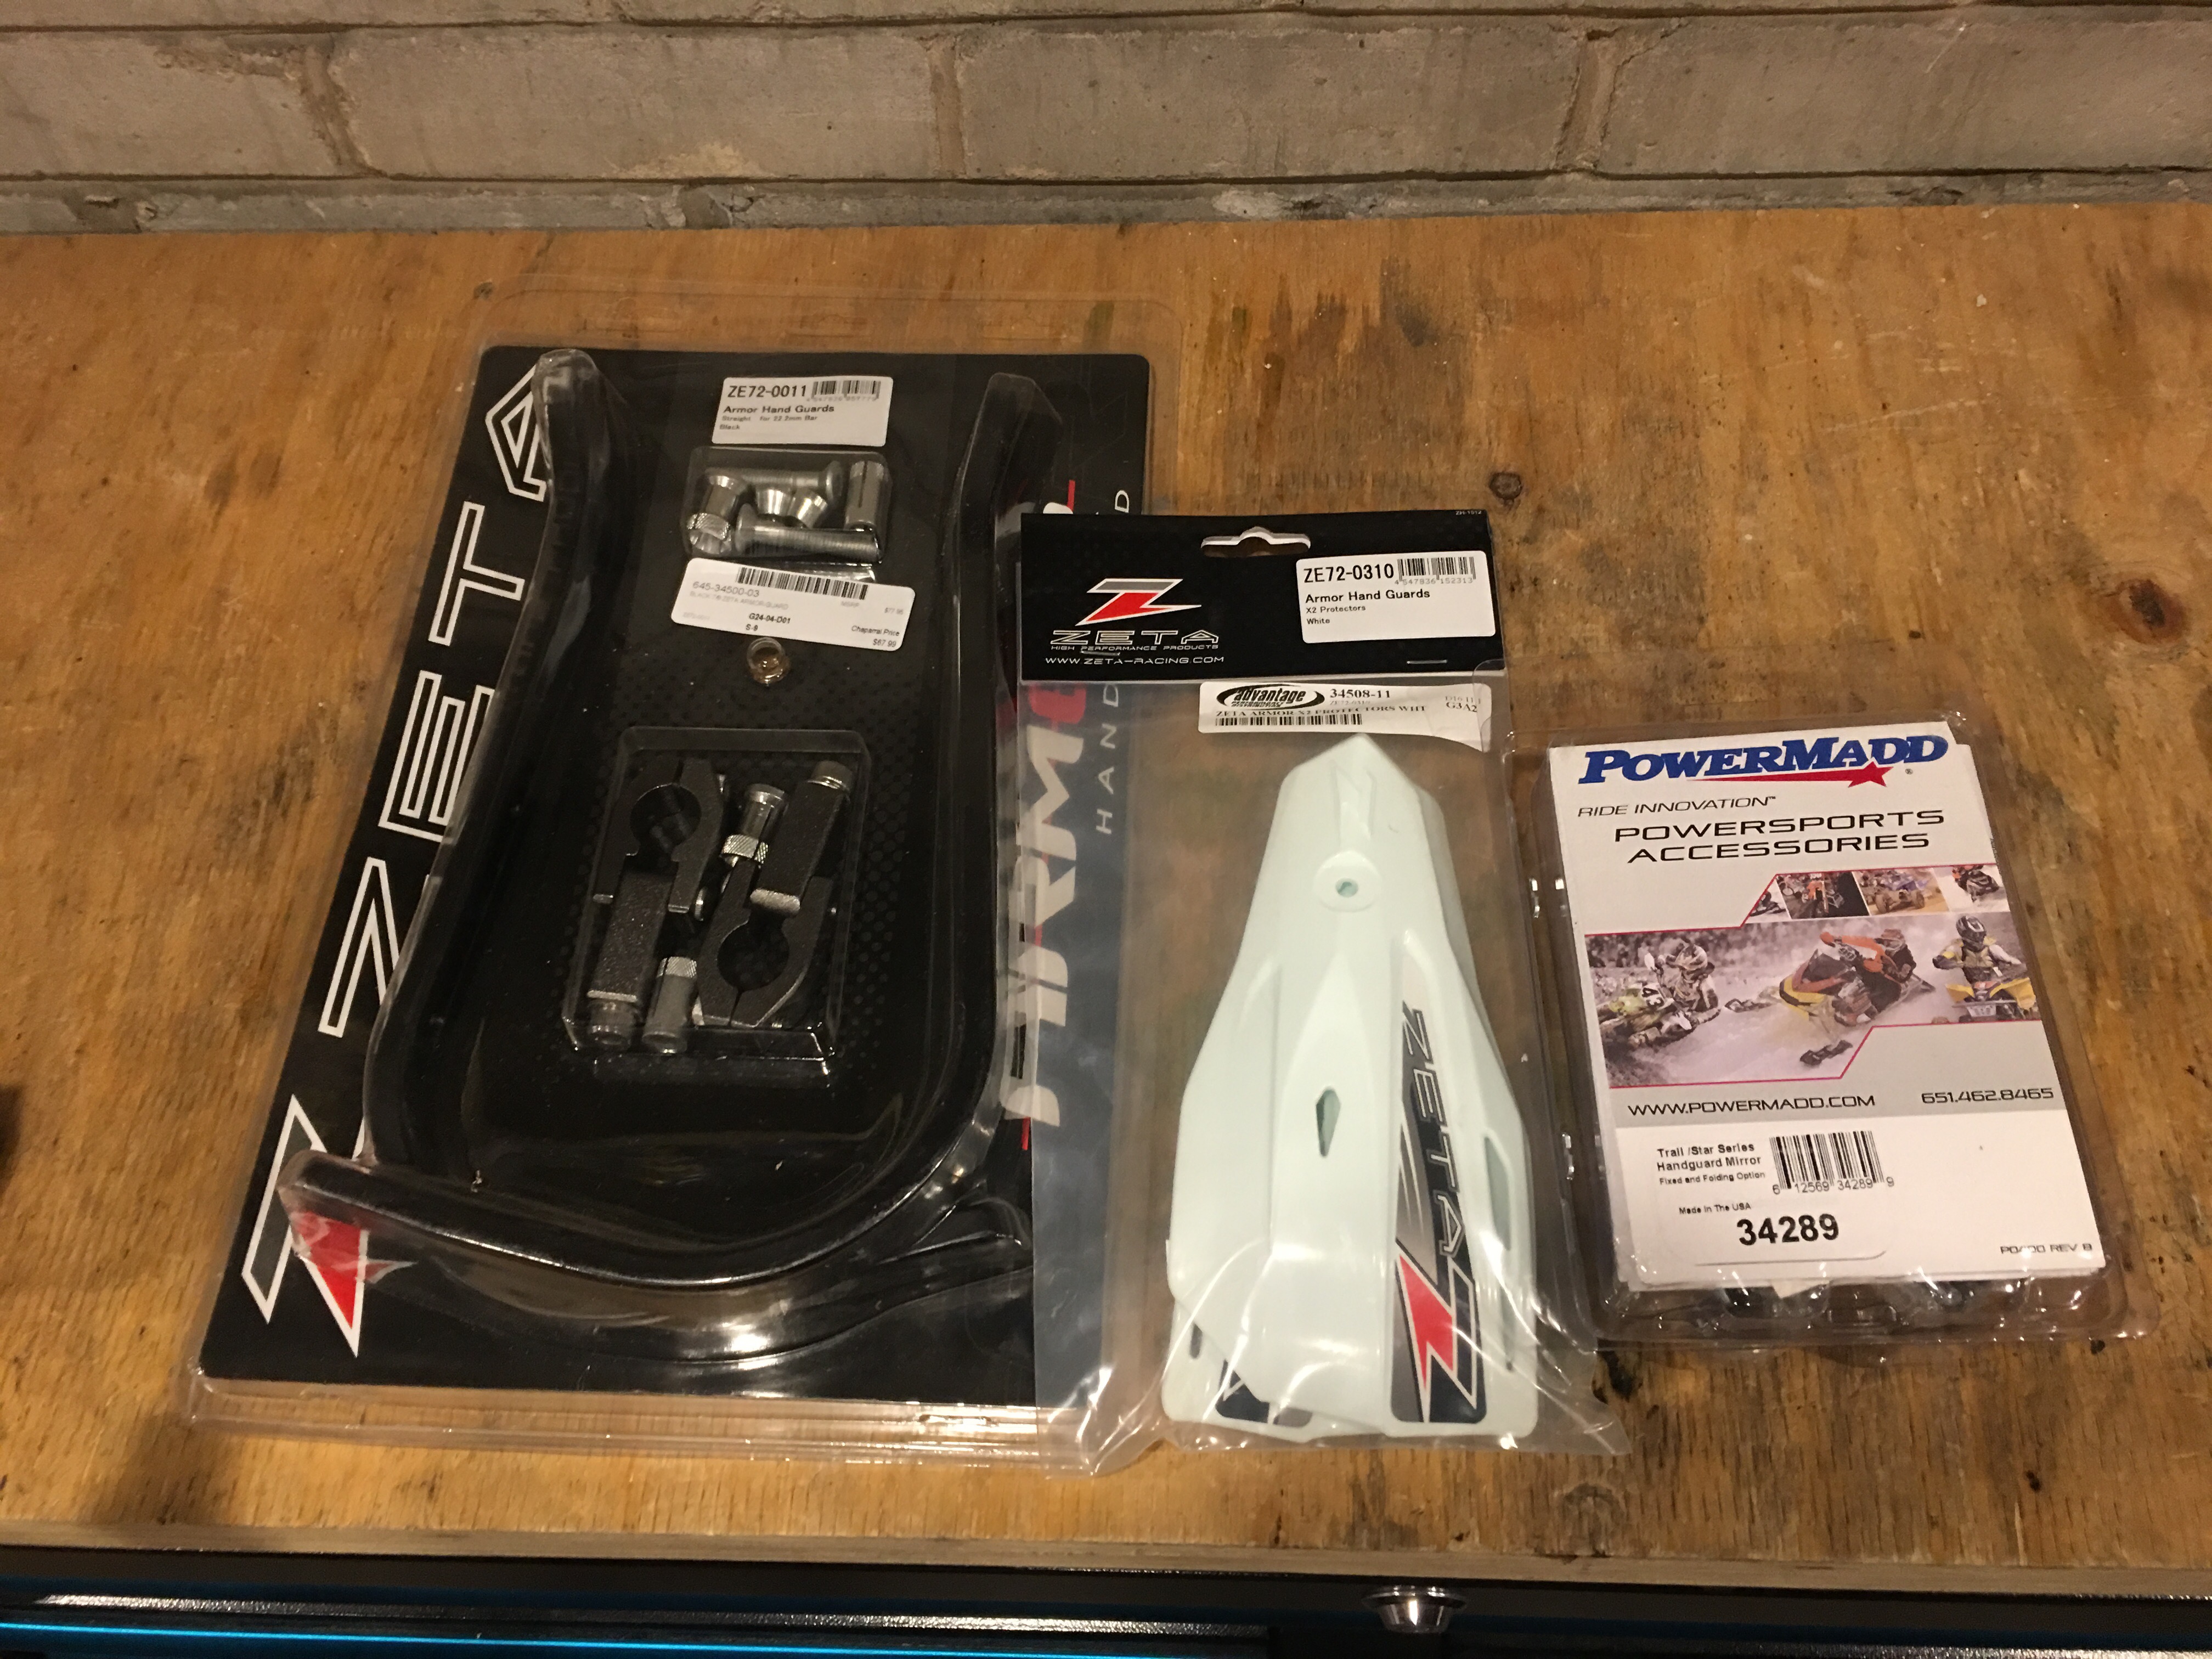
Although not explicitly designed for this application (they are actually used on ATVs and snowmobiles), the mirrors can easily be mounted, using the bolt location on the inside of the hand guard and providing a decent view of the rear. The round, convex mirror can be rotated to achieve the desired view while still maintaining a clean sight line across the handle bars.
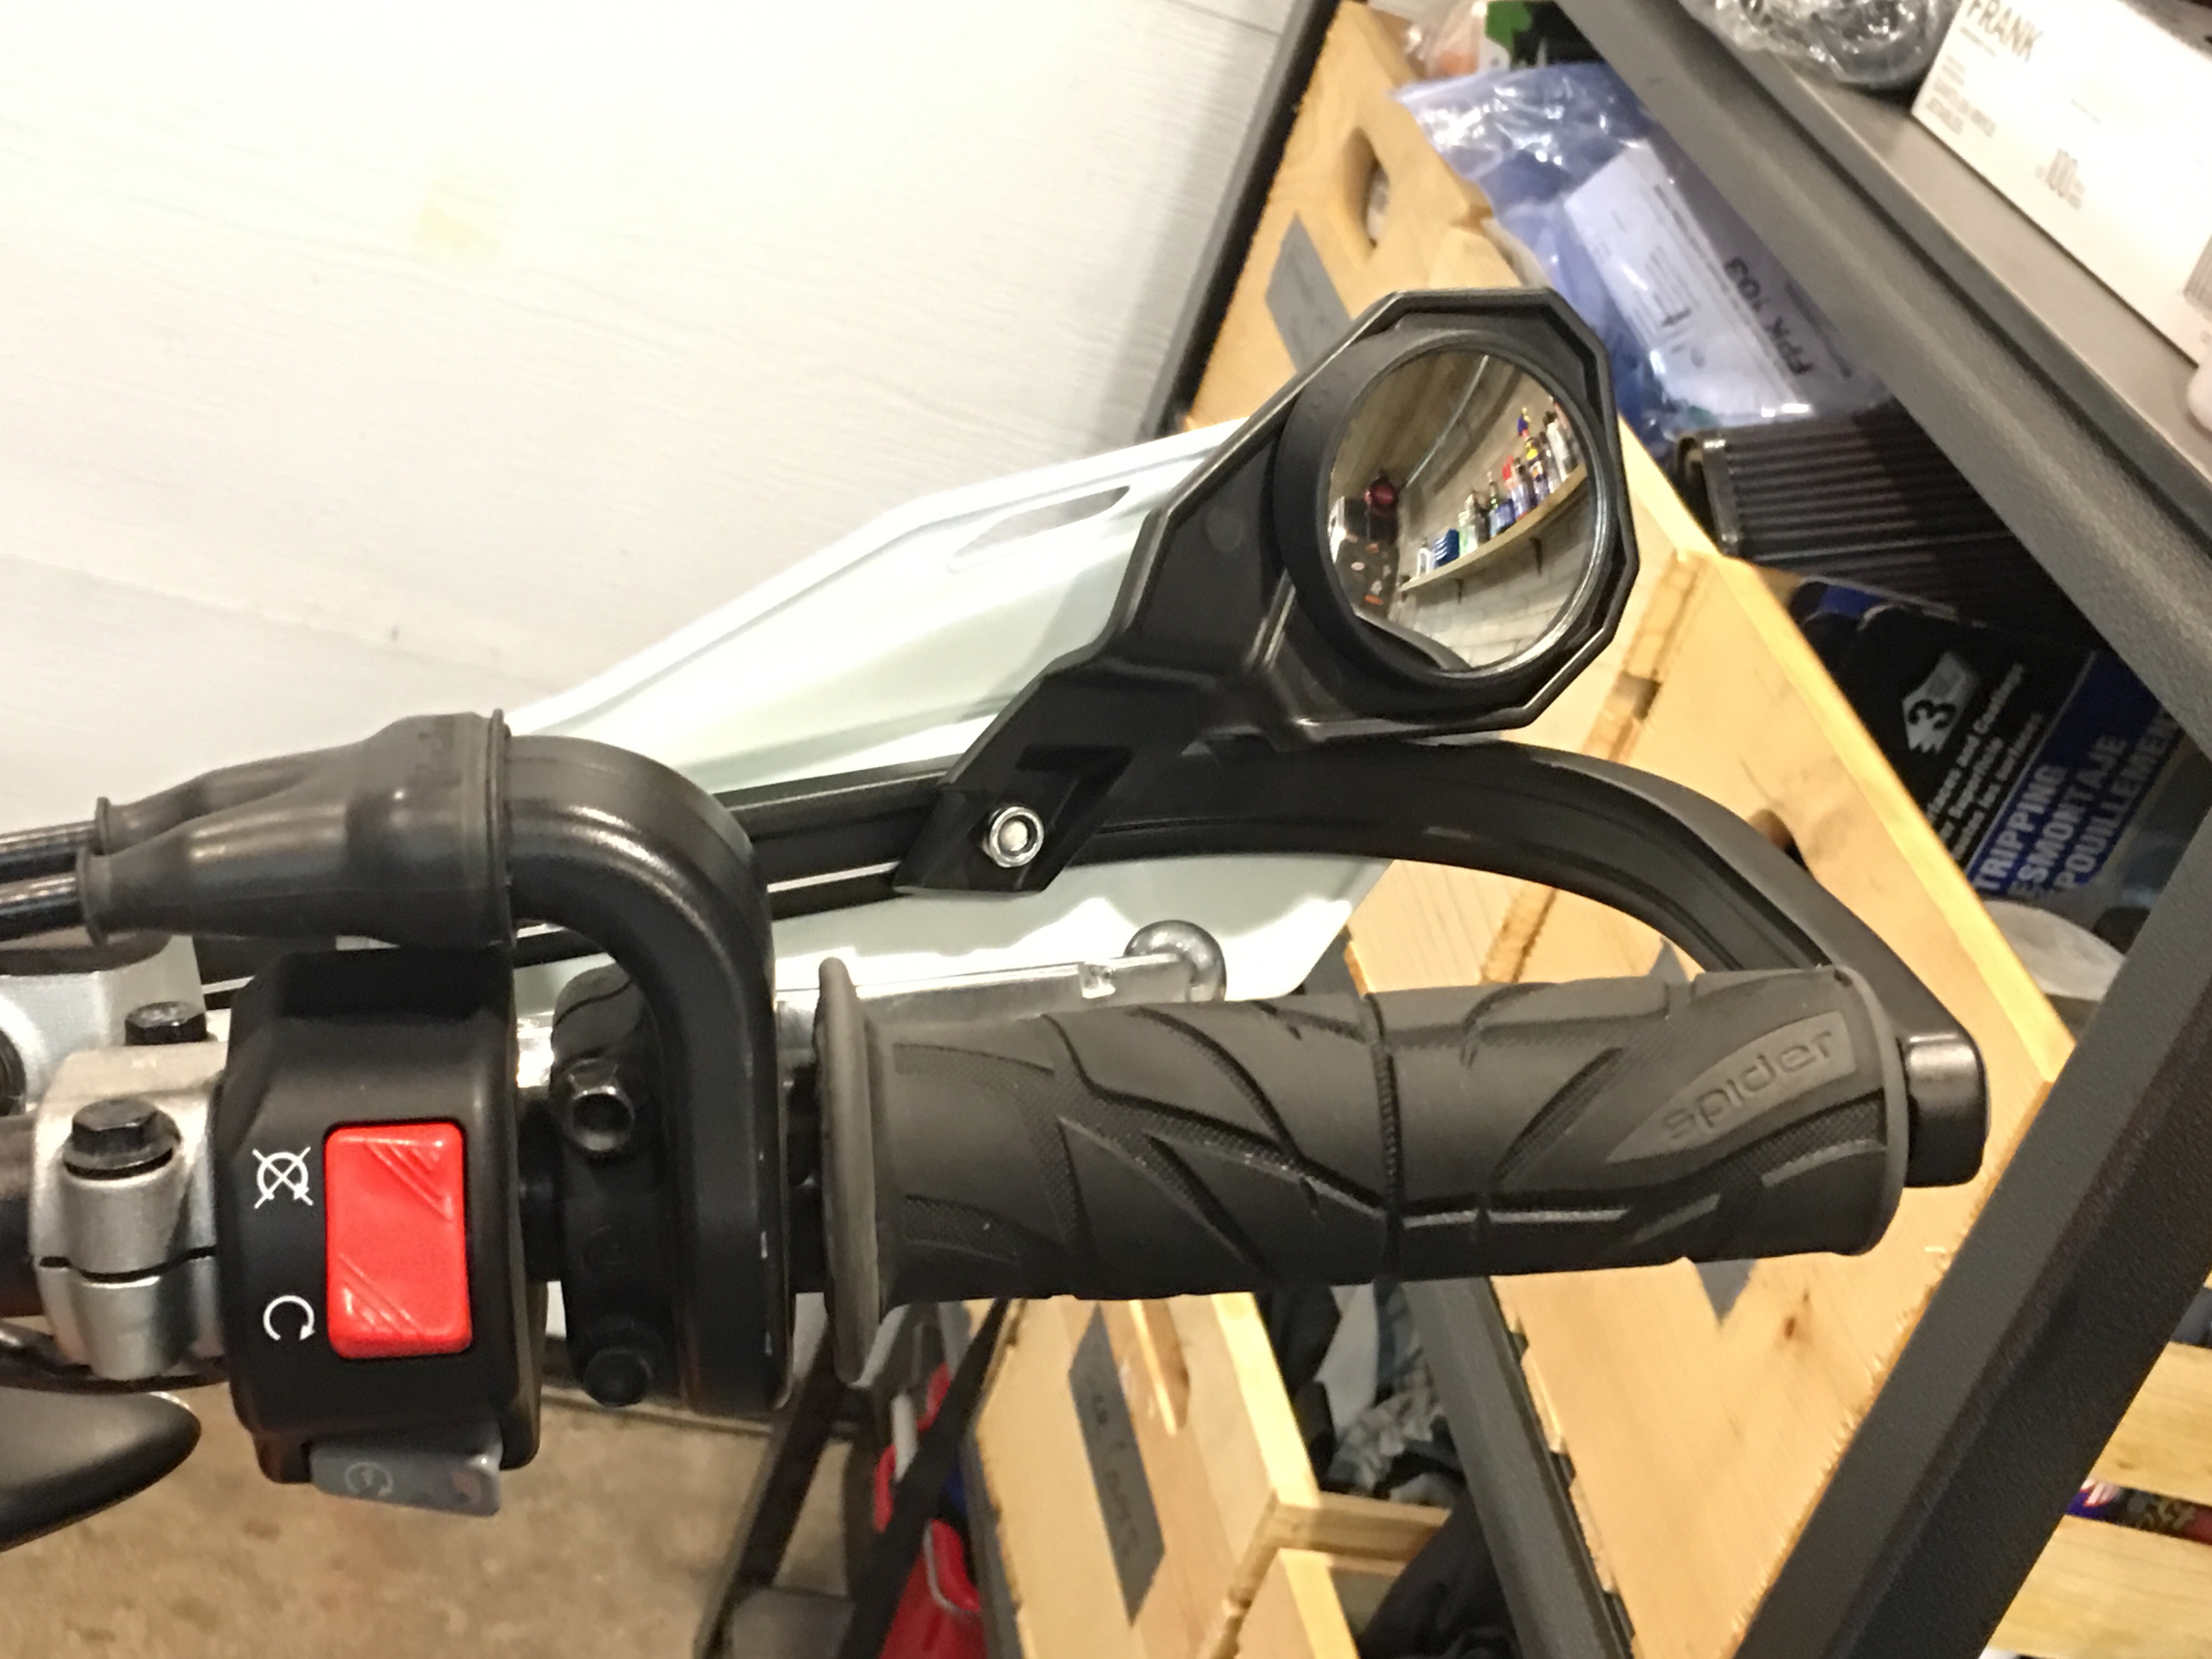 A clean looking, yet functional rear view mirror solution, for those who want to be both 1) legal and also 2) see what’s behind them.
Corrosion Removal: Since this is a street-going, we wanted to really clean look and the header pipe was already showing signs of rust from some dirt riding and road grime build-up.
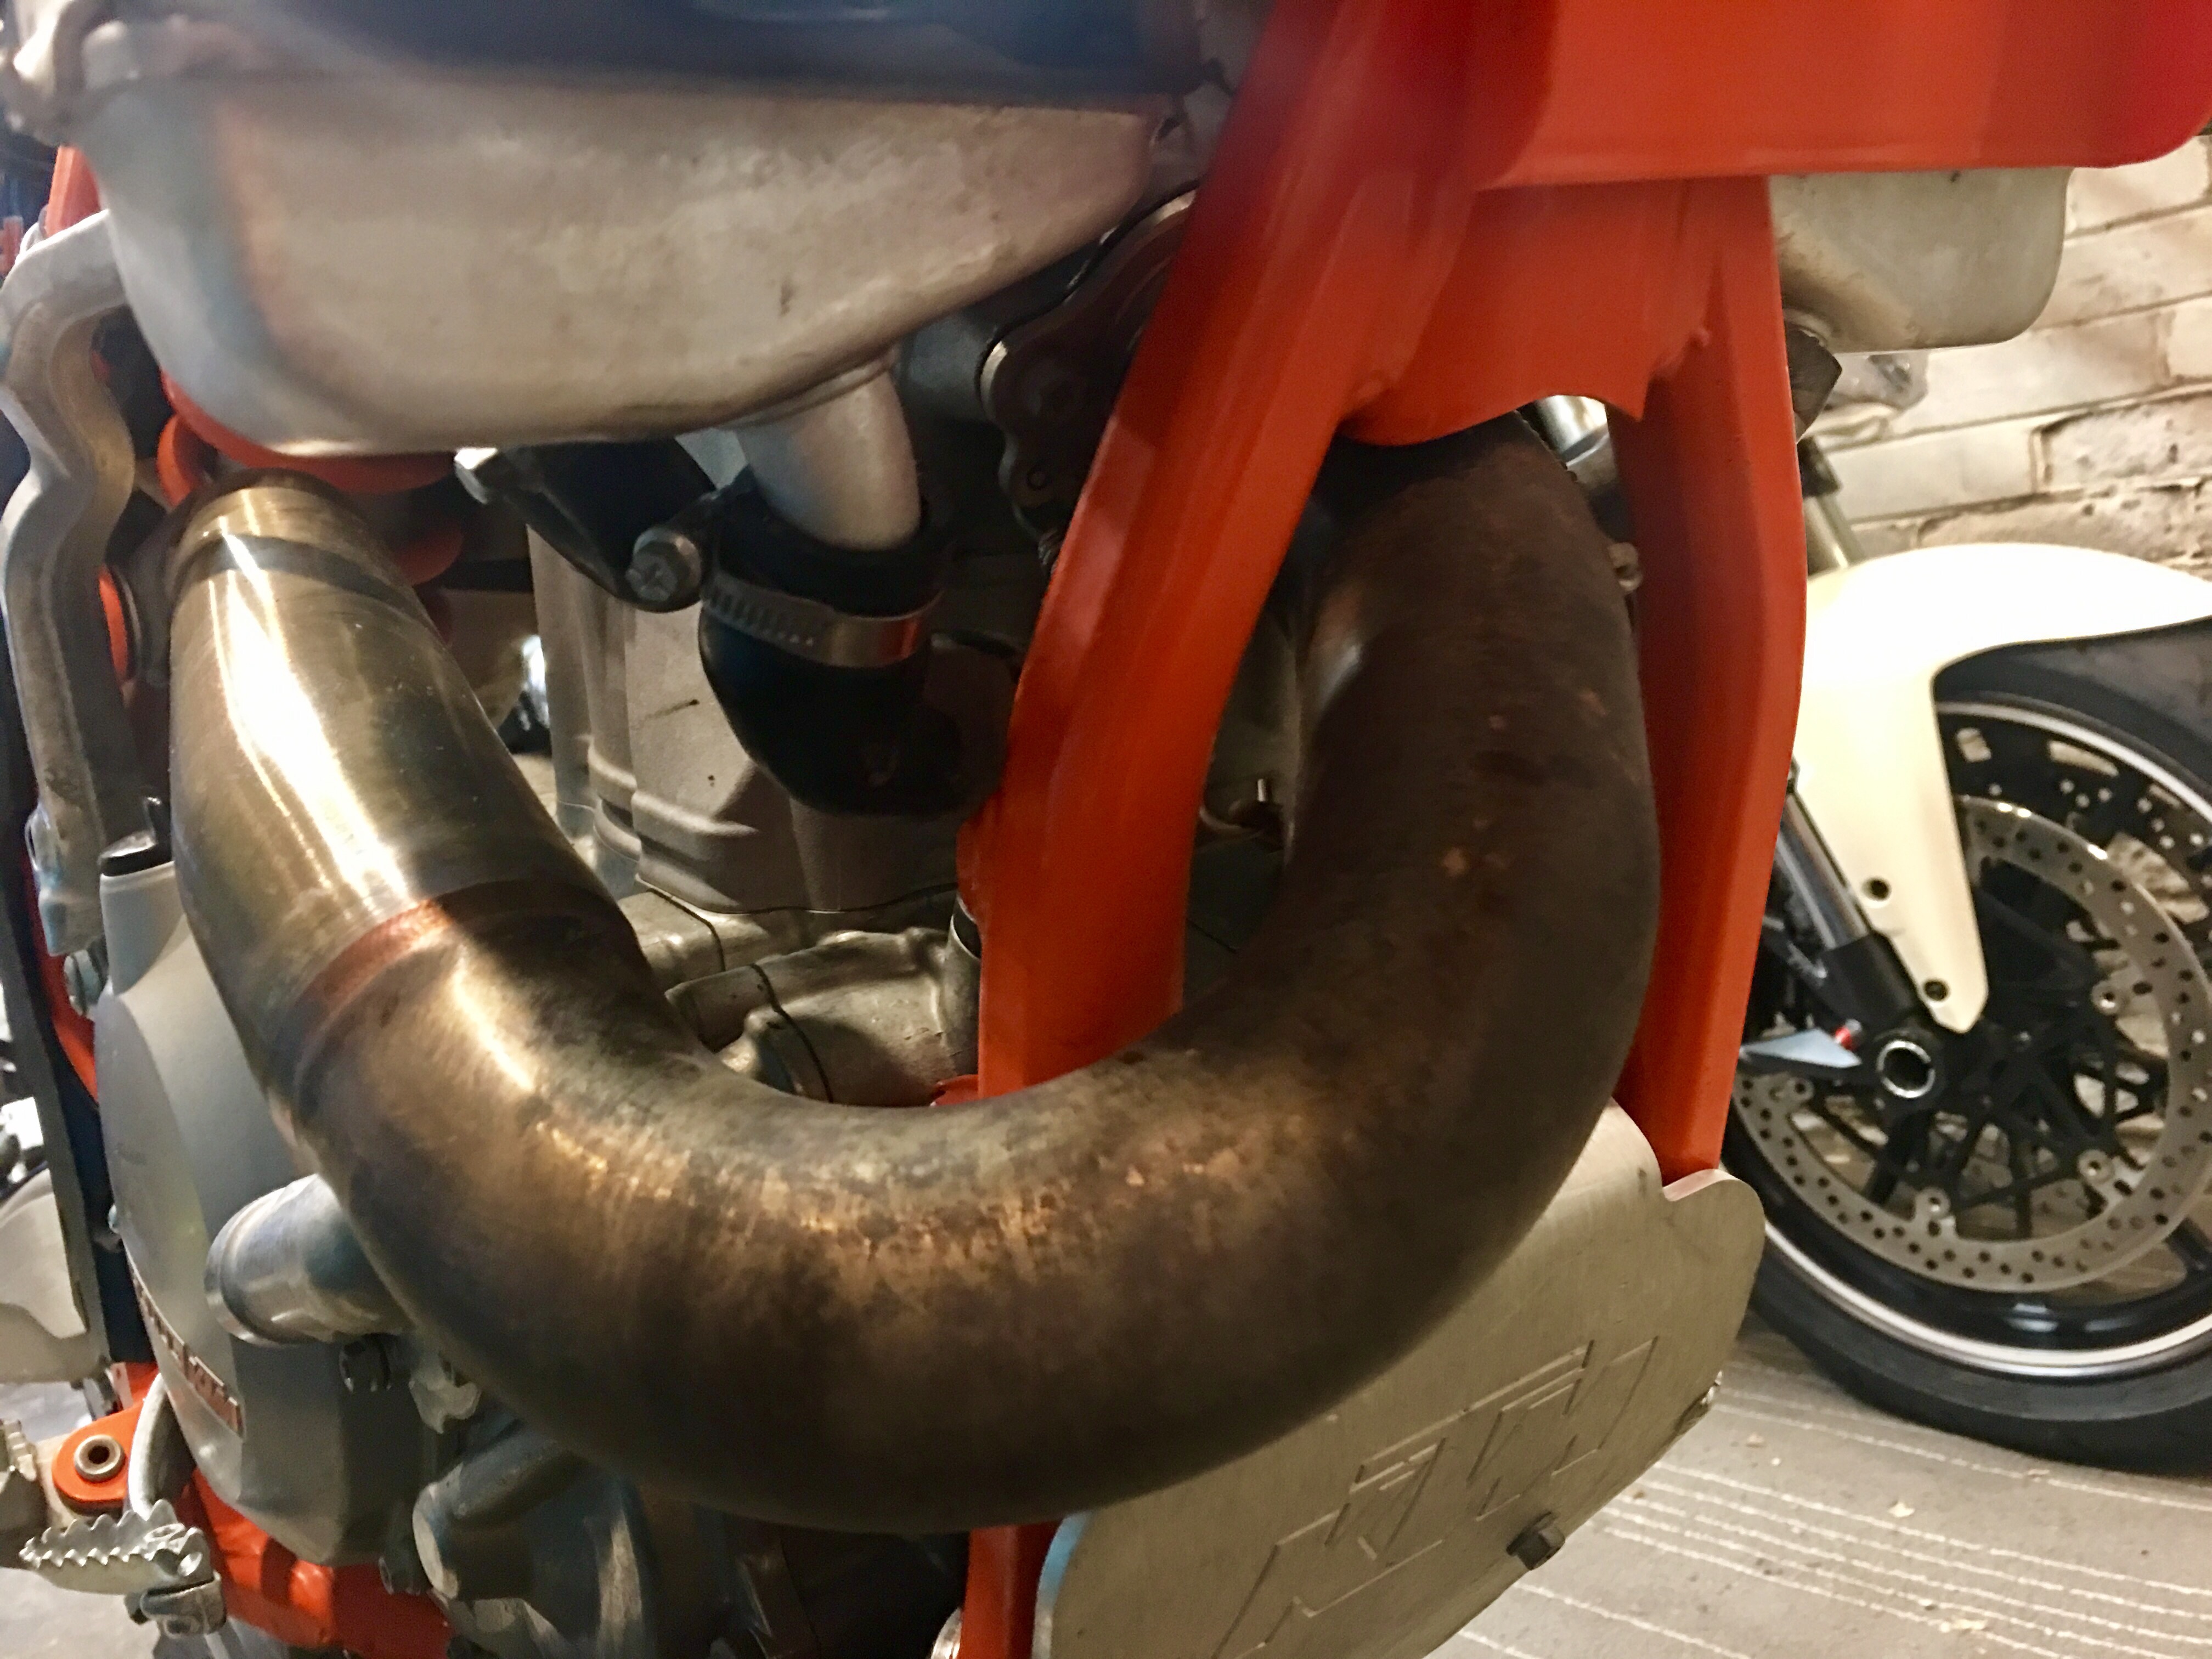
A little elbow grease combined with California Purple Polish was enough to get the header pipe back to its original shine.
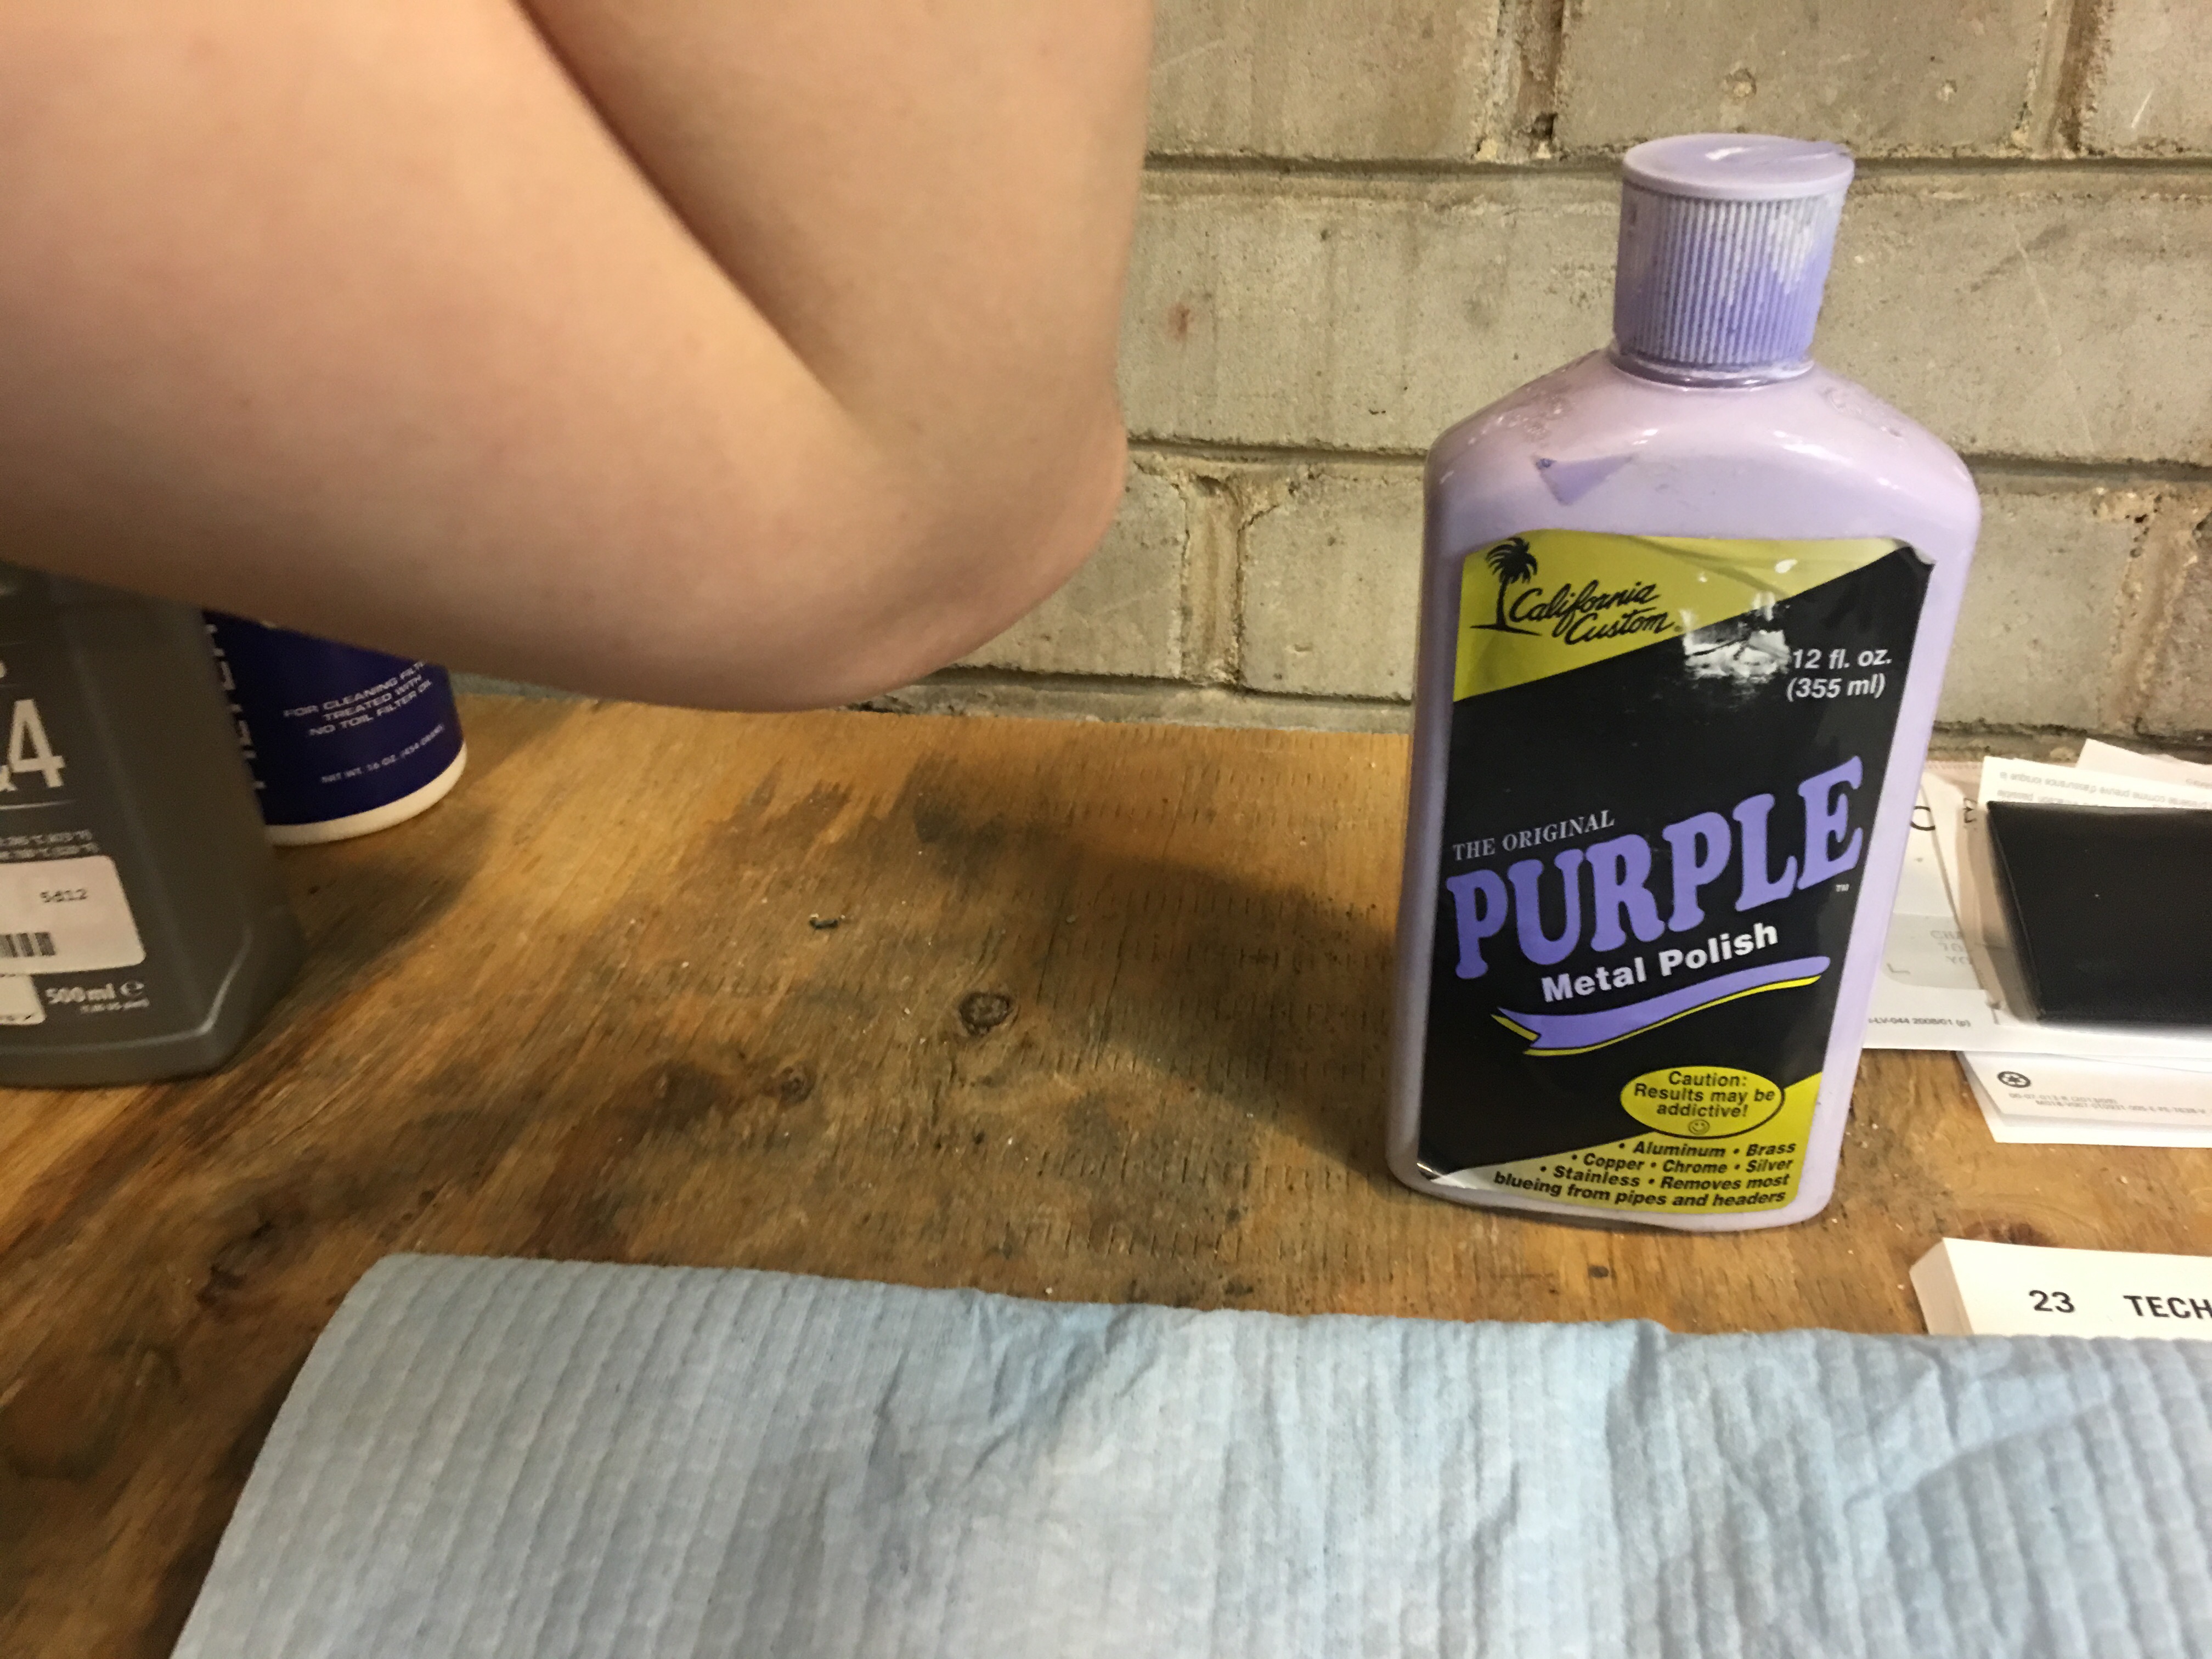 Although any metal polish can be used, we’ve done our fair share of experimentation and are big believes in the Purple.
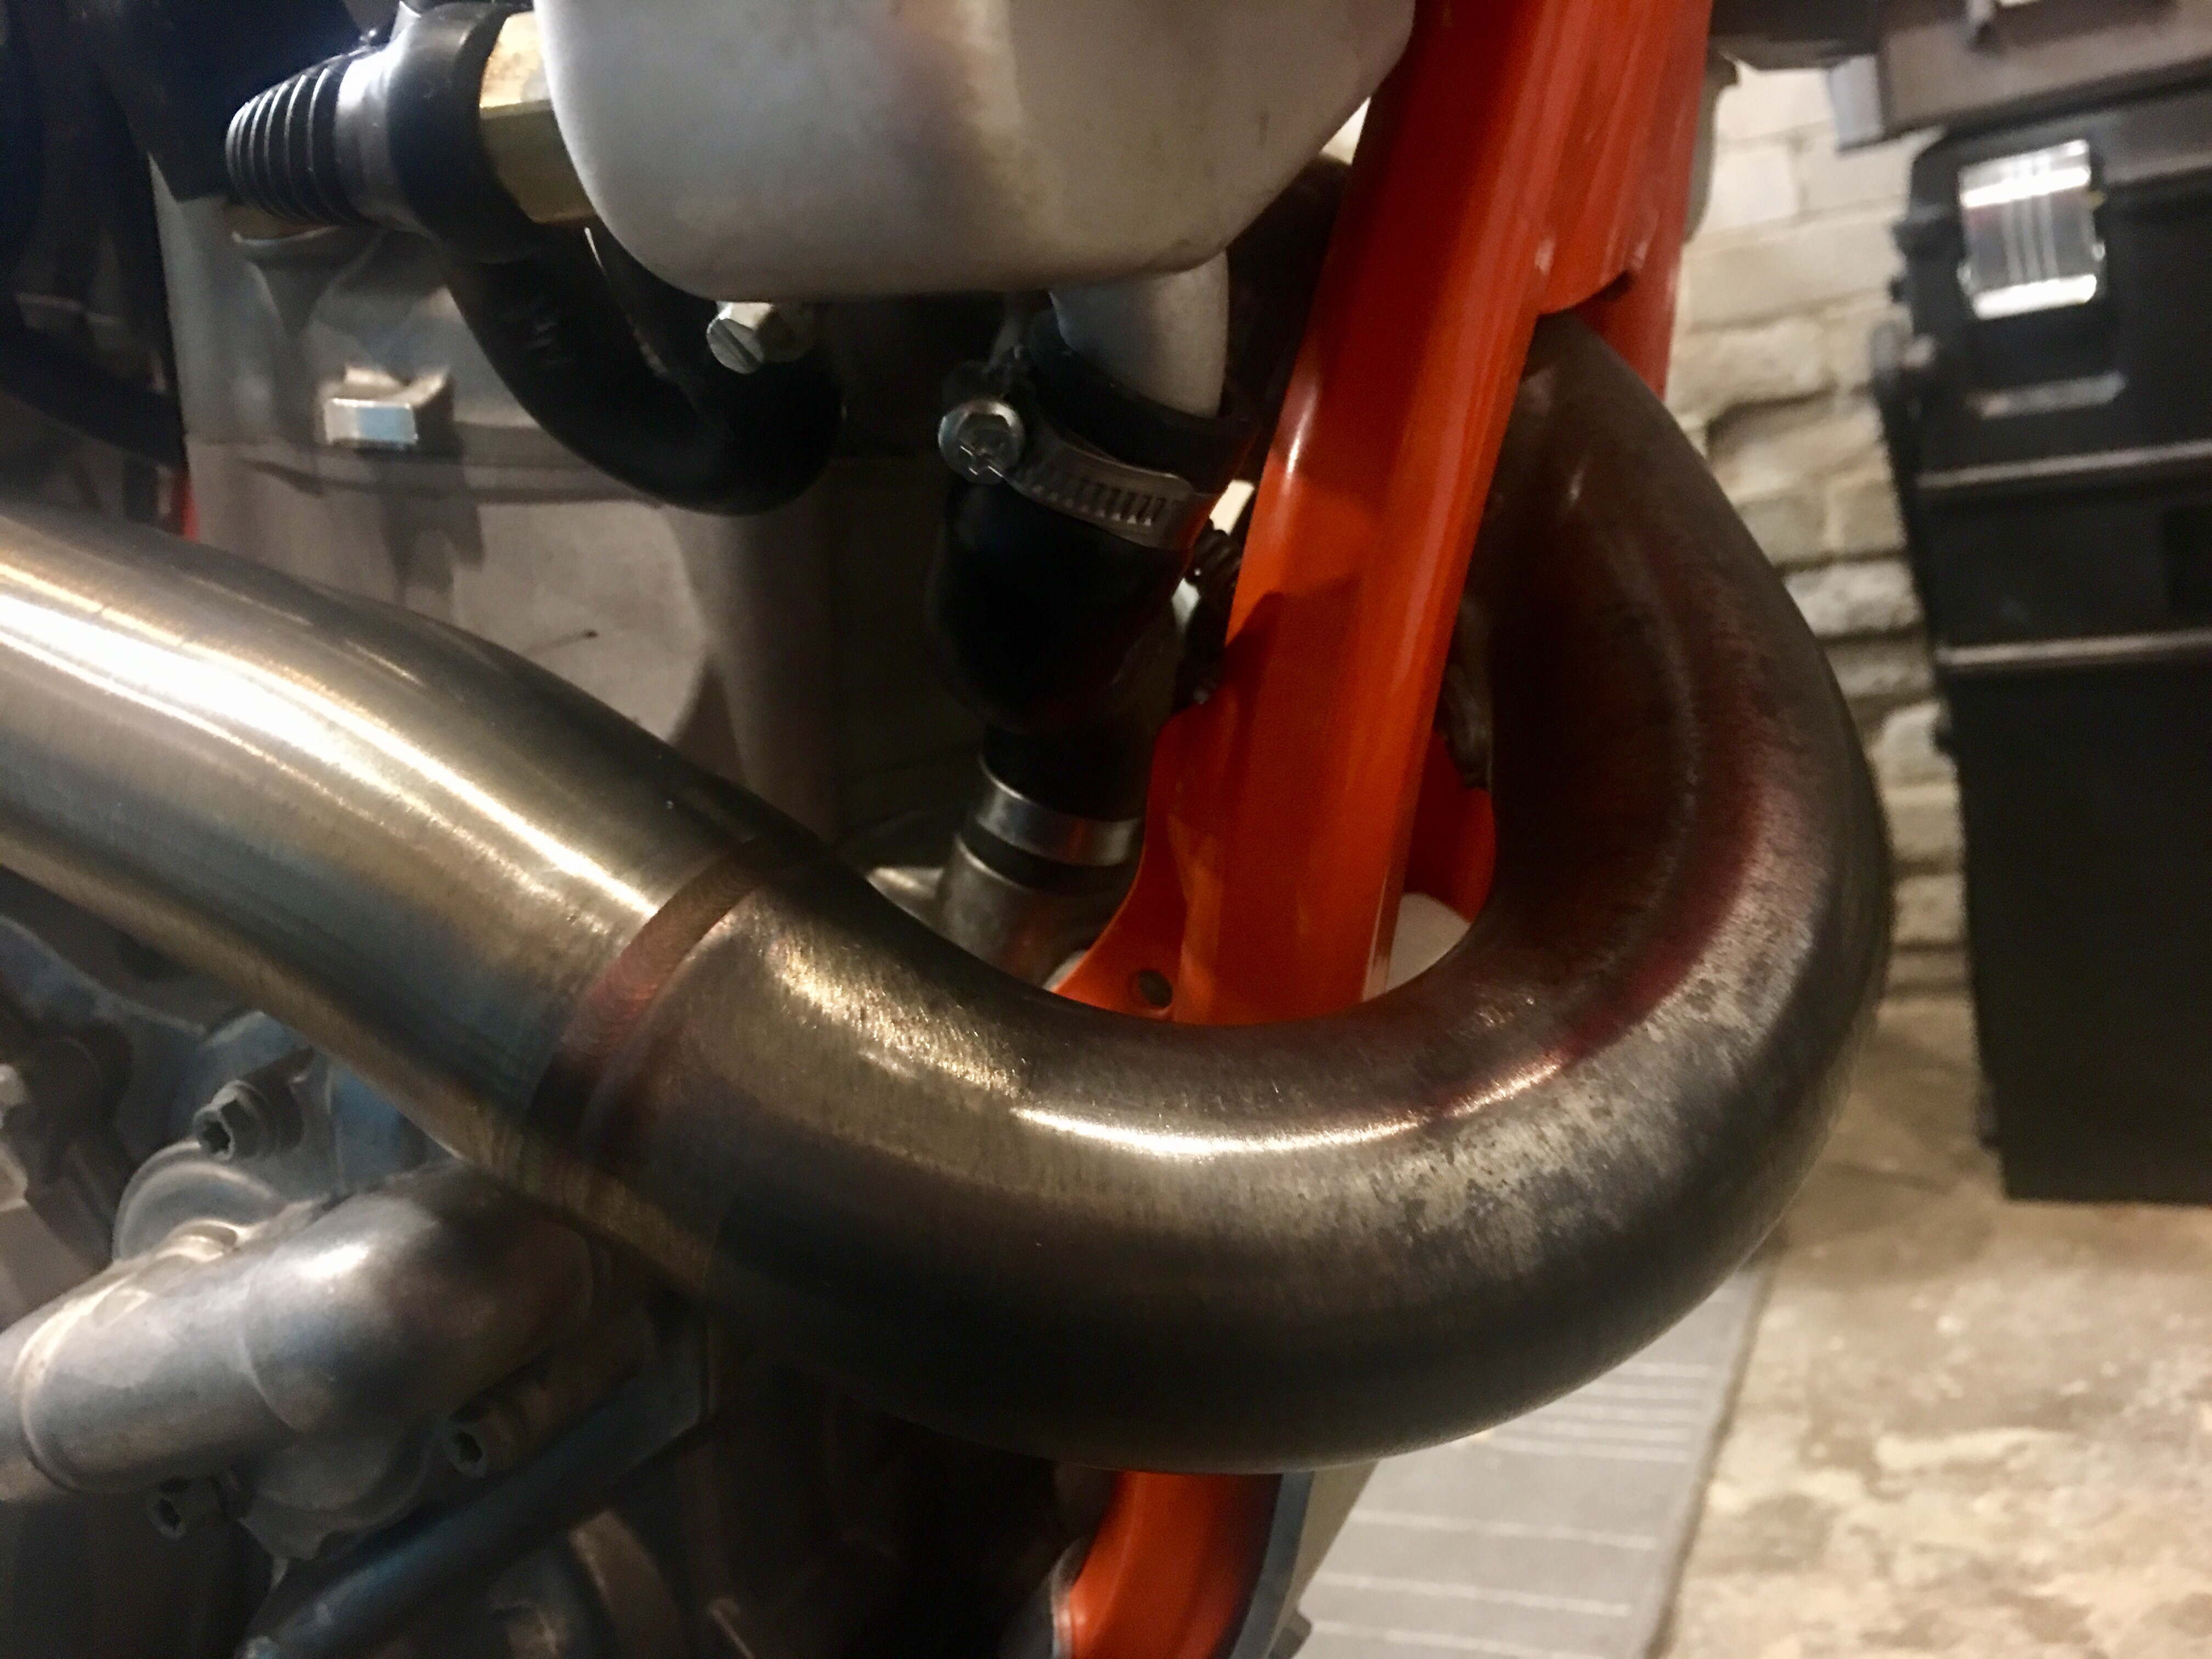 Is it just us or do clean bikes actually run better?
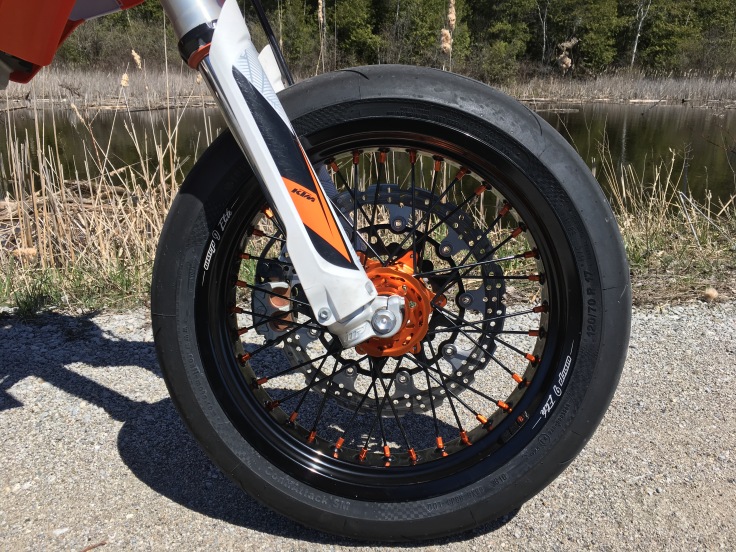
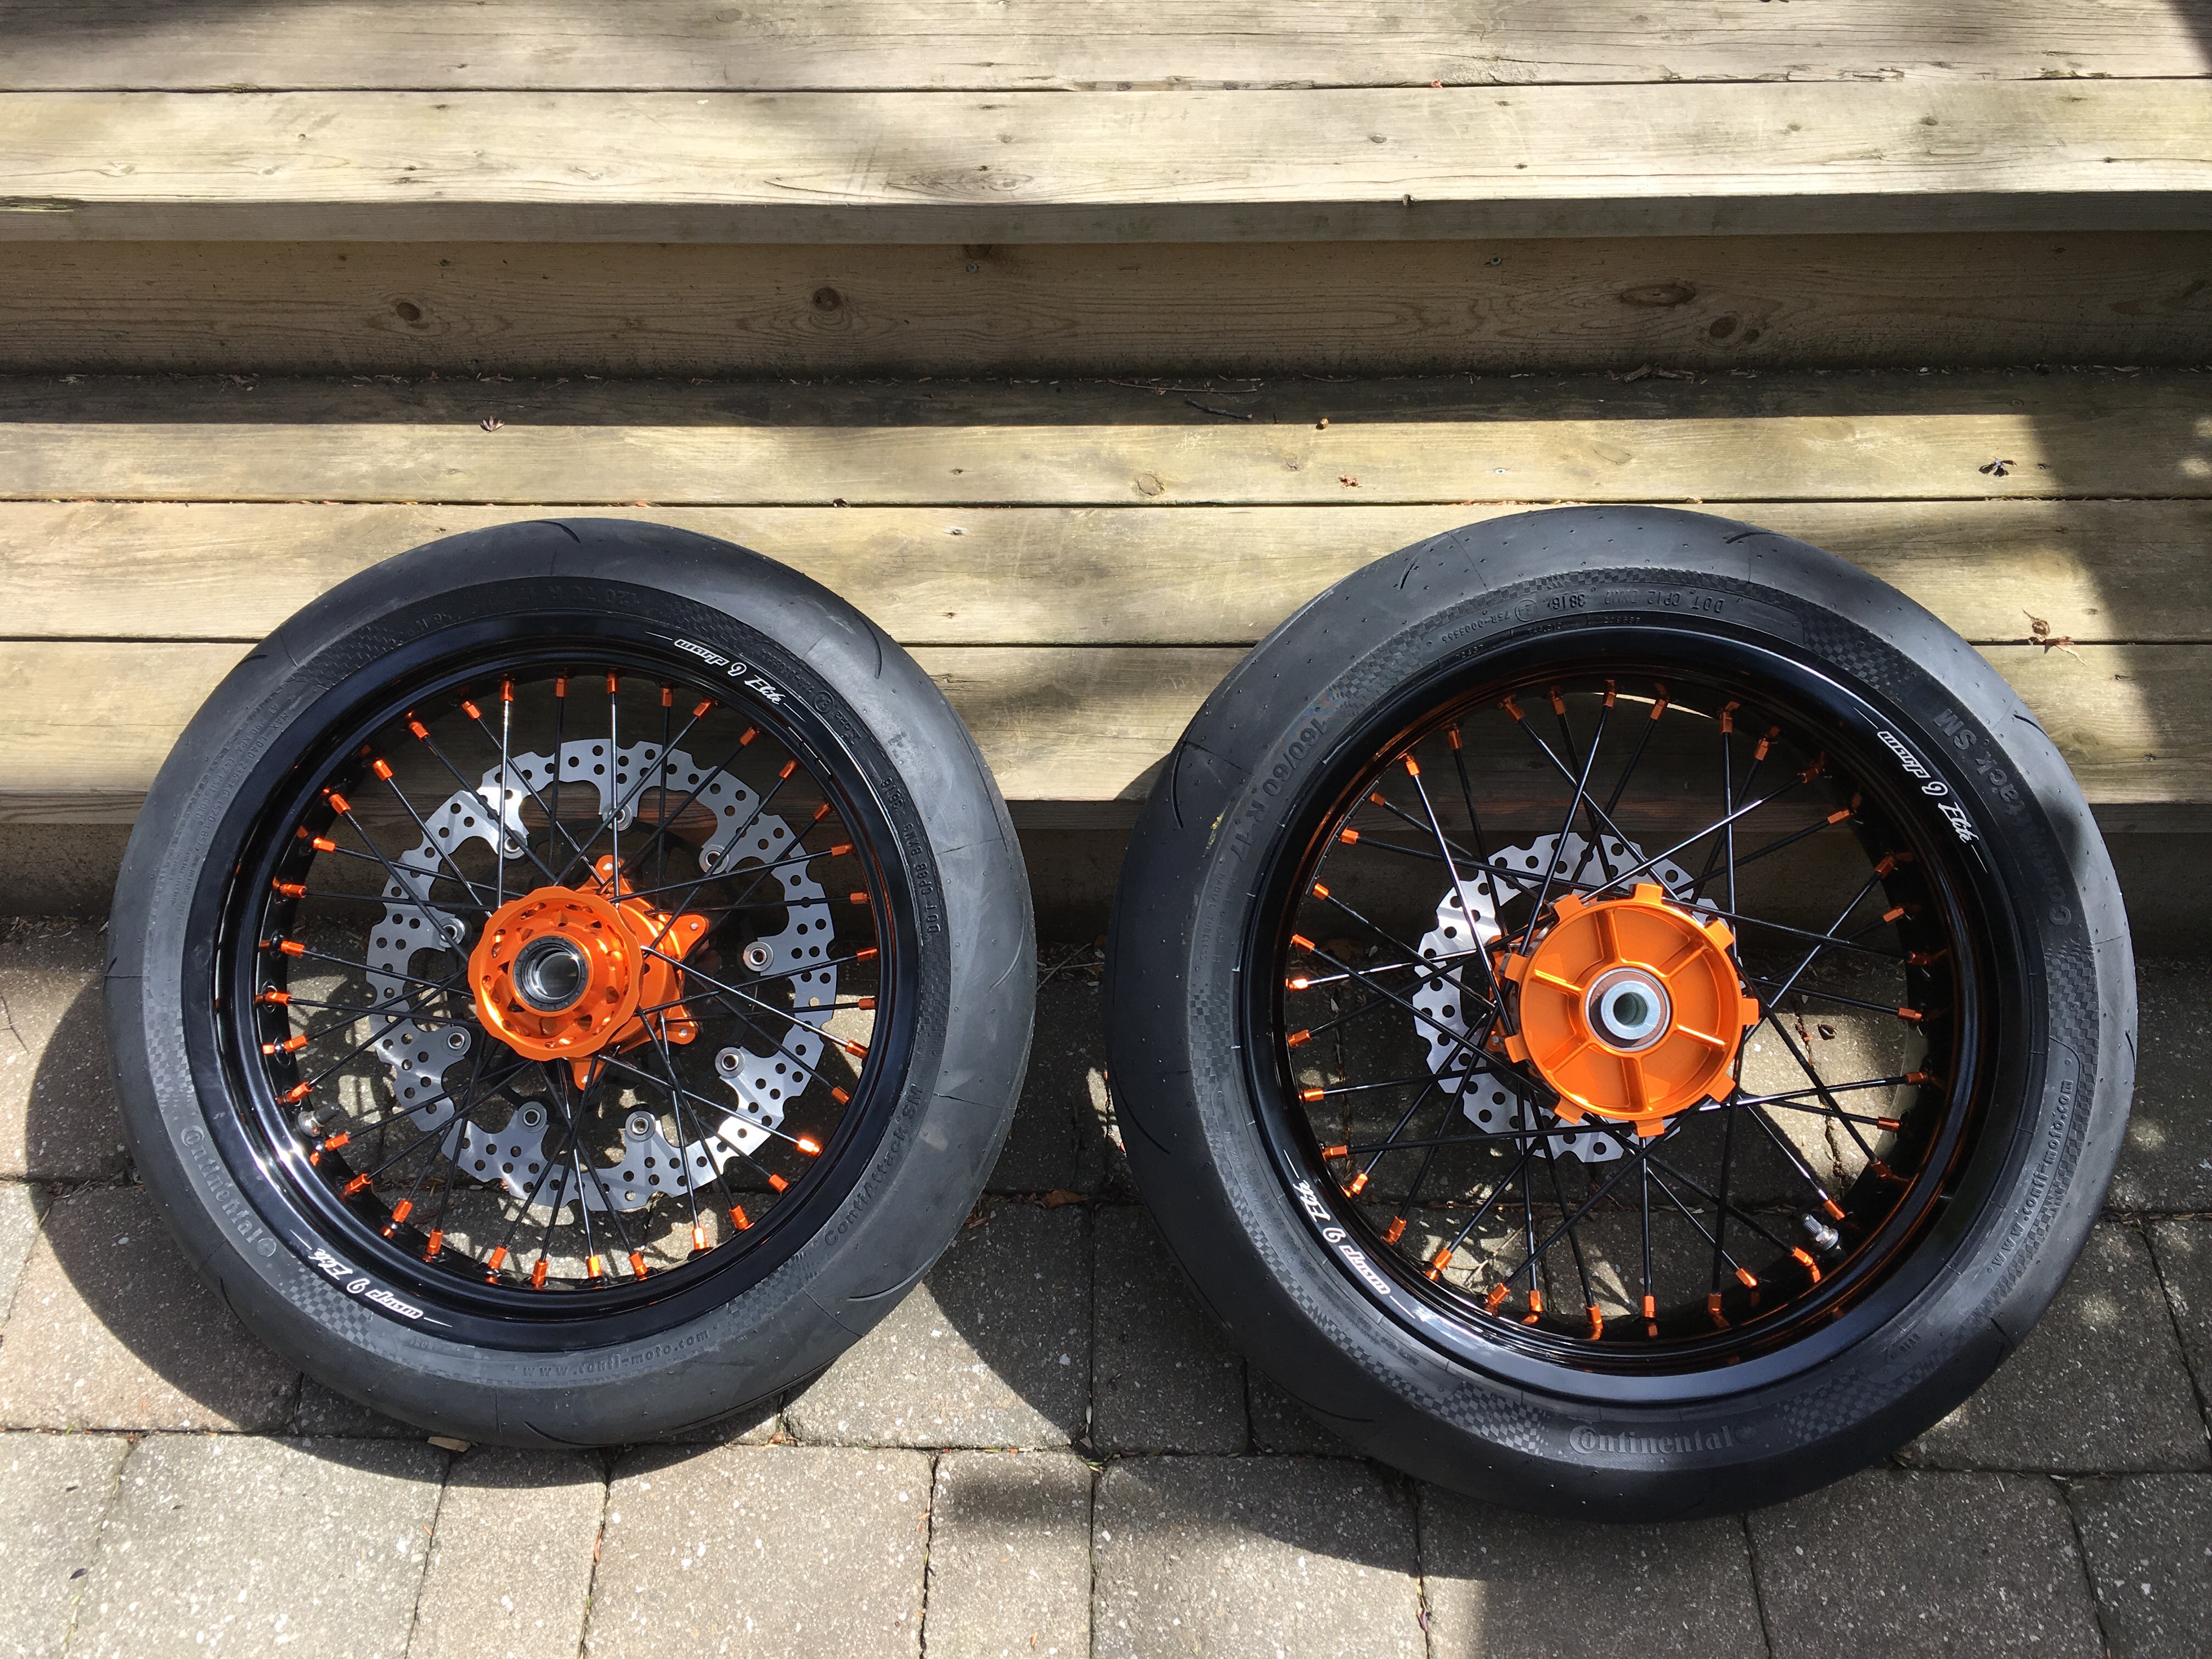
Wheels & Tires: The defining characteristic of a supermoto are its spoked wheels so we put a lot of time into researching various manufacturers and local suppliers. The bad news is that Canada is a niche in itself for the niche that is supermoto, and that even near the largest city in the country (Toronto), that suppliers were few and far between. After considering all options for cost, quality, shipping, customs and weight, we settled on a set of custom Warp 9 Elite wheels in black, with orange hubs (cush drive in the rear) and spoke nipples.

After much deliberation on wheel size and width, along with tire availability, we decided on 17″ wheels, with 5″ width at the rear and 3.5″ at the front. Tires chosen were Continental ContiAttack SM (stock equipment on the Husqvarna 701 Supermoto and very sticky) in 160/60 rear and 120/70 front. We also opted for the front brake caliper relocation bracket from Warp 9, along with a 320mm floating rotor. To maintain near-stock gearing, we left the primary drive alone and fitted a 46T sprocket to the rear.

Mounting of the wheels on the bike did require some finesse as the wider rear tire and wheel make for a tight fit inside the swingarm. Chain rub was minimal (although present) so we kept the chain at the tight end of the spec (55mm) and let it shave off a few millimeters from the tire (there was no danger to the sidewall in our particular application but extreme rub could be problematic and tire selection is critical). On the front, a slight modification of the fork protectors was required (as the front tire is wider than stock and would rub). A quick cut with the Dremel created the required space while maintaining a stock appearance.
Kickstand: Lastly, a shorter kickstand was required due to lower overall wheel/tire profile. KTM part #78003123044 was the right height (an alternative is to cut the stock kick stand but we elected to keep that for dirt setup). We decided to keep the stock gearing (15-45) for the moment and make adjustments later once initial impressions settled in.
Riding impressions: So, is it worth it to take arguably the street-legal dirt bike available and relegate it to street duty as a supermoto? The answer will vary based on your expectations but for us, the result was bittersweet…

The Sweet: With the sticky street rubber and the 500 EXC’s torque and light weight, the bike handled like a dream on tight, twisty roads. 2nd and 3rd gear (<100 km/h) were where the bike was the happiest, its plentiful torque able to loft the front end on command, transitioning effortlessly from side-to-side and backing into corners with total confidence. Surprisingly, the front end (wheelie-prone-ness) calmed down a bit (vs its stock form) with the addition of the heavier wheel/tire combo and with the suspension stiffened up, allowed for the bike to be ridden either supermoto style (leg out) or GP style (knee out). Around town, the bike was incredibly agile, a real head-turner and a joy to commute on.
The Bitter: The weight of the new wheels and tires were a tradeoff. On the one hand, providing grip and stability, but taking away from the bike’s overall light feel. This could be felt everywhere from acceleration to braking, where the new 320mm rotor and single caliper struggled to keep up with the unsprung weight once the pace picked up. Further upgrades to the braking system could certainly remedy the latter issue and re-gearing could improve acceleration. The overall issue of wheel, tire and inner tube weight could be further addressed by choosing a lightweight, sealed spoked wheels such as the (much more costly) Alpina Carbon Matrix. Taking the bike on longer rides (eg. full day rides) reminded us of its intended purpose: short, spirited jaunts where the rider is moving around on the bike, standing up and shifting weight frequently on the otherwise hard seat. Even with the new wheels, highway vibrations were intense and we couldn’t help but feel for the poor thumper as we maintained highway speeds (to get to the good roads).
Verdict: In the end, the KTM 500 EXC is a purpose-built animal, designed to provide the best dirt biking experience to anyone who needs to do an occasional bit of tarmac. Turning it into a strictly asphalt-going machine has its merits but is not without its share of trade offs. For one, the maintenance intervals (oil changes and valve check primarily) come quickly when doing road miles and the all-in cost of this unique supermoto is close to a comparable (arguably better), dedicated factory machine such as the Husqvarna 701 Supermoto, KTM 690 SMCR or Ducati Hypermotard. Many have also converted the KTM 690 Enduro to supermoto with good results, preferring the characteristics and maintenance intervals on the larger displacement single. If you plan on riding on the tightest, twistiest of roads, don’t mind doing a little maintenance, aren’t overly concerned with budget and want something unique, there is definitely merit in considering a KTM 500 EXC supermoto project of your own.

Did your wheels come with two different spacers for each wheel? If so did you use the smaller one in the front and the back?
LikeLike
Hey Nick. Yes, the Warp 9 wheels came with 2 sets of spacers and if memory serves correctly, it was the smaller of the two that we used.
LikeLike
Any more updates on this bike? How are you enjoying it?
LikeLike
Hey Brian. Although the 500EXC was a savage supermoto, the maintenance intervals weren’t conducive to long-term ownership for people (like me) who do a lot of miles. Parted ways with it and replaced with a Hypermoratd 939 SP which has some similar attributes but has been more mile-worthy. You can read about that experience here if you’re not familiar: https://chancemoto.com/2017/05/15/2016-ducati-hypermotard-939-sp-review/
LikeLike
I’ve had a much different experience with the 2016 500 EXC I bought brand new. I put 9K miles on it first year of ownership and now ever since then my SuperDuke sits on display at my man-cave in the living room. I get 50-55 mpg and the commute to work is awesome. Splitting lanes and wheelying past a-holes is invigorating. I have 4 road worthy KTMs and this one is always my daily weapon of choice.
LikeLike
I did three things to make my 15 500 all day comfortable. Barkbuster bar-end weights tamed the annoying handlebar vibration. PivotPegz surprisingly reduced the footpeg vibes. The finishing touch was the Fisher seat. All day comfortable.
I actually have a set of Warp 9 Elites I was thinking about fitting, but after reading your review I think I’ll just stick with 2 sets of dirt wheels, one with aggressive knobbies and the other with DS friendly rubber.
Cheers.
LikeLike
All great suggestions to help make it more rideable Jim. Ride safe!
LikeLike