
If you’ve ridden a pre-2021 KTM 690 SMCR / Enduro or Husquvarna 701 Supermoto / Enduro, you may have noticed that the shifting leaves quite a bit to be desired. Sloppy shifts, missed shifts, false neutrals and the bike occasionally dropping out of gear…are all known issues for this platform. Fortunately, KTM (parent company of Husquvarna) rectified this issue in the 2021 model year, updating the part numbers for components that were causing the issues. The good news is that this is a relatively straightforward and inexpensive upgrade for pre-2021 bikes so read on and we’ll cover everything you need to know!
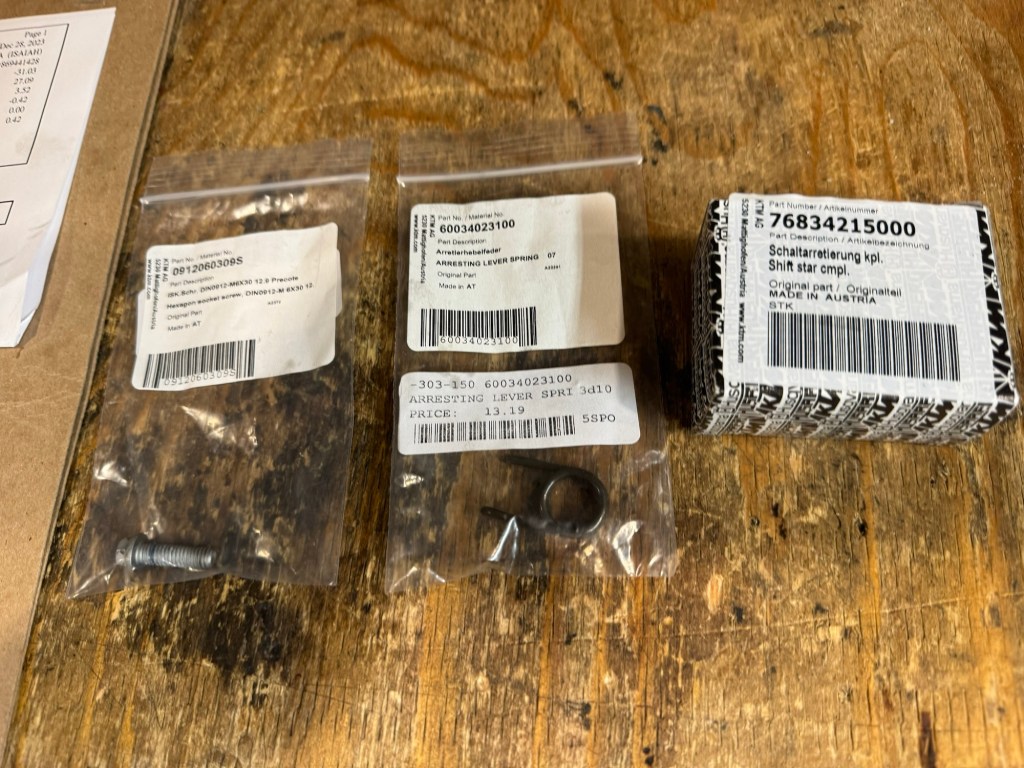
Parts Required: Updated 2021+ shift star (76834215000), longer hex head screw for shift star (0912060309S) , Updated 2021+ shift spring (60034023100), OEM Clutch cover gasket (75030025000). The grand total for all these parts was ~$75 CAD.
Tools required: Ratchet, sockets, extension, torx bits, hex bits, torque wrenches, punch (or small screwdriver), 24″ x 24″ cardboard, pliers, zip tie, pig mat (optional)
Step 1: Drain oil (see our oil change guide here) or lay bike on its left side (not recommended)
You CAN theoretically do this while the bike is full with oil (by laying it down on its side) but risk making a mess. Our strong recommendation is to just change the oil while you’re at it (remember: this motor only requires 1.5L of oil).
Step 2: Remove rear brake/footpeg bracket
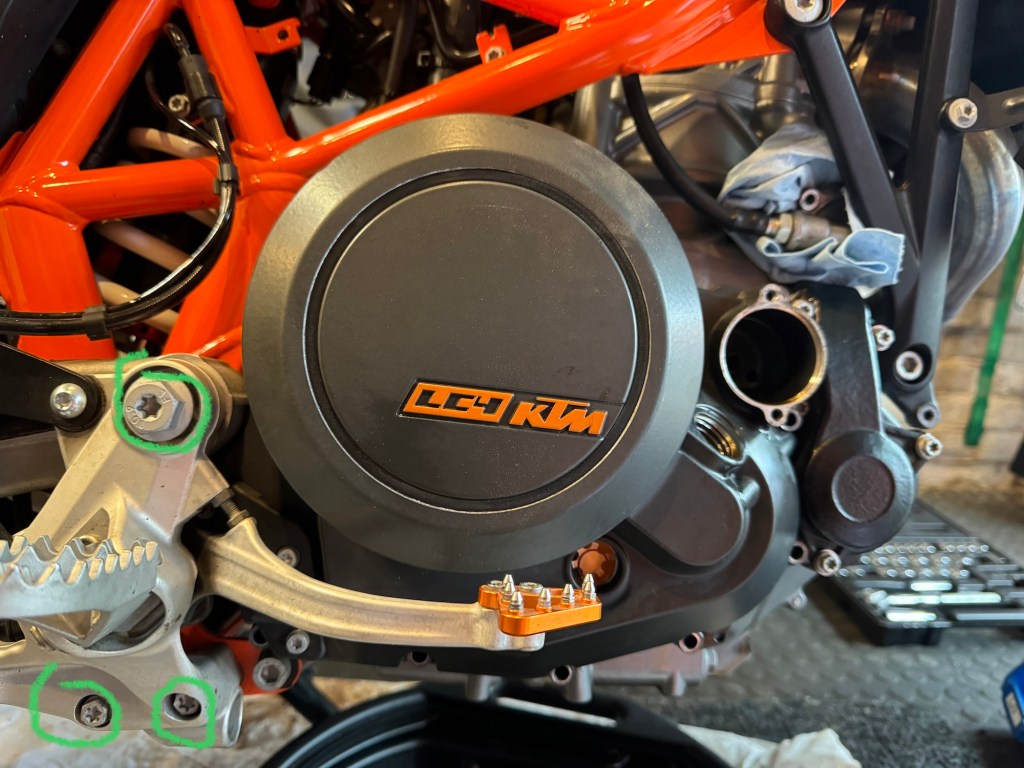
There are 3 bolts to be removed here. The swingarm pivot bolt is gunna be tight so you may need a breaker bar or long ratchet.
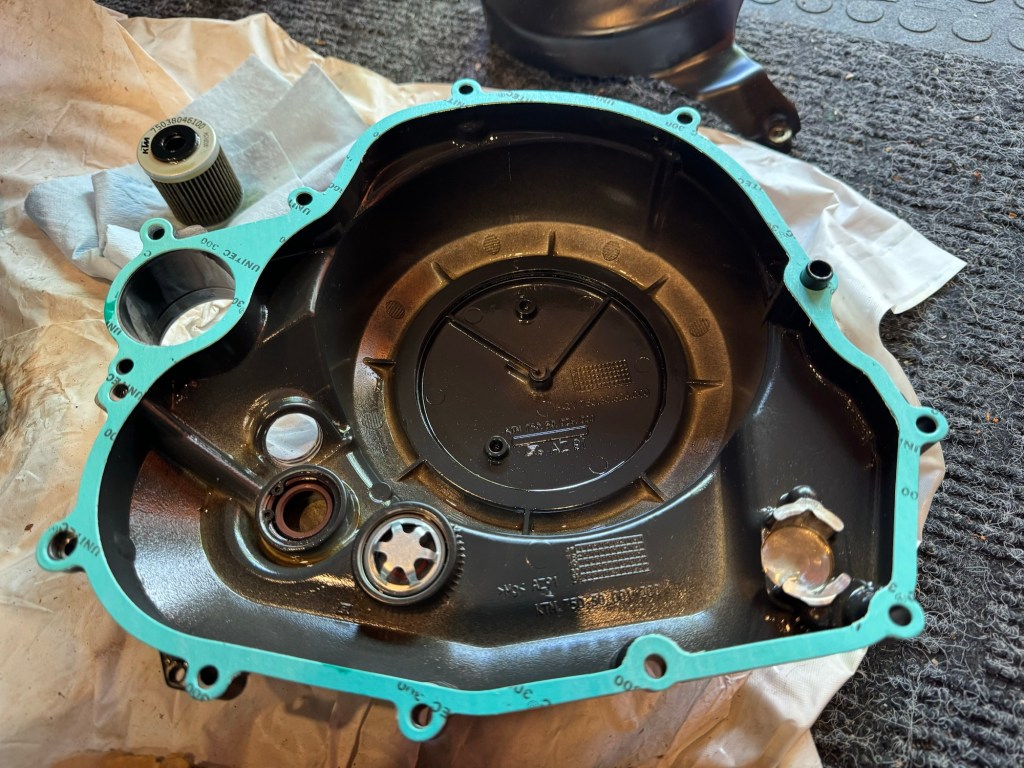
Step 3: Remove clutch cover (while keeping bolts in original locations, as they are different lengths)

Remember that the shift linkage in on the clutch side (right / brake side of the bike), even though the actual shifter is on the left. There are 16 bolts you’ll need to remove (including the oil filter cover) and they are all different lengths. A trick that my father-in-law taught me is to use a piece of cardboard and draw a diagram of where each bolt goes. Use a small screwdriver or punch to make the 16 holes and put the corresponding bolts into the template as you remove them, being cautious not to mix them up!
Step 4: Remove “old” gasket

You may or may not rip the gasket when you remove the clutch cover (we did!) but our recommendation is to replace it regardless. $20 part (75030025000) and cheap insurance to prevent an eventual oil leak.
Step 5: Remove shift lever & spring (1 bolt)
Note that the old and new springs are visually identical – so don’t mix them up! The only difference is that the new spring is stiffer.
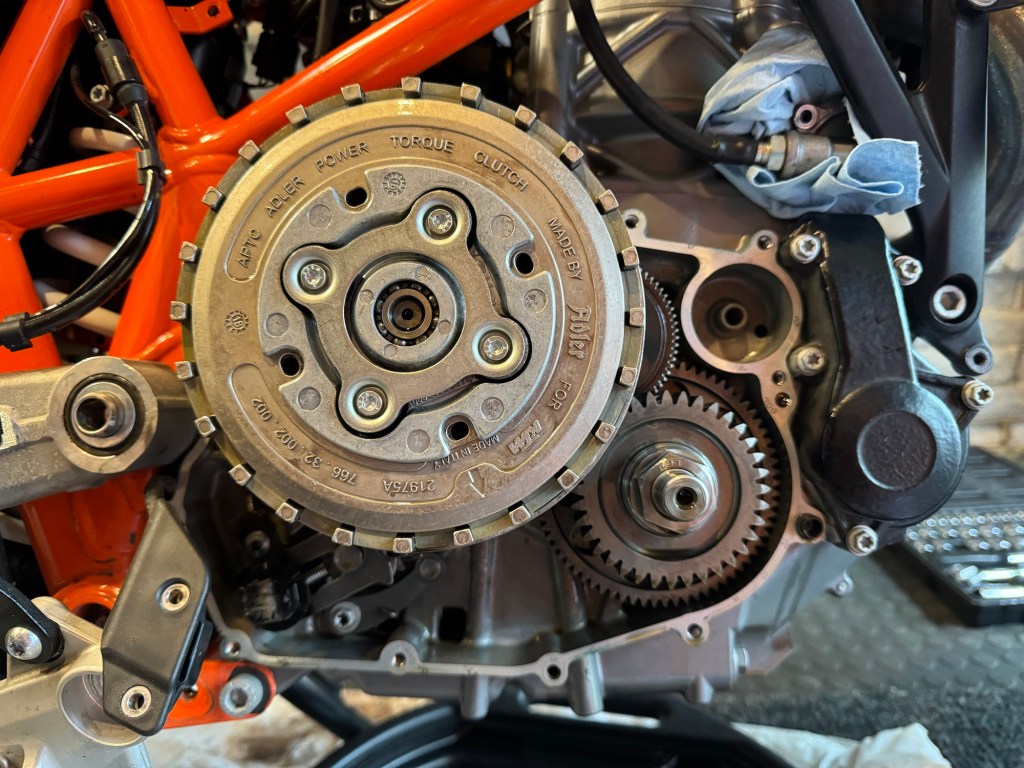
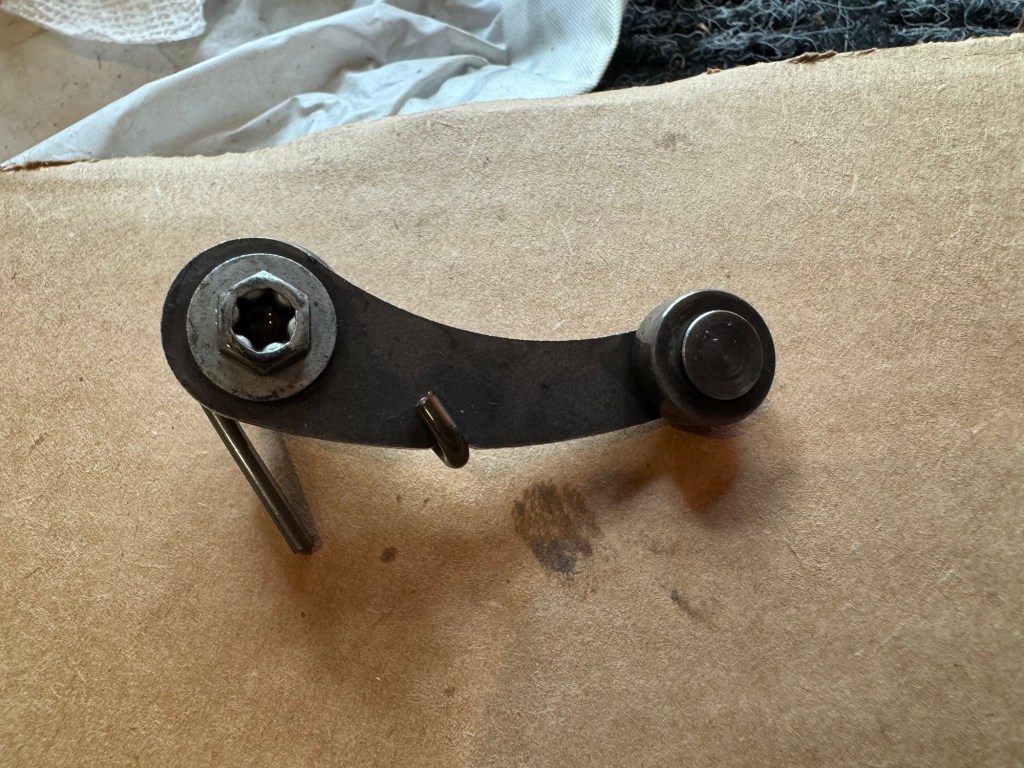
Step 6: Remove shift linkage & shift star (1 bolt)
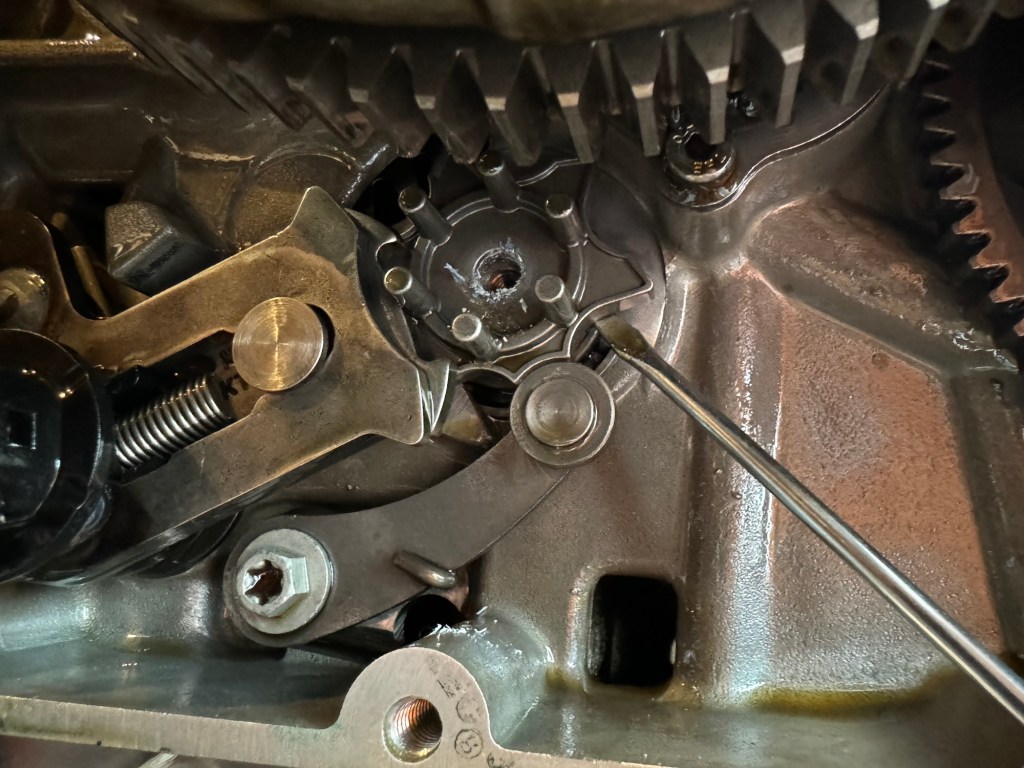
Both the shift star and shift linkage bolts are secured with loctite from the factory so it’s normal to feel some resistance when removing them. Once you’ve gotten both those bolts out, clean them up as we’ll be re-applying fresh loctite during re-assembly later. The shift star can be coaxed out with a small flat head screwdriver if you can’t get your fingers behind it.
Step 7: Replace shift star with updated part (76834215000) and longer hex bolt (0912060309S), then torque to 10nm with loctite

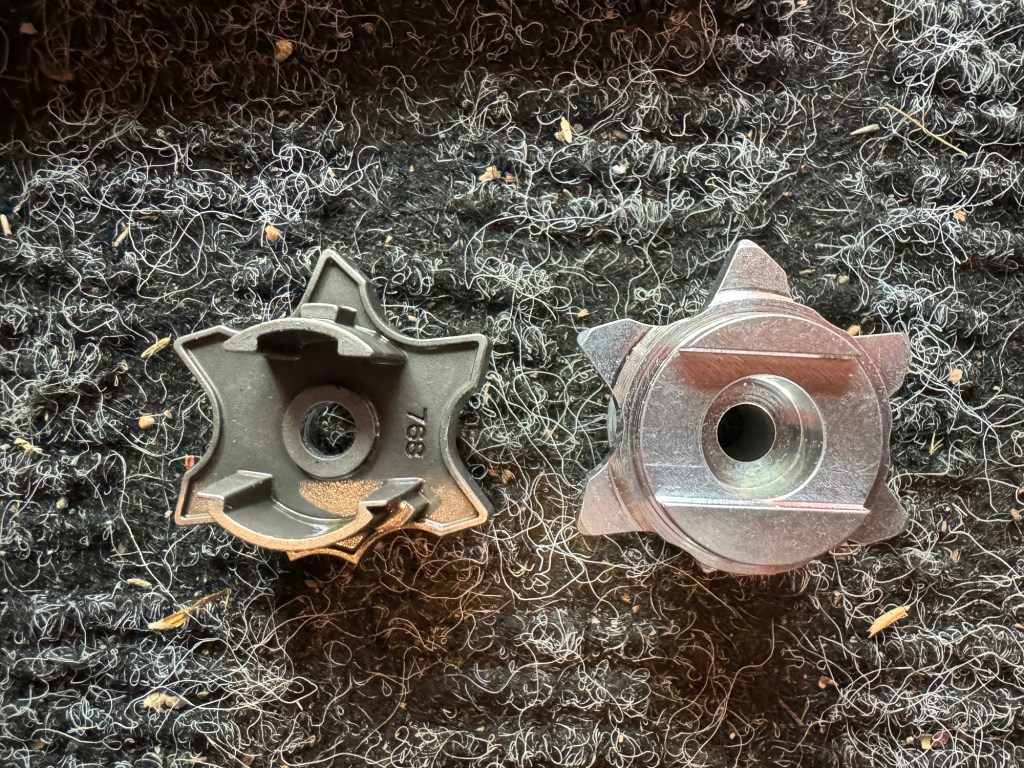
Although it doesn’t look like the new part will fit (it’s quite a bit heftier than the old shift star), it actually goes in quite easily. You may need to move/rotate the shift assembly (the part that attaches to the shift rod and has the visible spring). Just look at the pattern on the back of the star and line it up with the groove on the motor. You will need to use the updated, longer hex head bolt to secure the beefier shift star in place. Make sure you apply loctite generously (yes, even though the new OEM bolt has a bit on it from the factory).
Step 8: Replace shift spring (new part 60034023100) and torque to 10nm with loctite
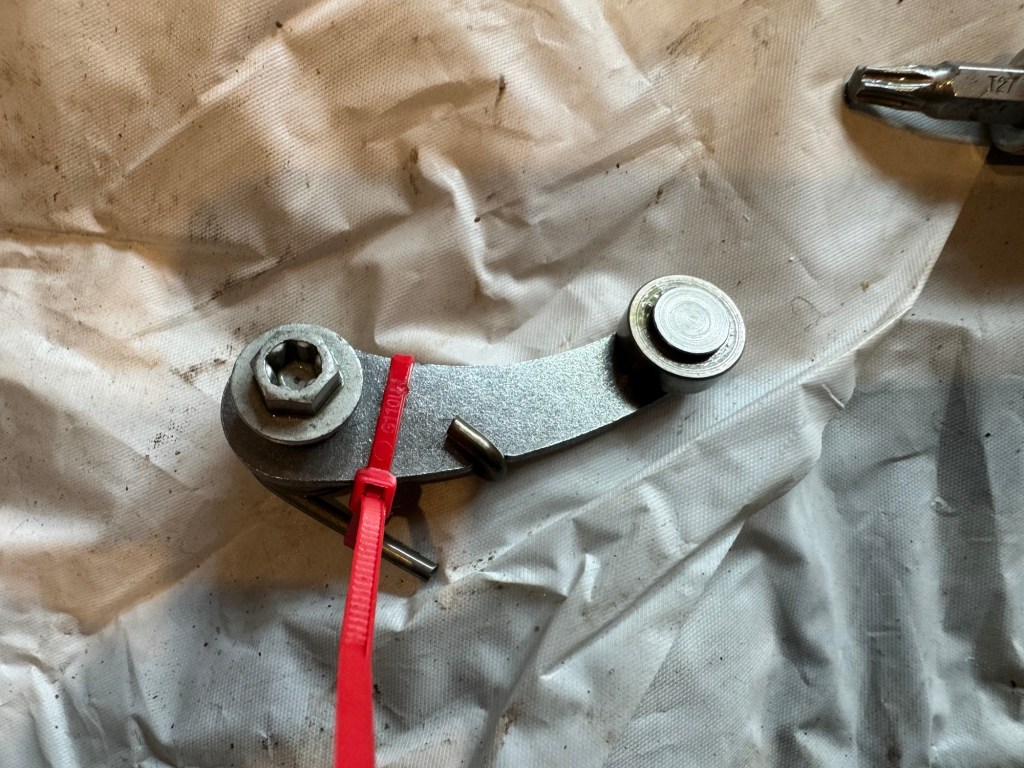
This one is a little tricky to install as the new, stiffer spring pushes against the engine case, making it challenging to get the bolt threaded (and clearly not wanting to cross-thread this one!). A little ChanceMoto trick: use a small zip tie and with a pair of pliers, compress the spring a little. You can then slide the assembly into place, hand-thread the bolt (which you should apply loctite on, generously) and cut the zip tie once the part is in place.
Step 9: Replace shift linkage
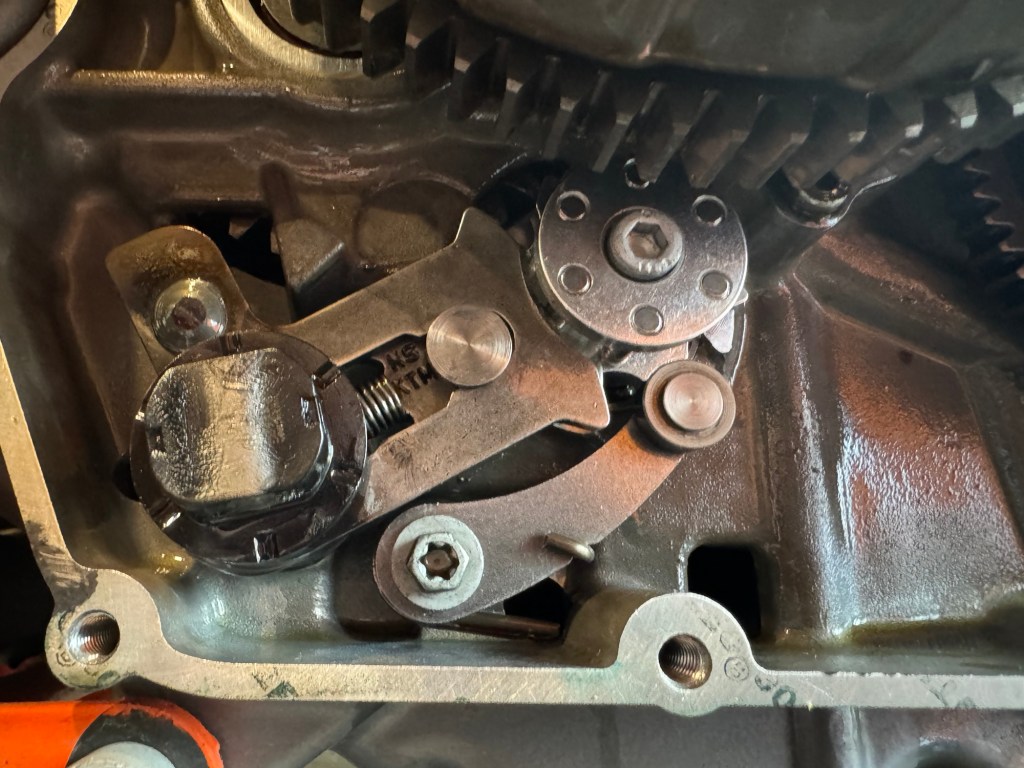
Lastly, if you displaced the shift linkage to install the new shift star, make sure it’s back in place and is meshing correctly with the shift star.
Step 10: Test new shift assembly
This is a critical step as we want to ensure the new parts are working as intended. All you need to do is pull the clutch in and go up and down the gearbox. The bike should change gears “normally”, albeit with a little more authority due to the new parts. If it doesn’t shift correctly, go back to step #5 and fit the parts over again.
Step 11: Replace clutch cover with new gasket (torque bolts to 10nm)
Once you’re satisfied that the new shift assembly is working, it’s time to put everything back together, starting with the clutch cover. The critical step here is to ensure we have clean surfaces on both the engine case and clutch cover. Use whatever cleaner you have handy (brake parts cleaner, degreaser or even WD-40 are fine) and wipe down the mating surfaces. We even like to use a scotchbrite pad to remove any residual gasket material. Preparation is key here.
Place the gasket on the clutch cover. It will hold (somewhat) in place with one of the bosses on the right side of the cover. Slowly place the cover on the engine, using your fingers to keep the gasket from falling off or moving out of place. Once you have the covers pressed against each other, use your fingers to fine-tune the placement of the gasket. You should see ~1mm of gasket material protruding from the sides of the cover and there should be no gasket material covering any of the holes. Once you’re satisfied with the placement, begin fitting the bolts, making sure to match the correct order from your template. Torque all the clutch cover bolts to 10nm and be sure to go over them twice as the gasket will compress a little.
Lastly, re-install the oil filter cover and torque those 2 bolts to 6nm.
Step 12: Replace rear brake/footpeg bracket
Torque value for the swingarm pivot bolt is 80nm and the 2 lower bolts are 30nm.
Step 13: Refill oil, start bike & check for leaks
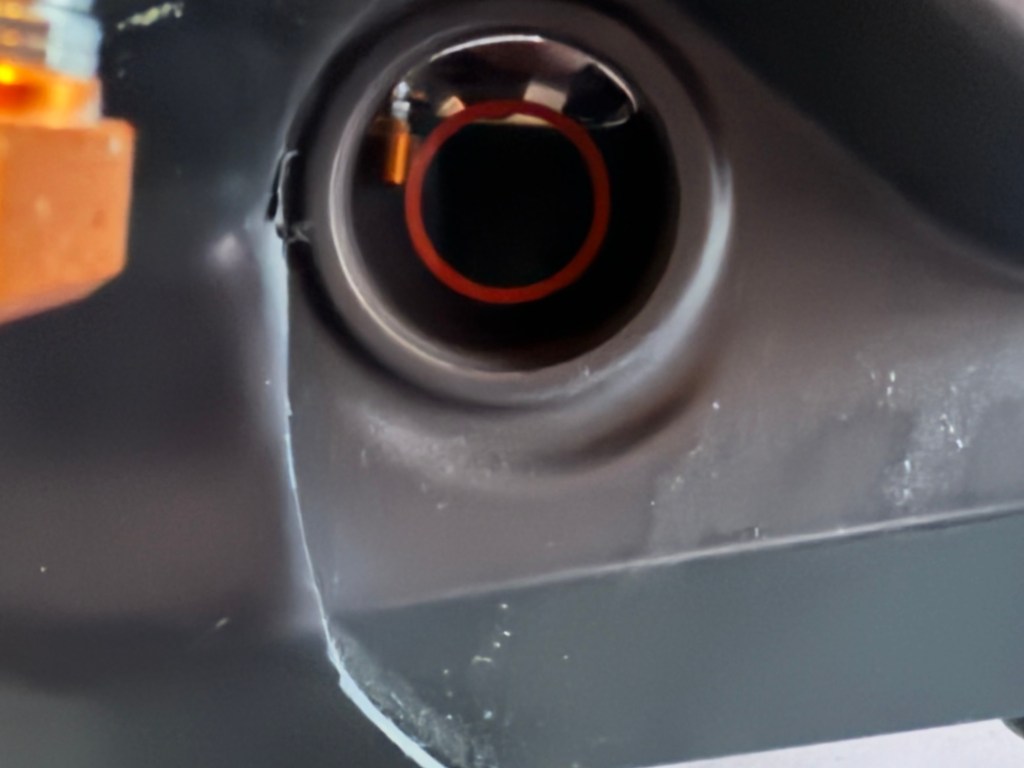
As we discussed previously, the bike should take 1.5L of oil to refill and the correct fill level on sight glass is at top of red circle. Use some shop towels with WD-40 to clear any oil or dirt that’s on the engine case so that you have a clean surface to check for leaks. Start the bike and let it idle for a minute or so, checking for leaks around the clutch cover.
Step 14: Test ride!
Ride the bike as you normally would and be sure to double check for leaks during the ride (as some leaks may not be apparent when bike it still). Enjoy a new, crisp shifter and say goodbye to false neutrals and missed shifts!

Hi Chance team great write up of how to do this modification. I followed your steps to the letter and upon opening up my engine discovered my 2015 MY was already fitted with the “up grade “ shift star. Having owned the bike with 87 miles on the clock and since 2018 I would suggest you check when the old star was superseded. I now have to go back to the dealership and say purchased in error and try to get a refund
LikeLike
The unfortunate truth is that there are likely differences within a given model year or even from one region to another so it’s impossible to tell exactly which bikes have which shift stars and springs.
LikeLike
How many folks have done this Mod ?
LikeLike
Thanks for that, I will upgrade my gear shifter based on your advice!!!
I will comment, as soon as some test riding is done.
Many thanks and kind regards
PeterPan73
LikeLike
I did it and it’s must have upgrade
I also bought Reinforced clutch spring kit from pirate race
I suggest to change a gear lever to this – https://www.ebay.com/itm/203710165846 – 79434031100 serial number. It’s from exc 450 and it perfectly fit to 690
LikeLiked by 1 person
I thought if you got part all the listed OEM parts listed for the upgrade it included a stiffer clutch spring, why would there be a need for the aftermarket spring at that point ?
LikeLike
When it comes to replacing the spring, there are several options for stiffer ones, ranging from the new OEM options to aftermarket ones such as pirate racing. Take your pick.
LikeLike
Does anyone have info on the specific spring rates of the different units being offered ?
LikeLike
New PN #60034023000 ARRESTING LEVER SPRING 03 – Which apparently superseded PN # 60034023100- Anyone know about this updated spring ?
LikeLike
My 2017 apparently came with the “new” 23000 spring (according to OEM parts lookup). Not sure why they would supersede the 23100 with an older, 23000 part number (2019 model for instance).
I ordered the 23100 and it is a bit heavier (and stiffer). I haven’t ridden it enough to be positive, but I hope it will cure the false neutrals.
LikeLiked by 1 person
In my experience, the fix doesn’t completely eliminate false neutrals/mis-shifts but it certainly reduced them closer to what I’d expect from a modern motorcycle.
LikeLike
That’s my worry – Wanting a stiffer spring for more pronounced shifting and now with PN# changes unsure of what actually arrives after placing an order and what I discover my 2019 came with after dissembly –
LikeLike
Just did this mod with the factory pro lever arm/spring and updated shift star- Put everything back together, started it up and the bike was able to shift and then got “stuck” and I hear a wobble of sorts- Pulled everything back off, looks fine and shifting seems to engage normally while just grabbing the shift foot peg with my hand. Does the shift star need to be installed in a specific position ? Bike now just sitting on its side with the clutch case off, not sure what else to do..
LikeLike
Hey there – I did the updated parts swap on my 2019 KTM 690 SMC-R and followed the directions to a T. Things do feel noticeably crisper but my quick-shifter no longer works. Any suggestions before I go back to the stock parts? Thanks 🤘
LikeLike
Strange. The shift star and spring have nothing to do with the QS system (which is sensor-based) so I doubt resetting to stock with solve your issue.
LikeLike